
By Rahul Dhakate · PMP Certified · May 2026 · learnxyz.in
If you’ve confirmed your eligibility and decided this is the year you finally sit the PMP exam, the next question is almost always the same: how do I actually apply?
The PMI online portal is not complicated — but it is a little dated, and there are specific sections that can trip you up if you don’t know what to expect. I went through this process myself, and while I had mentor guidance for a few points along the way, the overall experience was more straightforward than I initially feared.
This guide walks you through every step of the PMI application process for 2026, from creating your account to receiving your approval notification — with honest notes on what takes time, what needs care, and what you should prepare before you begin.
Before You Start: What to Have Ready
Attempting the application without your documents and information prepared is a common mistake that leads to incomplete submissions and wasted time. Before you open the PMI portal, have the following ready:
- Your educational qualification details — degree name, institution, year of completion
- Your project management experience listed out — for each project, you need: project name, organisation, your role, approximate start and end dates, and a short description of your PM responsibilities
- Your 35 contact hours certificate — the course name, provider, dates, and total contact hours
- The name and contact details of at least one supervisor or manager who can verify your experience if you are selected for audit
Spend 30–60 minutes preparing this information in a separate document before touching the portal. Candidates who try to recall project details on the fly during the application frequently make errors they later need to correct.
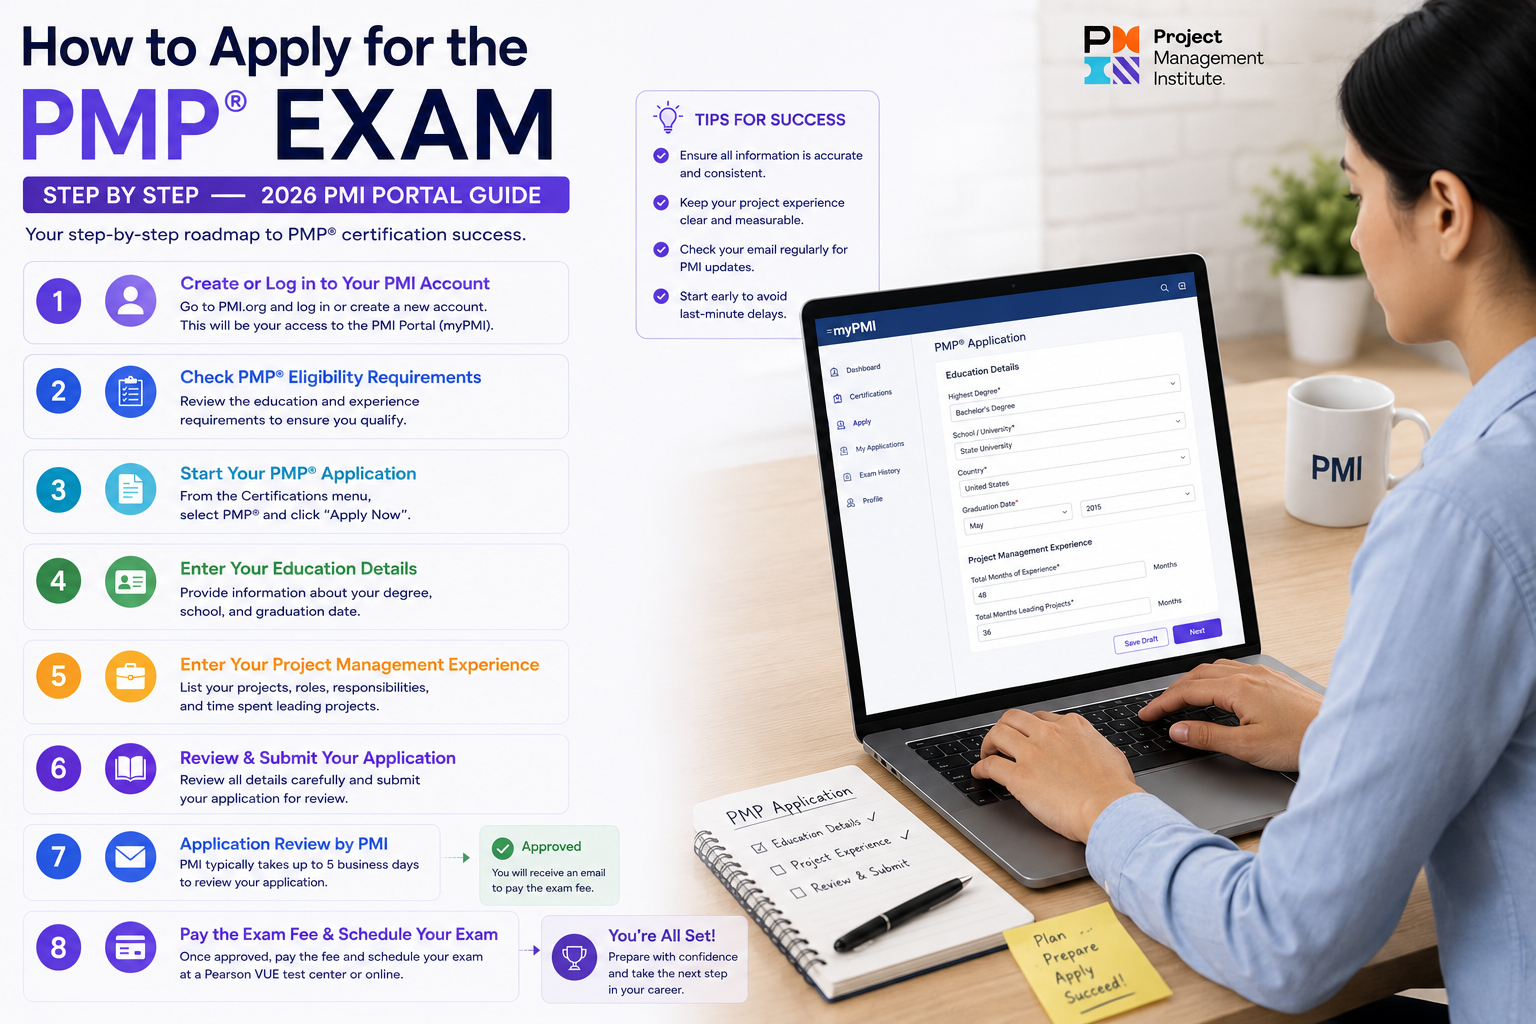
Step 1 — Create Your PMI Account
Go to pmi.org and create a free account if you don’t already have one. You’ll need a valid email address and a password. If you already have a PMI account from a previous membership or event registration, use that — don’t create a duplicate.
Once logged in, navigate to the Certifications section and select PMP. You’ll see an option to begin your application. Click it to open the application portal.
The portal interface is functional rather than beautiful — the buttons and layout look a little dated compared to modern web applications — but the process itself is logical and linear. Each section is clearly labelled and you move through them one at a time.
Step 2 — Choose Your Membership Status
Before completing the application, you’ll be asked whether you want to join PMI as a member. This is worth thinking about carefully before you click.
PMI membership costs USD 139 per year. With membership, the PMP exam fee is USD 405. Without membership, it is USD 555. The saving is USD 150 — more than the cost of the membership itself. For the vast majority of candidates, joining PMI as a member before applying is the financially rational choice.
Membership also gives you free access to the PMBOK Guide 7th Edition and the Agile Practice Guide in digital format — both of which are required study materials. If you haven’t purchased these yet, membership pays for itself twice over.
Join PMI as a member before submitting your application. You save $150 on the exam fee immediately, more than covering the $139 membership cost, plus you get free access to the PMBOK Guide and Agile Practice Guide.
Step 3 — Fill in Your Educational Background
This section is straightforward. Enter your highest level of education, your degree name, the institution, and the year of completion. As covered in the eligibility article, your degree does not need to be in project management — any four-year degree qualifies for Path A.
If your degree is from an institution outside the US, enter it exactly as it appears on your certificate. Don’t try to translate or convert the name — PMI accepts international qualifications and their reviewers are familiar with global educational systems.
Step 4 — Enter Your Project Management Experience
This is the most time-consuming section and the one where most candidates need to slow down and think carefully. You’ll be entering details for each project that contributed to your 36 months (or 60 months) of experience.
For each project, you’ll need to provide:
- Project title and a brief description of what the project involved
- Your organisation and your role on the project
- The start date and end date of your involvement
- The number of months you led or directed the project
- A description of your specific project management responsibilities — what you actually did, not just what the project was
This last point — describing your PM responsibilities — is where most candidates either undersell themselves or write descriptions that are too vague. PMI wants to see that you were leading and directing the project, not just participating in it.
A strong experience description covers: the size and type of the team you led, the PM processes you were responsible for (scope, schedule, risk, stakeholder communication, quality), and a brief note on how the project was delivered. You don’t need to write a case study — three to five clear sentences per project is sufficient.
Having a mentor or an experienced PMP holder review your experience descriptions before submission is genuinely worthwhile. There are nuances in how PMI interprets ‘leading and directing’ that aren’t obvious on the form, and a second pair of eyes can catch descriptions that are too thin or too technically focused rather than PM-focused.
From my own experience applying, the project description section is the one where having guidance made the biggest difference. I no longer remember the precise wording I used — it’s been over five years — but what I do know is that without a mentor helping me frame my experience in PMI’s language, I would have written descriptions that focused too heavily on the technical delivery rather than the project management activities. That distinction matters.
Step 5 — Enter Your 35 Contact Hours
In this section you’ll enter the details of your formal project management education. For each course or training programme, you’ll need: the course name, the provider name, the date completed, and the number of contact hours.
If your training was a single course (such as a Udemy course or an in-person classroom programme), you may be able to satisfy the 35-hour requirement with one entry. If you’ve done multiple shorter programmes, enter each one separately.
As mentioned in the eligibility article — if you completed your training years ago, those contact hours are still valid. PMI does not have an expiry date on contact hours. Your original course certificate is still usable.
Step 6 — Review Everything Before Submitting
Before you hit submit, go back through every section carefully. Check:
- All project dates are accurate — overlapping months are acceptable but shouldn’t be double-counted
- Your experience descriptions clearly describe project leadership responsibilities, not just project participation
- Your contact hours add up to at least 35
- The supervisor or manager details you’ve listed are reachable and would be able to verify your experience if contacted
- Your educational details match your actual qualification certificate
Errors at this stage can delay your approval or trigger an audit. It’s worth spending 20 minutes on a careful review.
Step 7 — Submit and Pay the Application Fee
Once you submit the application, you’ll be prompted to pay the application processing fee. This is separate from the exam fee and is non-refundable. As of 2026, the application fee is included in the overall exam fee structure — PMI’s pricing page has the current amounts.
After payment, your application moves into the review queue.
How Long Does Approval Take?
Based on my own experience and from what I’ve seen others report, PMI typically reviews and approves applications within 5 to 10 business days if everything is filled in correctly and completely. However, it is wise to budget up to three weeks, particularly if:
- Your application is selected for audit (random selection — not a reflection of any problem with your application)
- There are any gaps or unclear sections that require PMI to follow up
- You applied during a high-volume period such as end of calendar year
My advice: don’t schedule your exam date until you have your approval notification in hand. Some candidates book their exam date optimistically before approval and then have to reschedule. Approval first, then booking.
What Happens If You’re Selected for Audit?
A small percentage of applicants are randomly selected for audit after approval. If this happens, PMI will notify you by email and give you 90 days to submit:
- A copy of your degree or diploma
- Copies of your contact hours certificates
- Signed experience verification forms from the supervisors or managers you listed
The audit is entirely manageable as long as your application was accurate. PMI provides the verification forms — you send them to your listed supervisors, they sign and return, and you submit the completed forms. If your supervisors are reachable and your experience was accurately described, the audit is a paperwork exercise, not an interrogation.
The only time an audit becomes a problem is if you inflated your experience or listed supervisors who are no longer reachable. Don’t do either. Be accurate from the start.
After Approval: Scheduling Your Exam
Once approved, you’ll receive a notification from PMI and an eligibility ID. You can then schedule your exam through Pearson VUE — PMI’s exam delivery partner. The PMP exam is available at Pearson VUE test centres globally (including multiple locations in India) and as an online proctored exam from home.
For most working professionals, the online proctored option is convenient — you take the exam from your desk at home. The technical requirements are a stable internet connection, a webcam, and a quiet private room. Pearson VUE’s website has the full technical requirements list.
You have one year from your approval date to sit the exam. Don’t let that window slip by. Book your exam date, put it in your calendar, and study toward it with a fixed deadline.
The One Thing That Makes the Application Easier
If I were advising someone starting the application process today, the single most useful thing I would tell them is this: find someone who has been through the PMI application recently and ask them to review your experience descriptions before you submit.
This doesn’t have to be a paid mentor. It could be a colleague who holds a PMP, a member of a PMP study group, or someone you connect with through a PM community online. The value is simply having someone who knows what PMI is looking for read your descriptions and tell you whether they adequately communicate project leadership.
The application portal itself is manageable. The experience descriptions are where candidates make the mistakes that slow down approval or trigger unnecessary audit complications. Get those right, and the rest of the process is straightforward.
About the Author:
Rahul Dhakate is a PMP-certified software project manager and product management leader based in Nagpur, India. He completed the PMI application process with mentor guidance and writes at LearnXYZ.in to help working professionals navigate the PMP journey from eligibility through exam day.
Next Article:

Wow! This blog looks just like my old one! It’s on a entirely different
subject but it has pretty much the same page layout and design. Outstanding
choice of colors!