![[keyword]](https://learnxyz.in/wp-content/uploads/2026/04/How-to-Turn-an-Old-PC-into-a-NAS-Using.png)
A friend of mine texted me that he was going to throw away an old PC. I bought it from him and decided that I was going to turn this thing into a NAS because the kind of work I do requires me to use 2-3 computers, sometimes 4.
Building a NAS(Network Attached Storage) out of an old PC is the wisest thing to do, if your work and files are scattered on multiple devices. You don’t even have to buy expensive NAS devices available in the market.
If you are like me who doesn’t like paying subscription fees to Billion-Dollar tech giants then you are going to enjoy this guide. Why pay money for storage when an old PC, with Linux inside, could do the job? Yes, this is the same old PC you considered e-waste and plan on throwing it away. The best part is that you won’t even need a monitor, keyboard and mouse once you install Linux server on this old PC.
NAS is the central storage within your home network, it’s usually a dedicated device where you store your files. All of your devices will have a shared folder where you can copy and paste your files, directories or any other data from your respective computer and it will be available essentially on all devices through this shared folder.
How to Turn an Old PC into a NAS Using Ubuntu Server
In this guide, you will learn how to turn an old PC into a fully working NAS using Ubuntu server 24.04 LTS. We will go through a step-by-step process of physically checking the old PC, Installation of Ubuntu server, stress testing, headless setup, samba installation, configuration and how to securely access your NAS from multiple devices:
- Inspect and Prepare the Old PC
- Check Hardware Specifications
- Stress Test the Hardware
- How to Install Ubuntu Server 24.04 LTS
- Connect to the Server Using SSH
- Convert the NAS to Headless Mode
- Create a Shared Directory
- Install and Configure Samba
- Connect to NAS from Different Devices (Linux, MacOS, Windows)
- Conclusion
1. Inspect and Prepare the Old PC
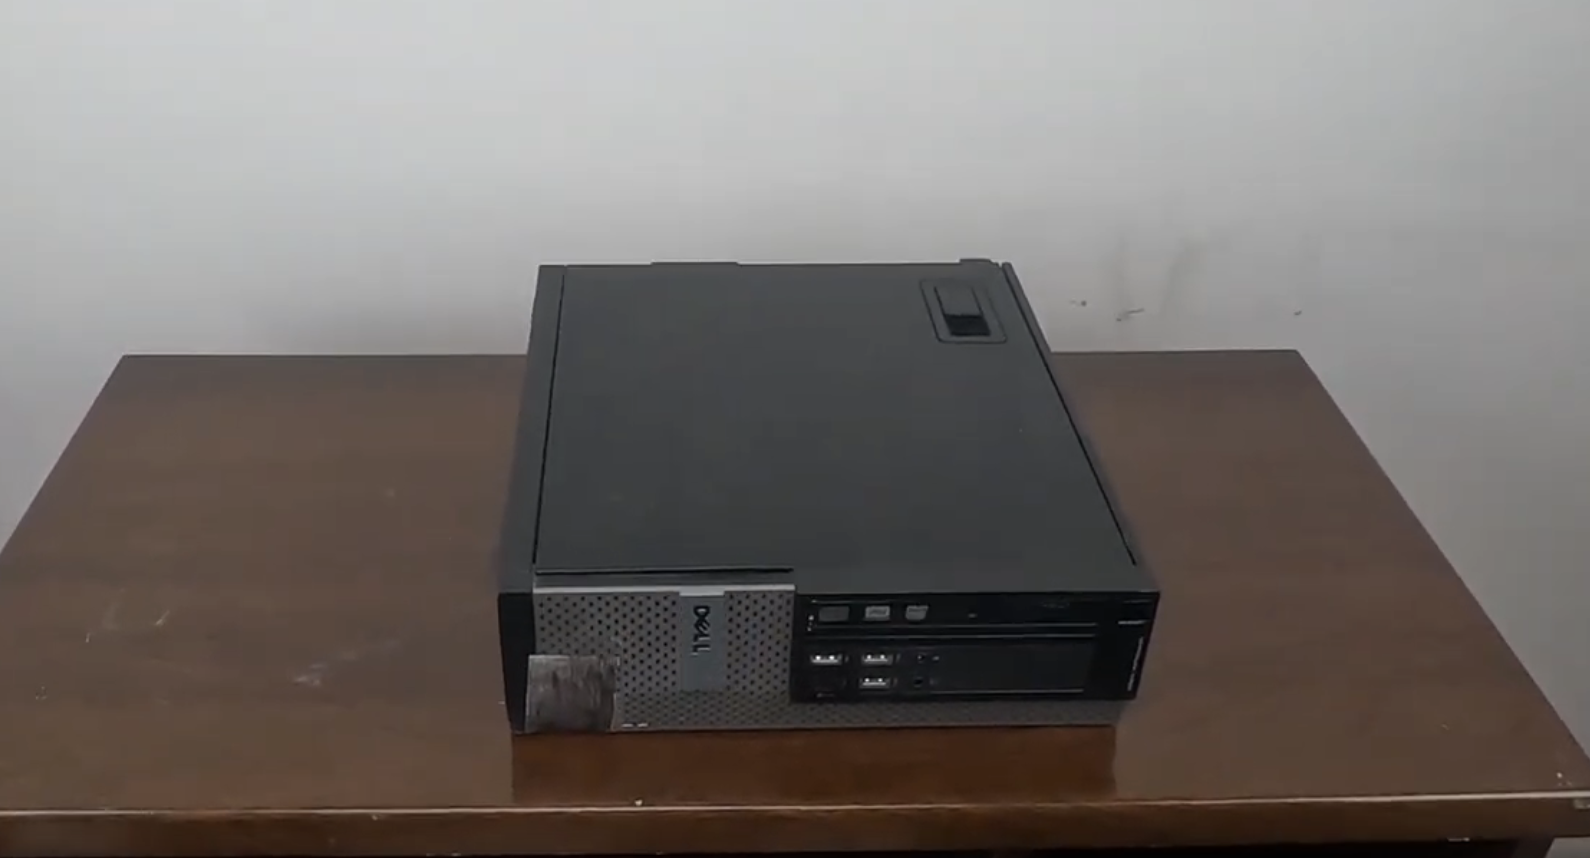
Go ahead and open the side panel of your PC case and visually inspect the internal components of your computer. Take a deep look and notice if there is dust build up, or leaking capacitors or any signs of liquid damage or even physical damage to any part. Check if HDDs and/or SSDs are properly mounted. Also, consider checking the cooling fans and connectors. If there is too much dust build up, then use compressed air to clean that.
2. Check Hardware Specifications
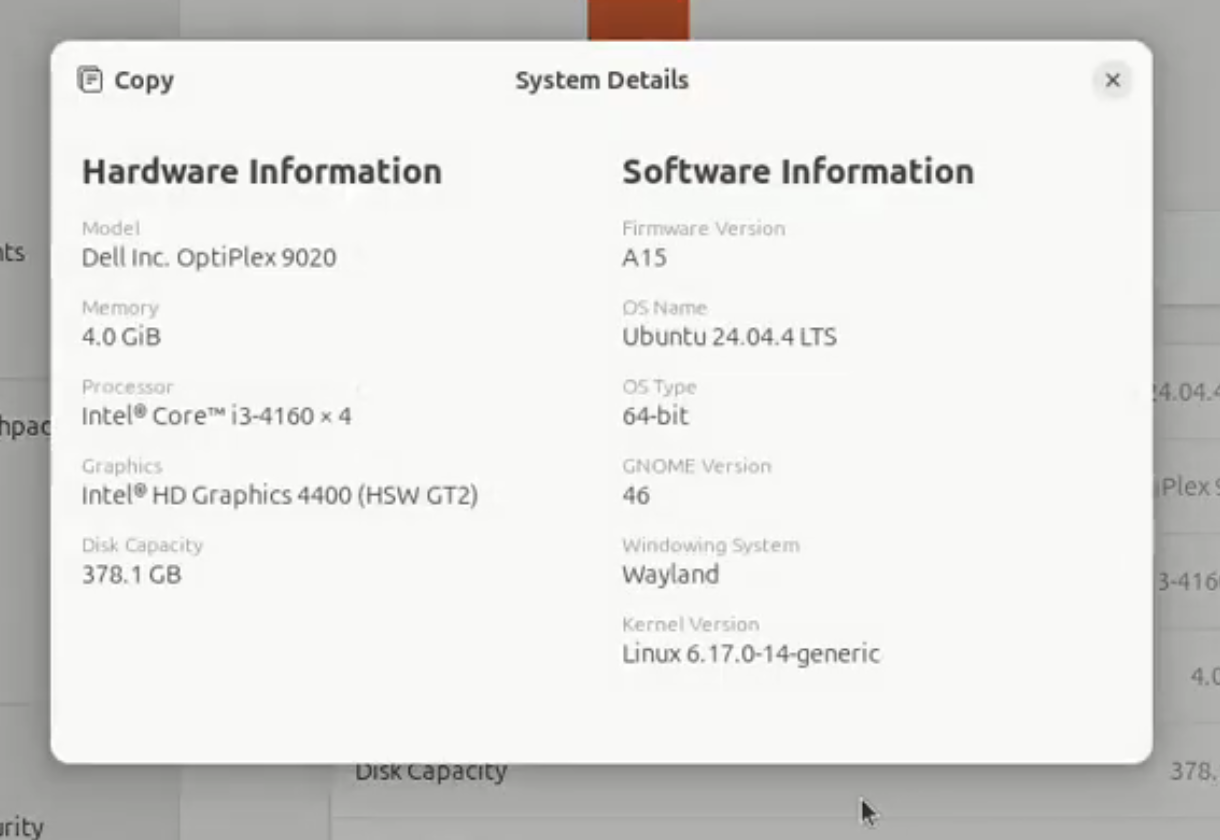
If the device already has an OS, then go check its specifications. If it’s Linux, specifically Ubuntu, then you can see those specs in the “About” section.
My system was OptiPlex 9020 and these systems are built like Tanks and their longevity is awesome. It had 4GB RAM, 119 GB SSD & more than 320 GB HDD.
Note: If it doesn’t have an OS yet, then you can check specs after installing Ubuntu server.
3- Stress Test the Hardware
Next, we need to stress test the hardware, we will conduct 5 tests to ensure if our hardware is stable and have no hardware issues.
Note: In case, you don’t have an OS already installed on your PC then you can do these stress tests after installing Ubuntu server, go to step 4 and come back to this step after the installation.
Test 1: Storage Health Test
I ran and used smartctl command to figure out if the system will pass the storage health test and when I was running the test, all I was looking for was the word “Passed”.
sudo smartctl -a /dev/sda

Test 2: CPU Stress Test
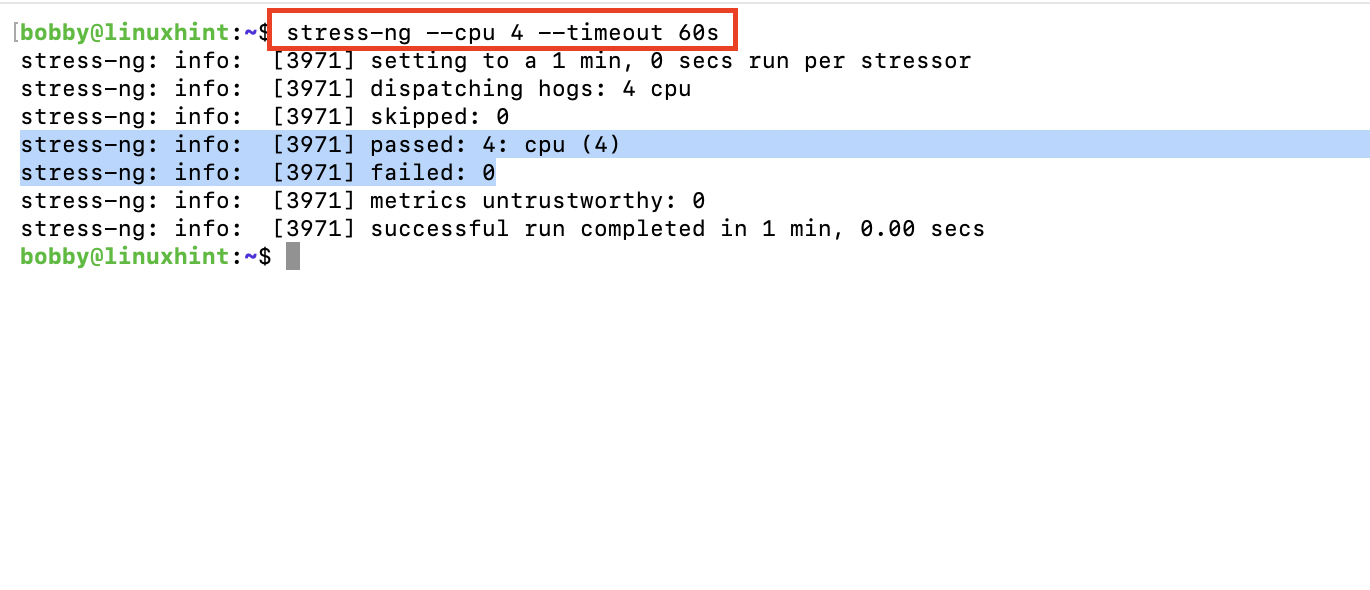
Next, I used the stress-ng command to stress test CPU and it fully loads the CPU cores and makes them operate and test them at almost a maximum utilization level by giving them artificial computational loads. This helps us identify any system crash issues, overheating issues, and help us verify system’s stability.
stress-ng –cpu 4 –timeout 60s
Later, I checked on the temperatures of the hardware and it was perfectly fine, remaining within very safe limits. Type in the terminal:
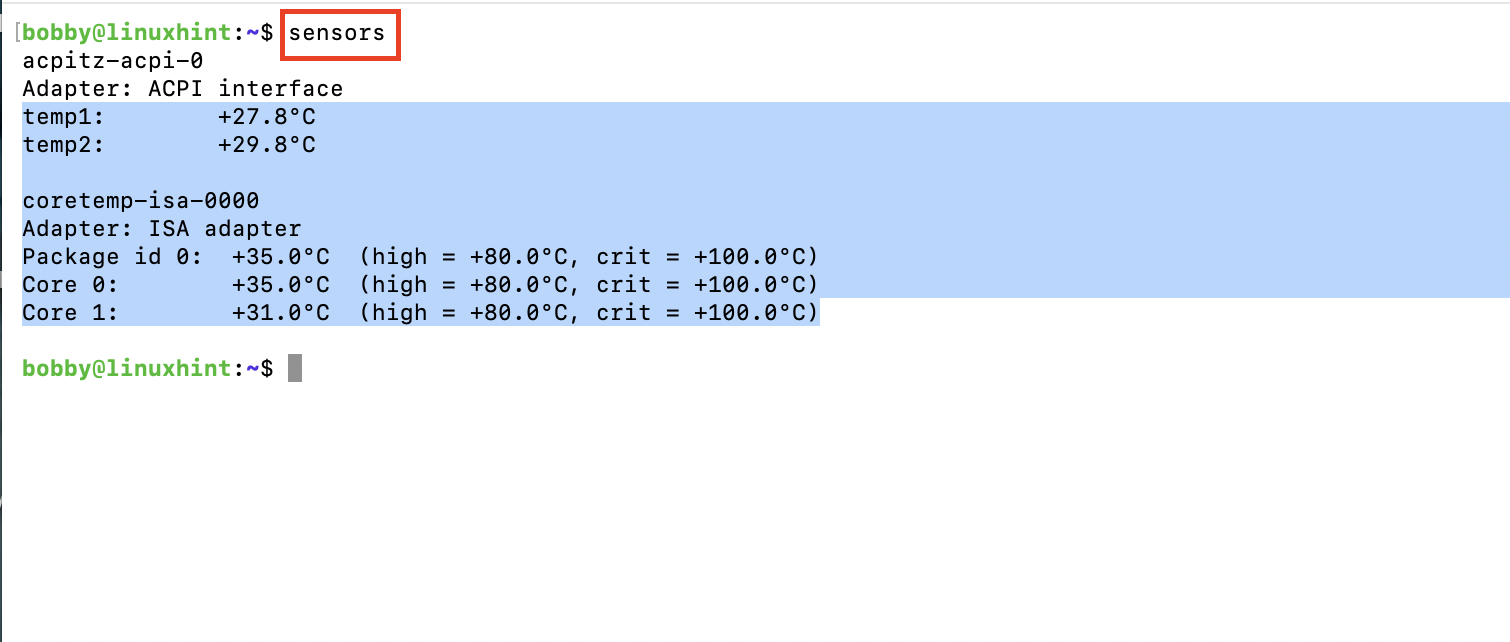
If you wanna see live temperatures during the test then use this command in another terminal:
CTRL + C to end this live overview.
Test 3: RAM Test
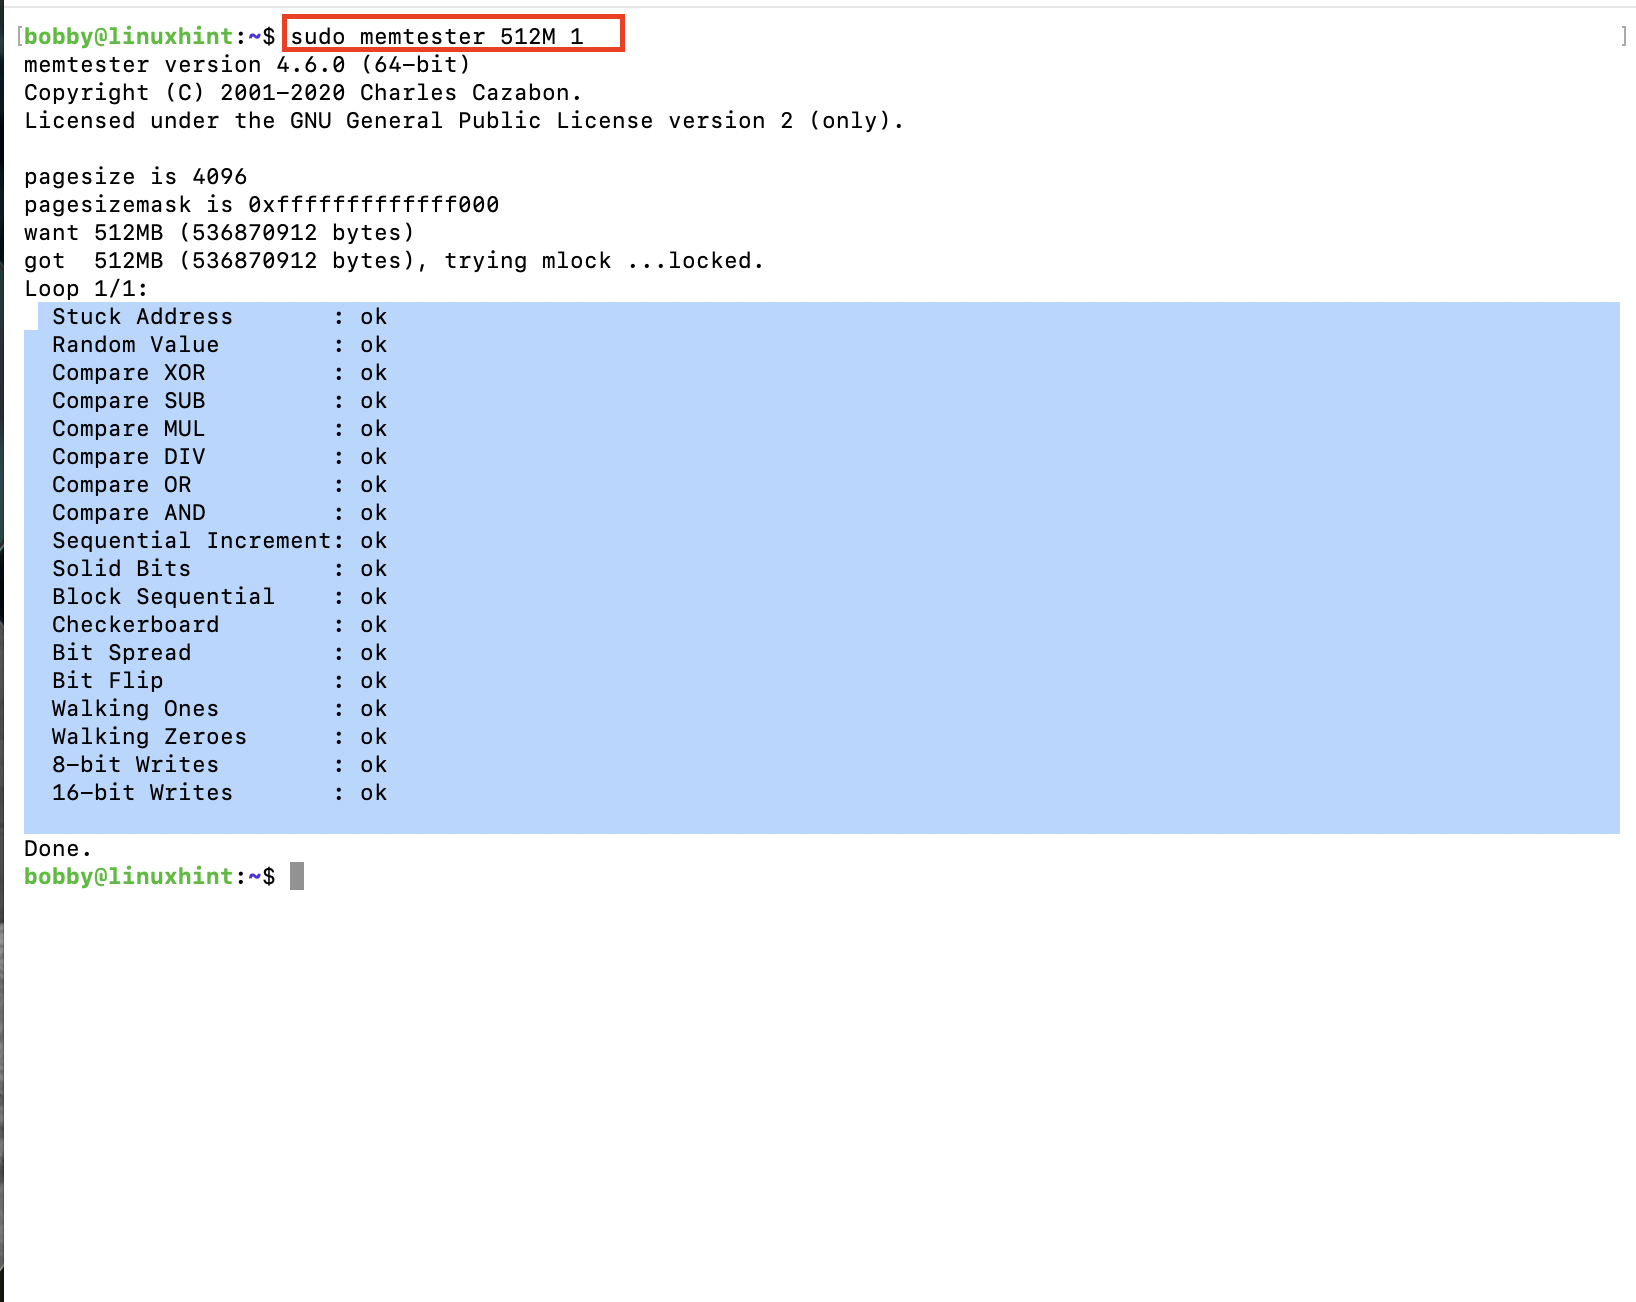
Next, I performed the RAM test where I used memtester command that basically locks in a specified space on RAM(in our case 512MBs) and then writes multiple test patterns to it and then reads it all back and verifies if it’s still accurate, if it’s not then RAM is very likely to be faulty. This test was passed by my old PC.
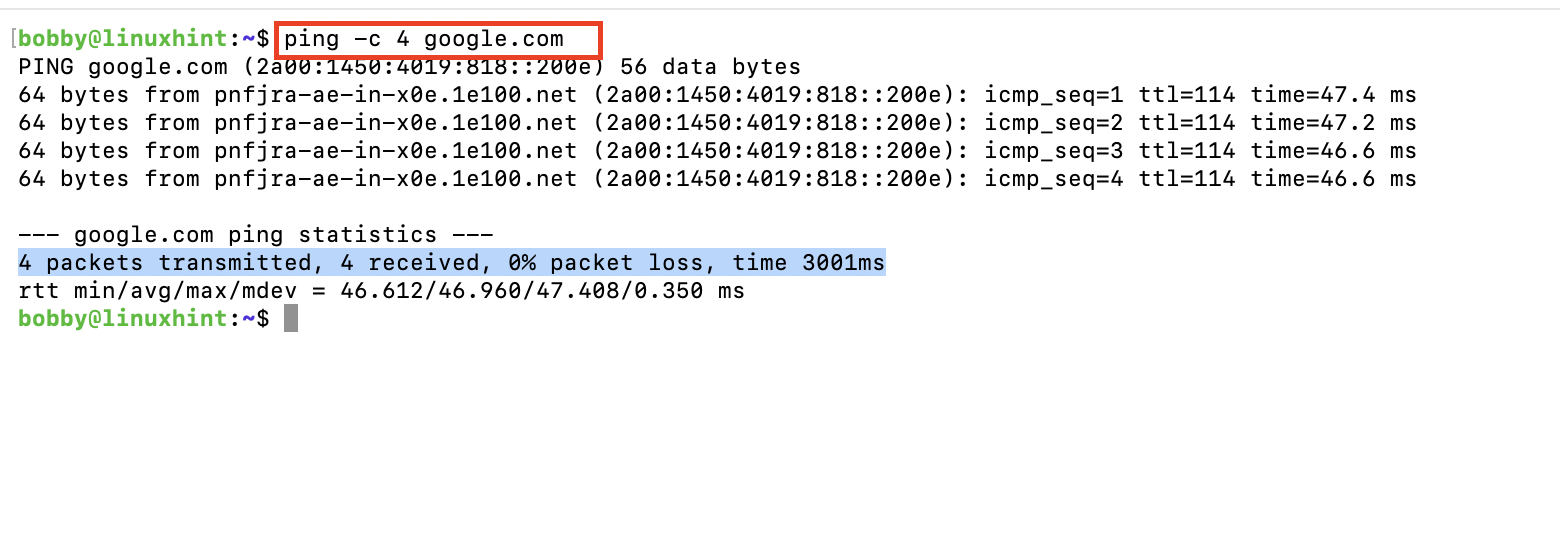
Test 4: Network Test
While doing the network test, my PC had no wifi card or component so this was the only test it failed but I knew that already so I bought a Wi-Fi dongle already and then put it to test and it passed that too. We were going to use ethernet anyway so it was pointless but still I wanted to test if Wi-Fi will work with an external dongle and it did. Type in your terminal to check basic networking:
Test 5: Workload Usage Test
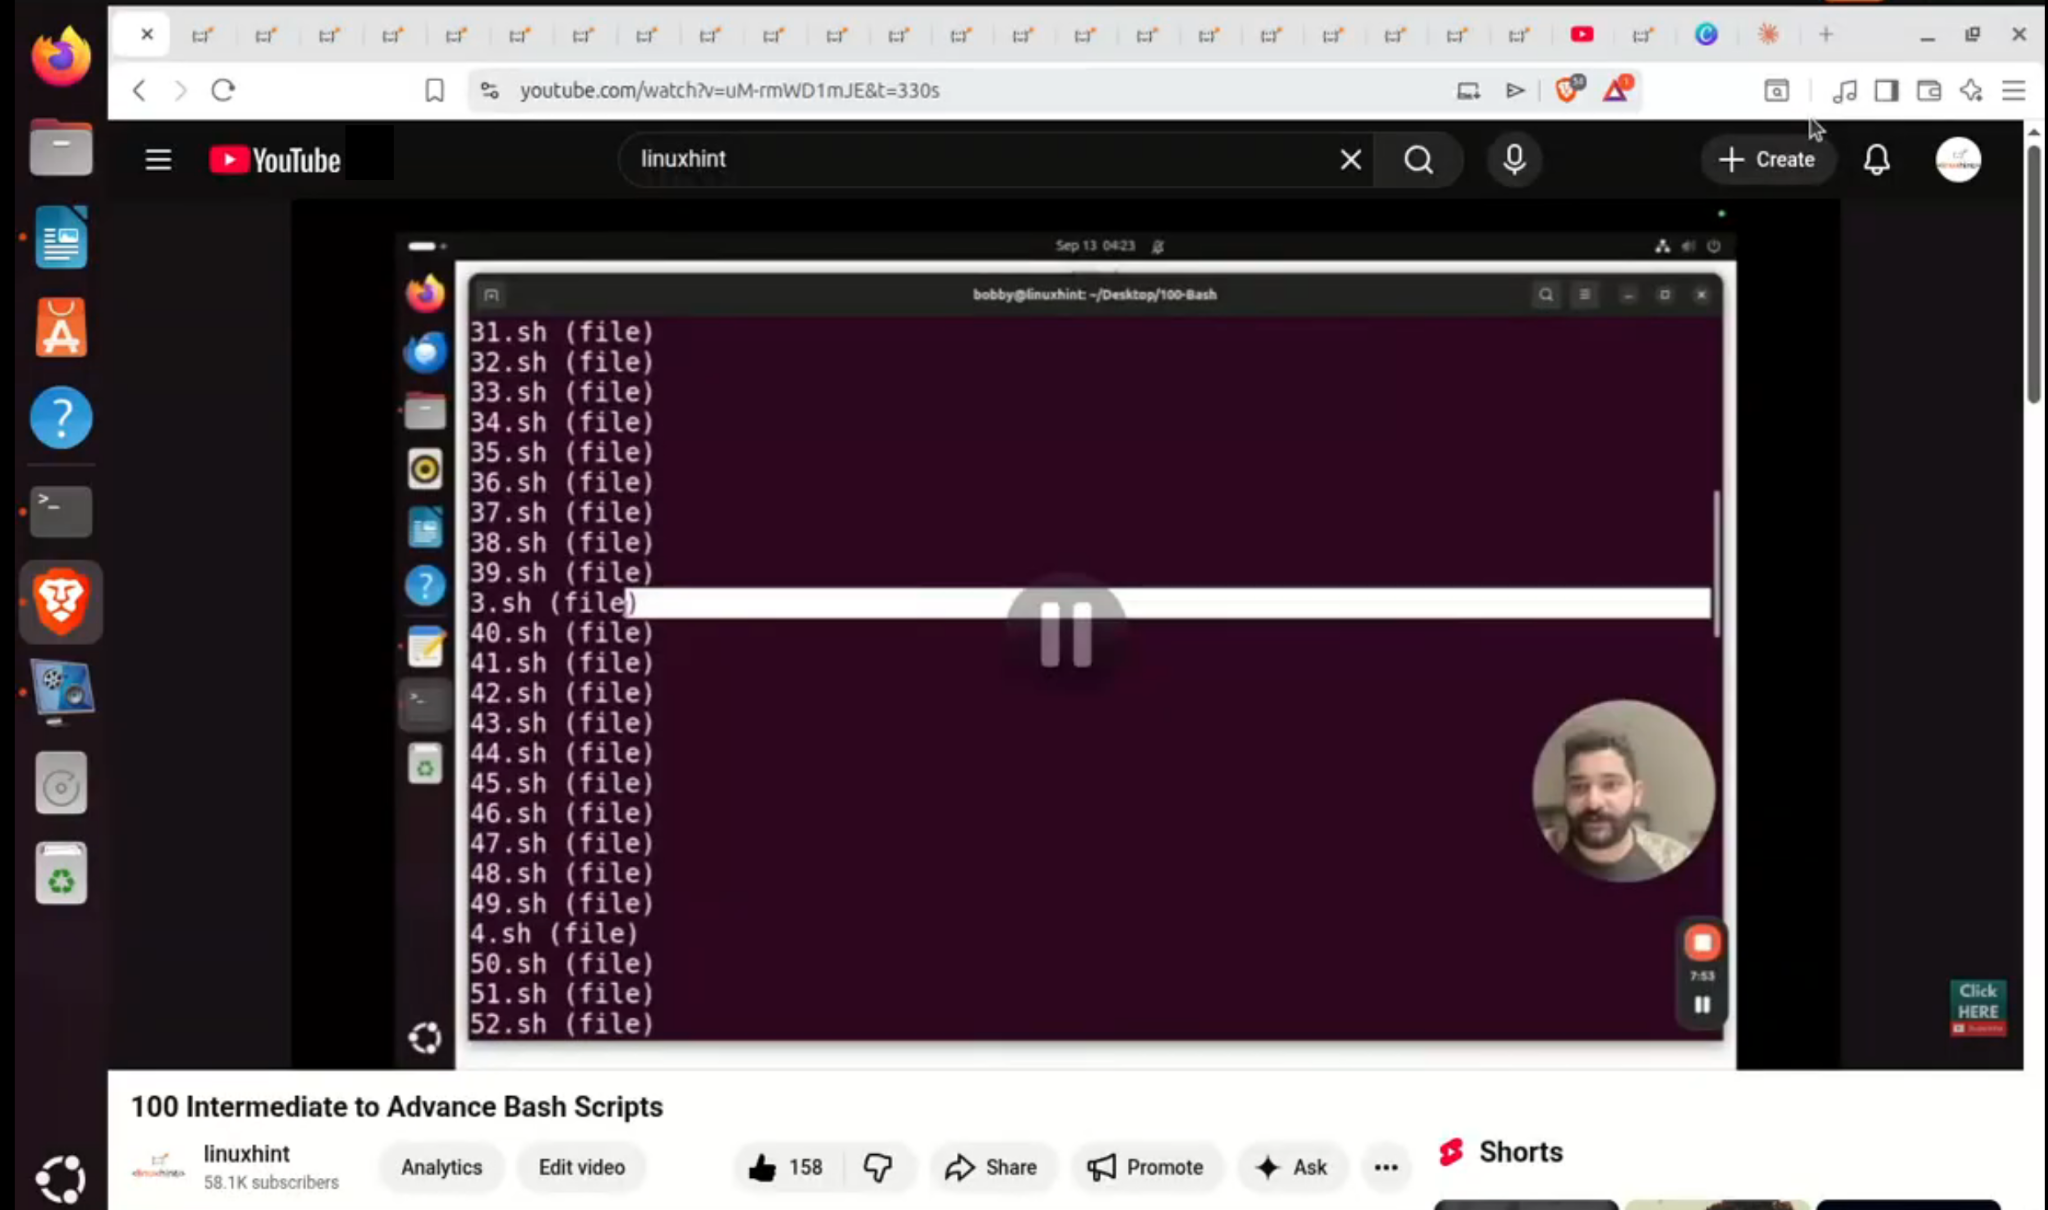
I didn’t do really heavy testing but I did open multiple tabs, played multiple YouTube videos, opened docs and used screen recording software all simultaneously and it was smooth. I was surprised to see that but my Old PC didn’t freeze or lag during this basic workload usage test.
4- How to Install Ubuntu Server 24.04 LTS
Follow these steps to install Ubuntu server 24.04 LTS on your PC:
Step 1: Download Ubuntu server from the official website.
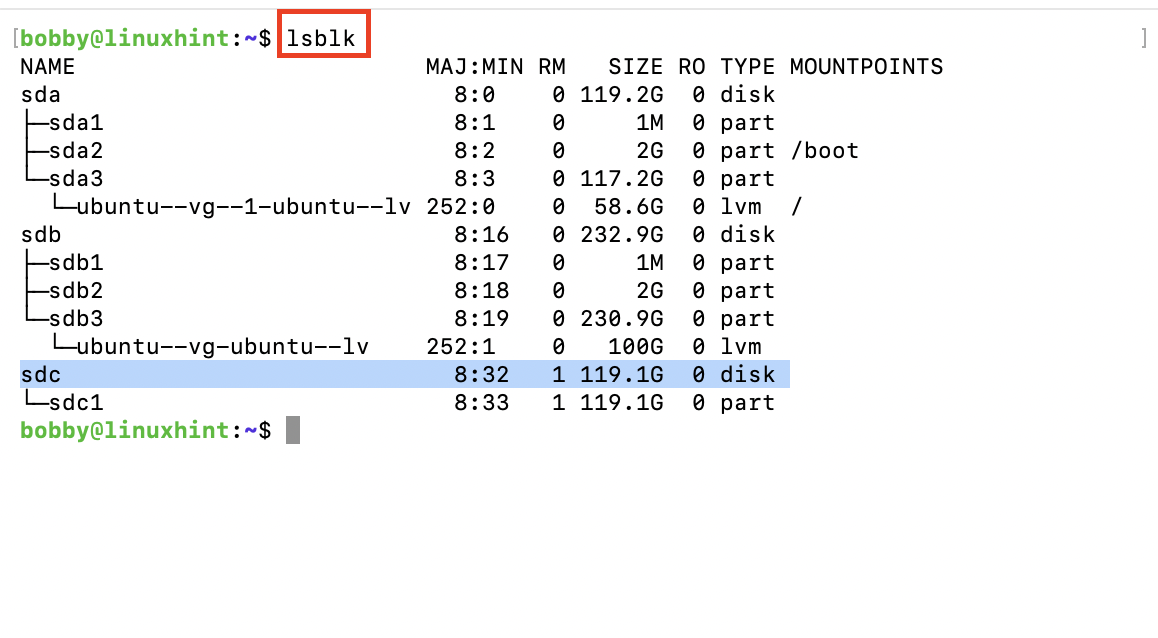
Step 2: Insert a USB in your PC to make it bootable but first identify the correct device name(such as /dev/sdb or /dev/sdc). You can use this command to identify:
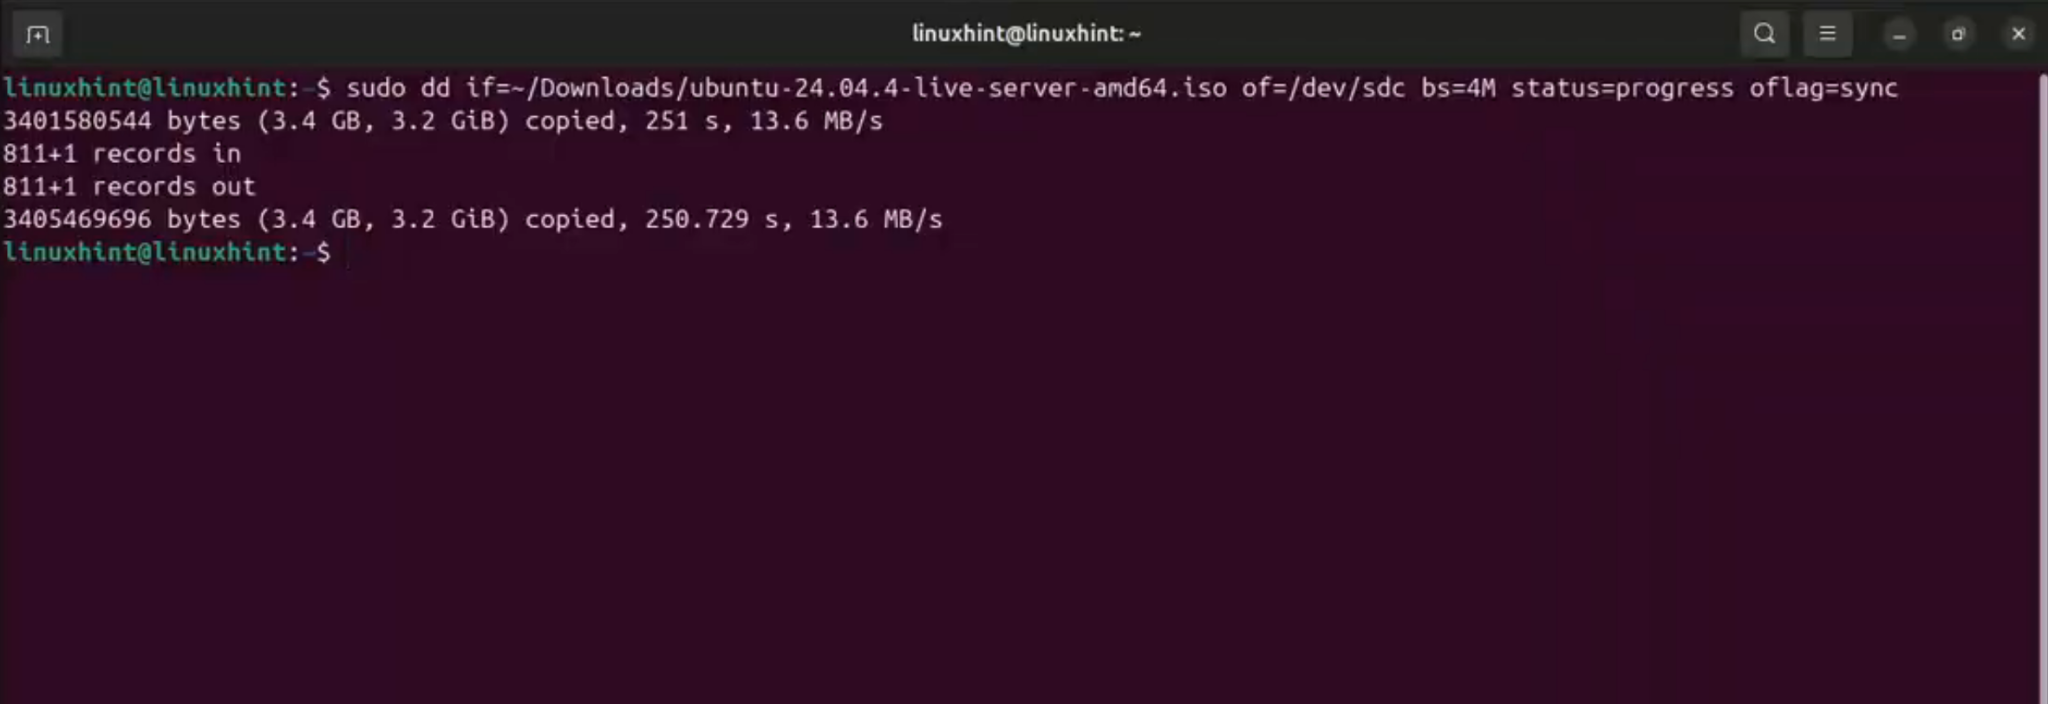
Step 3: Use dd command to make your USB bootable, make sure you downloaded the right version of Ubuntu server and it is inside the Downloads directory of yours and edit the .iso file name in the command to match it to yours:
sudo dd if=~/Downloads/ubuntu-24.04-live-server-amd64.iso of=/dev/sdc bs=4M status=progress oflag=sync
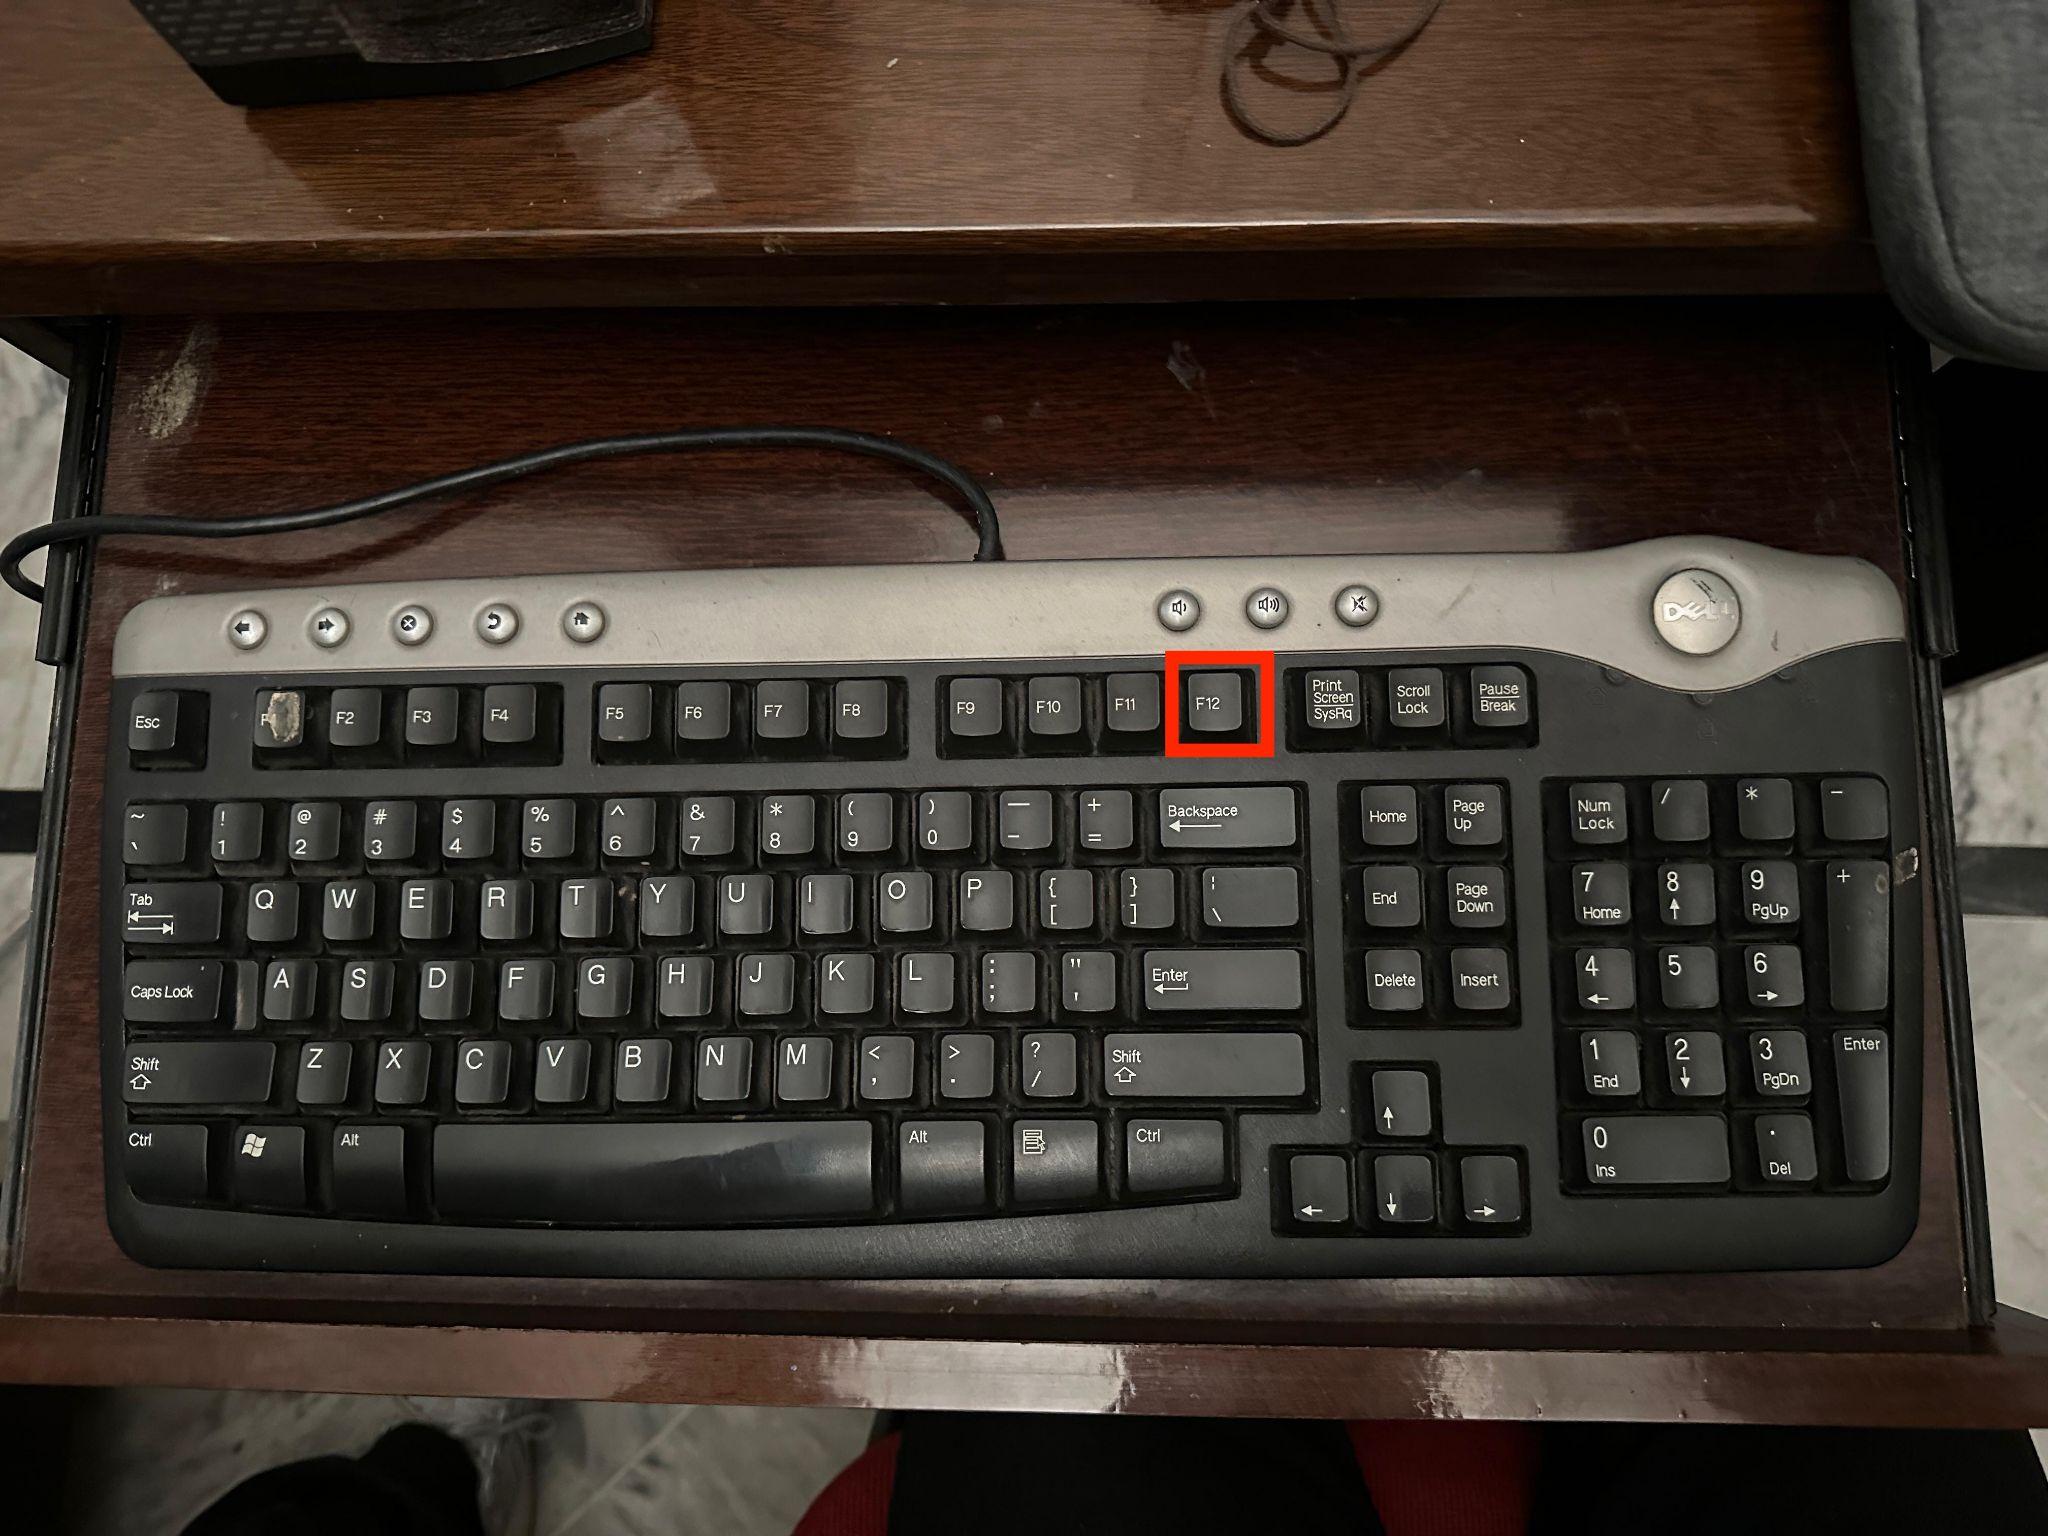
Step 4: Next, reboot your system and repeatedly press F10 or F12 key depending upon your system to enter 1 time boot menu.
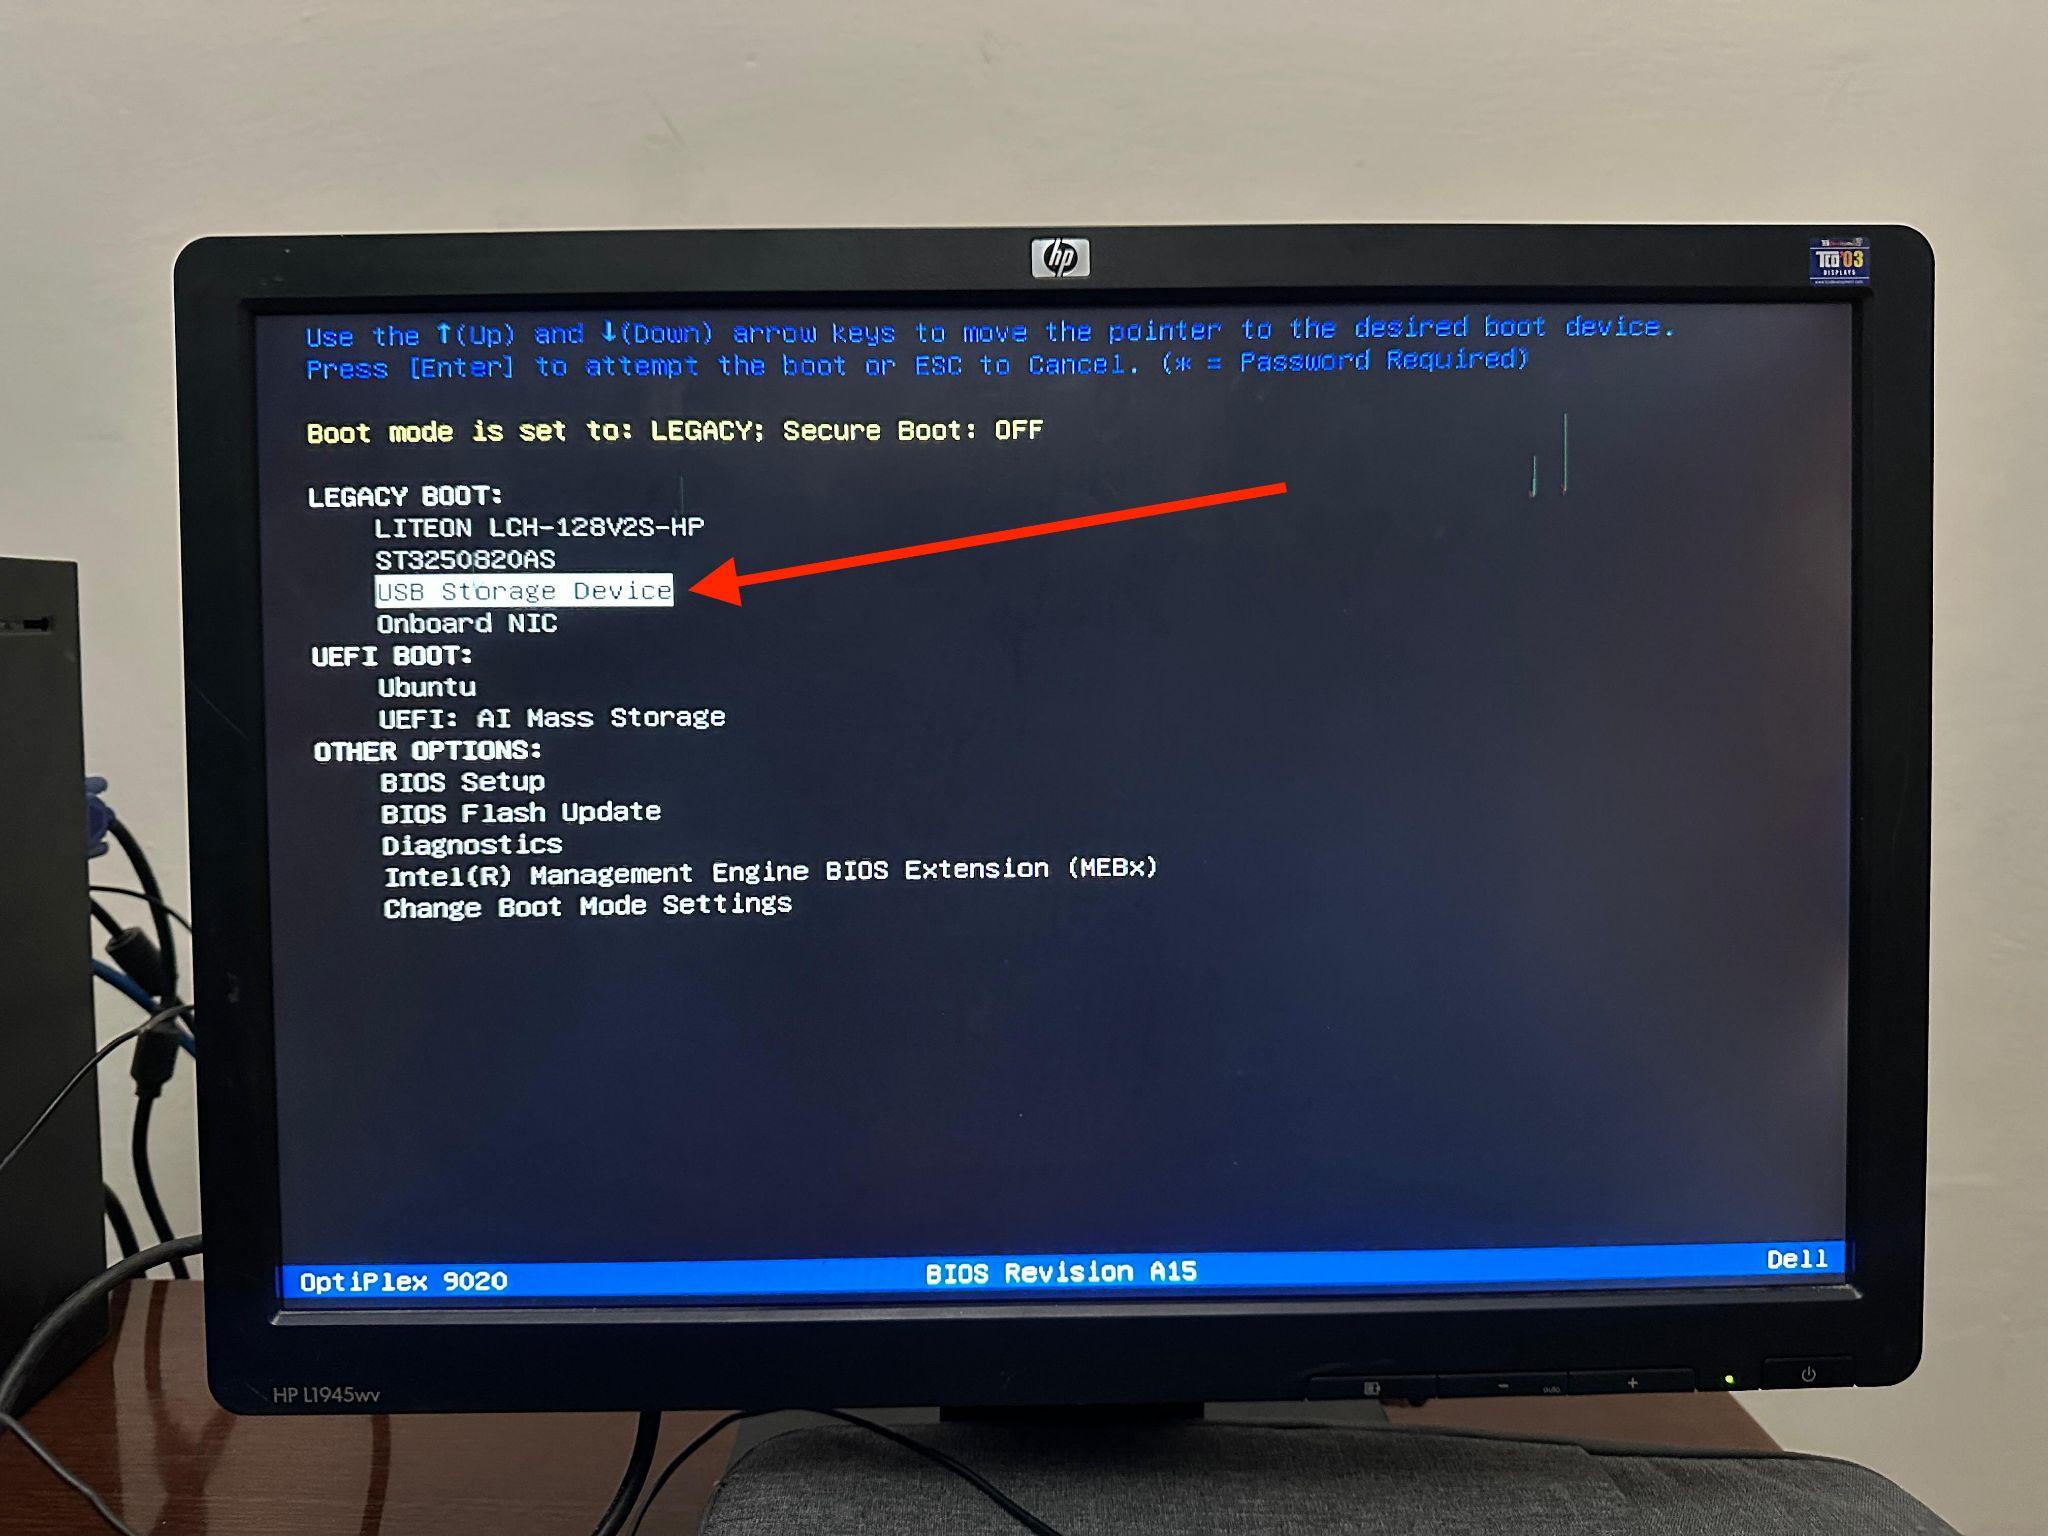
Step 5: In the boot menu, look for your USB device and select that option and hit enter.
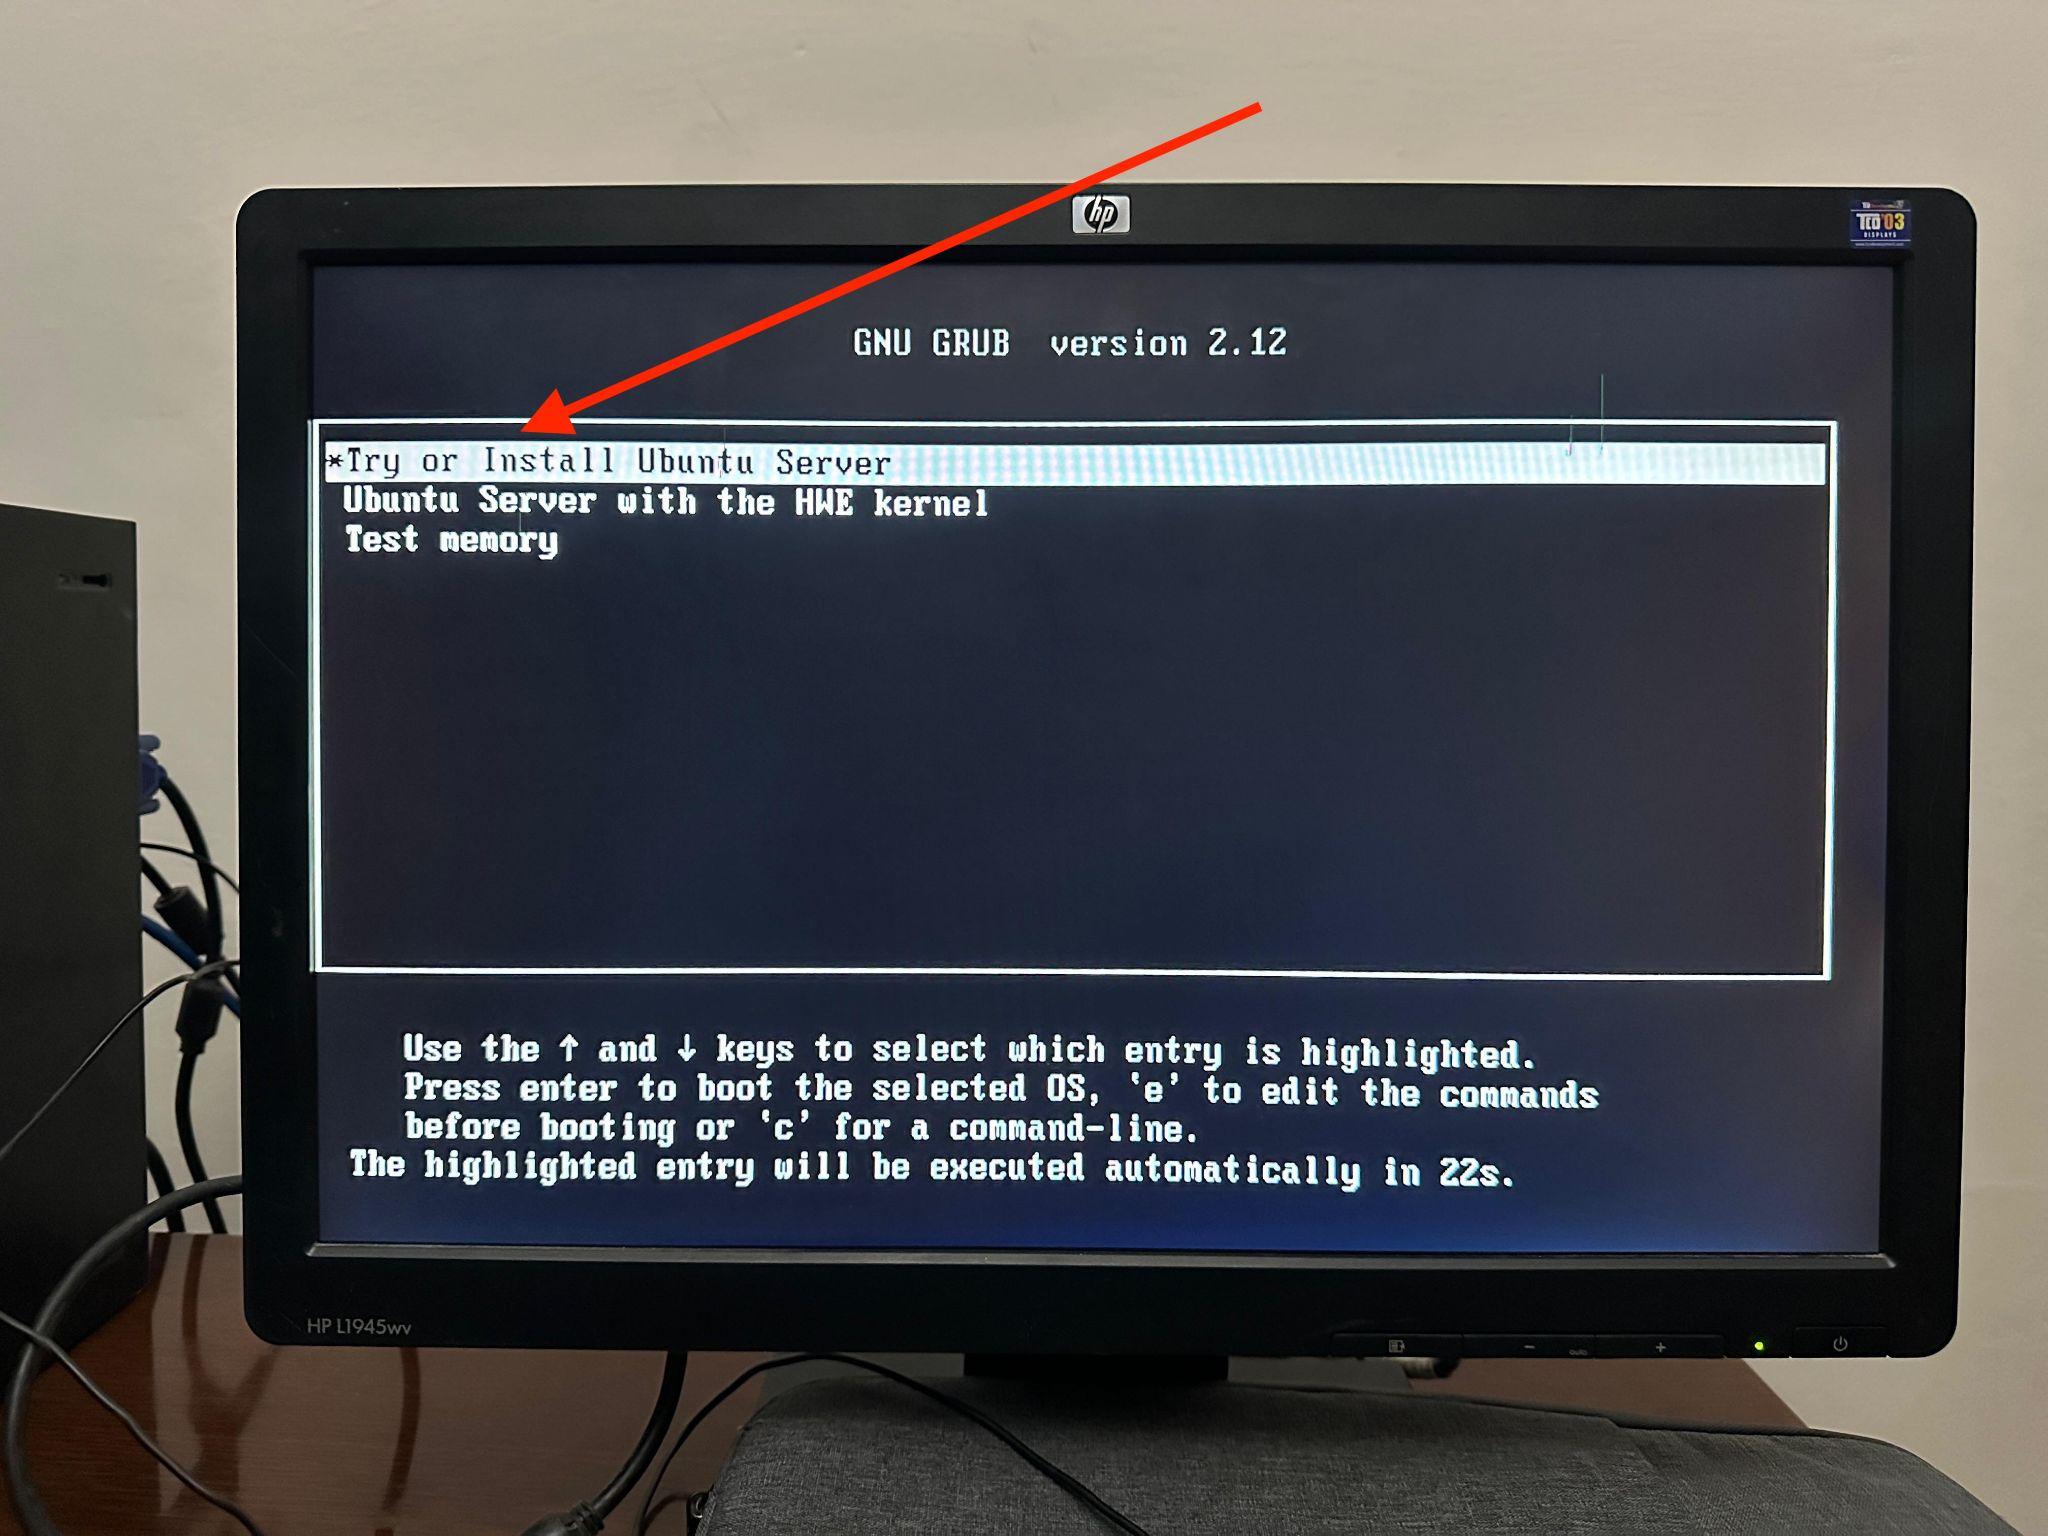
Step 6: You will see the screen below, choose the option “Try or Install Ubuntu Server”.
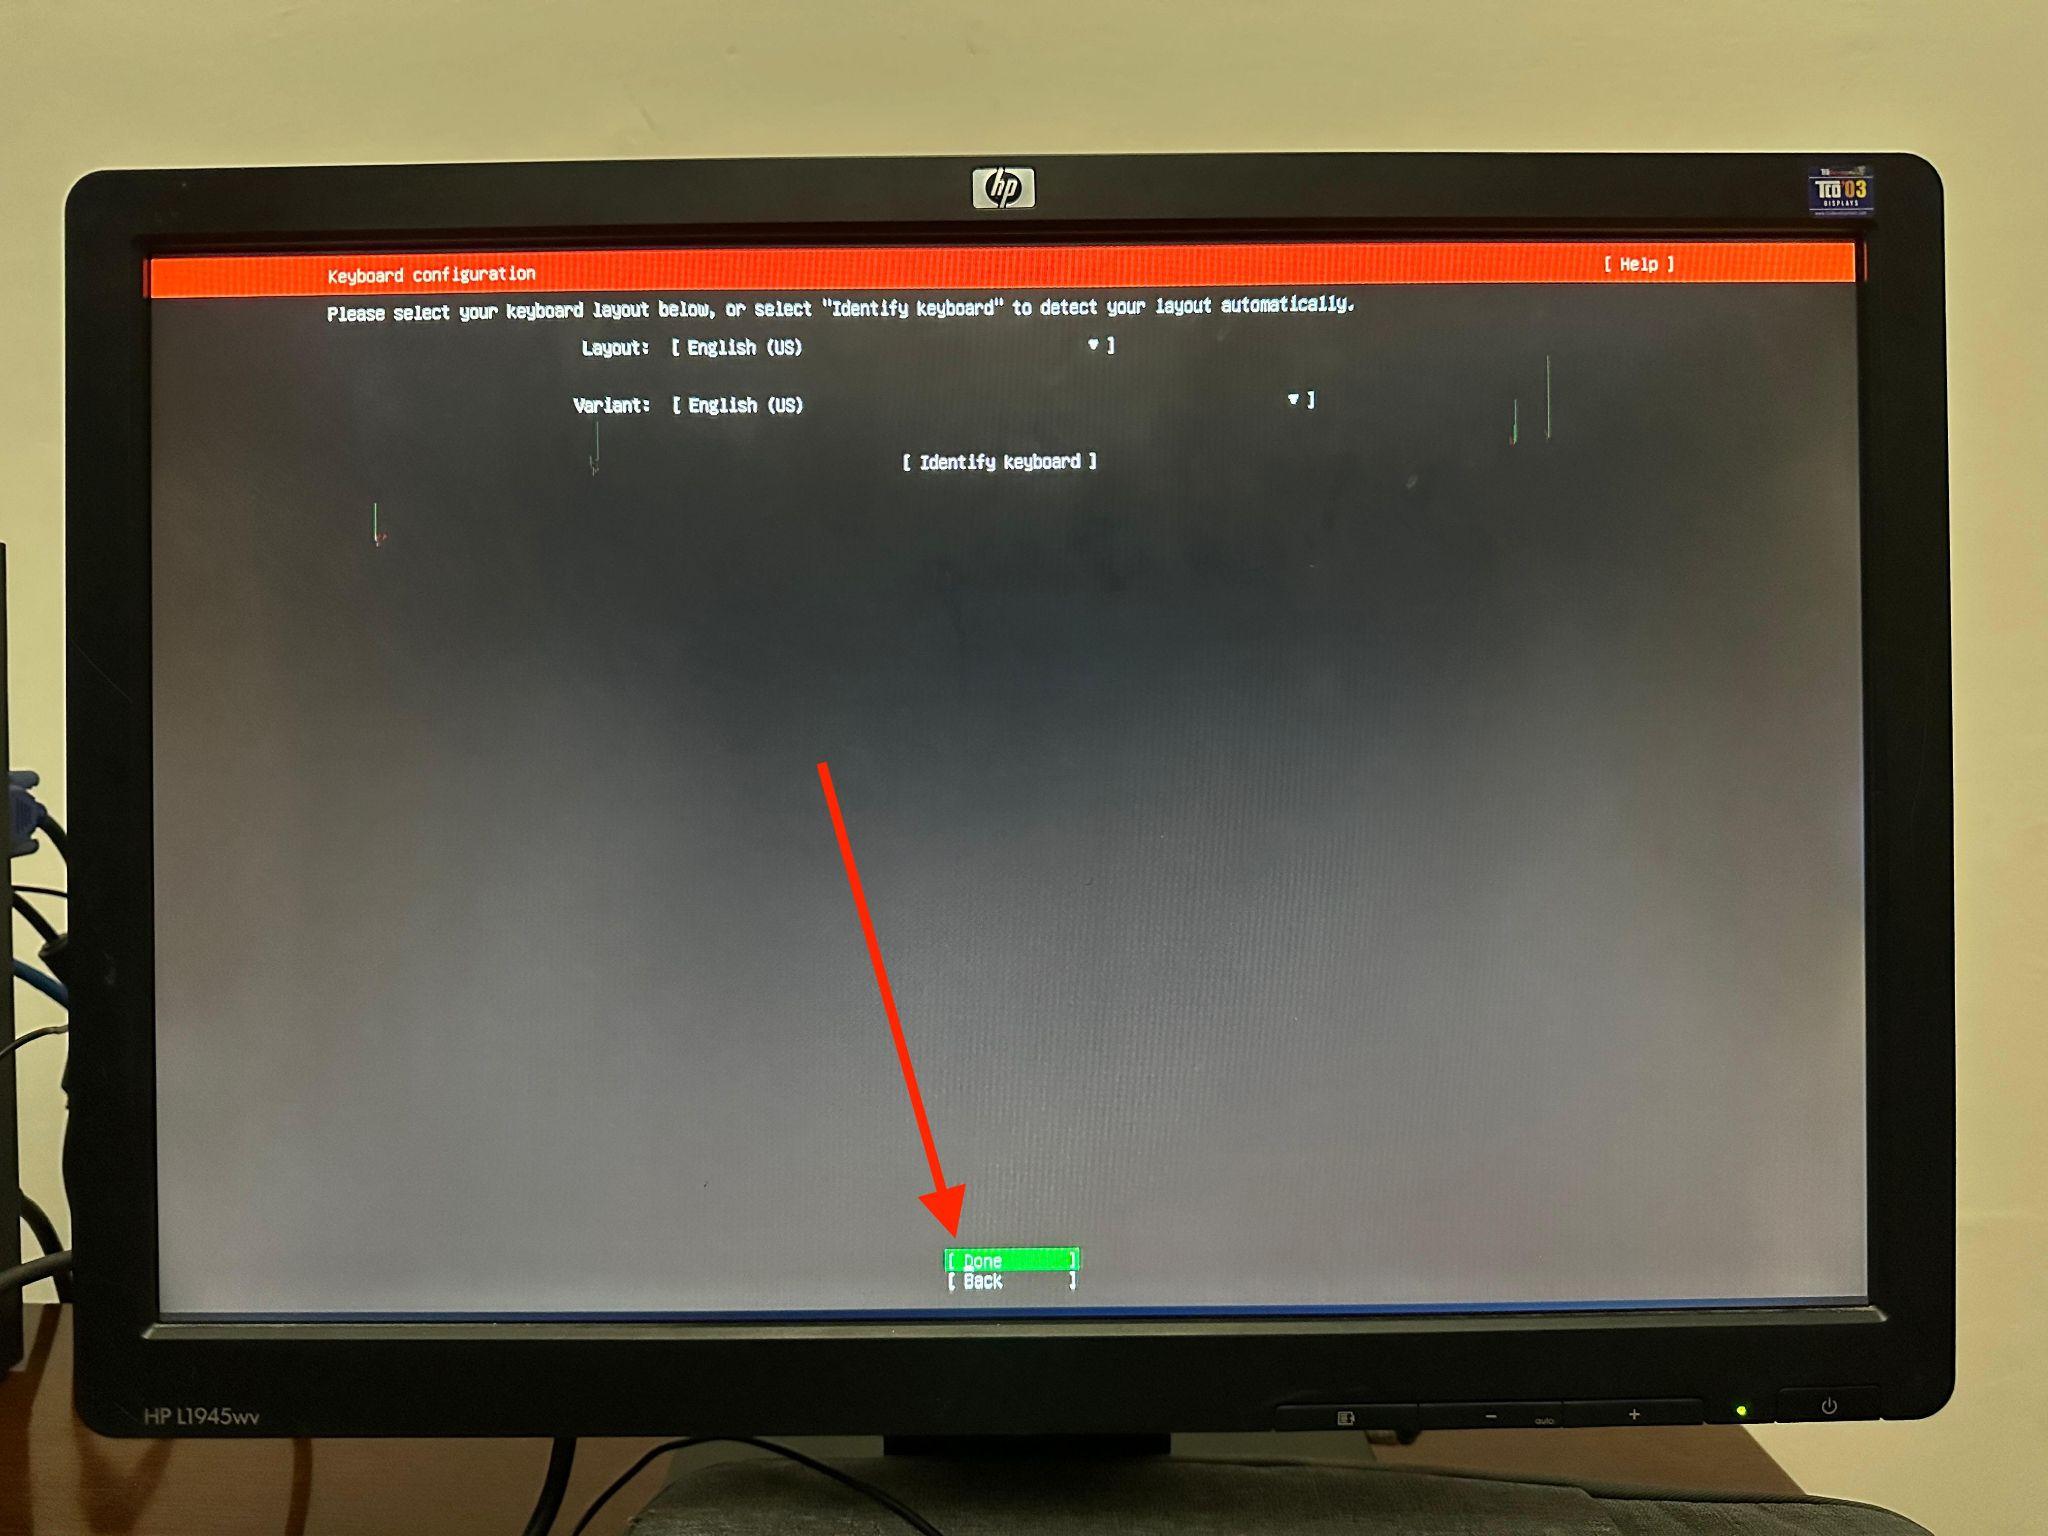
Step 7: Select the language.

and next it will ask you to configure the keyboard, just keep everything as it is if the selected language is English and then select “Done” and hit Enter.
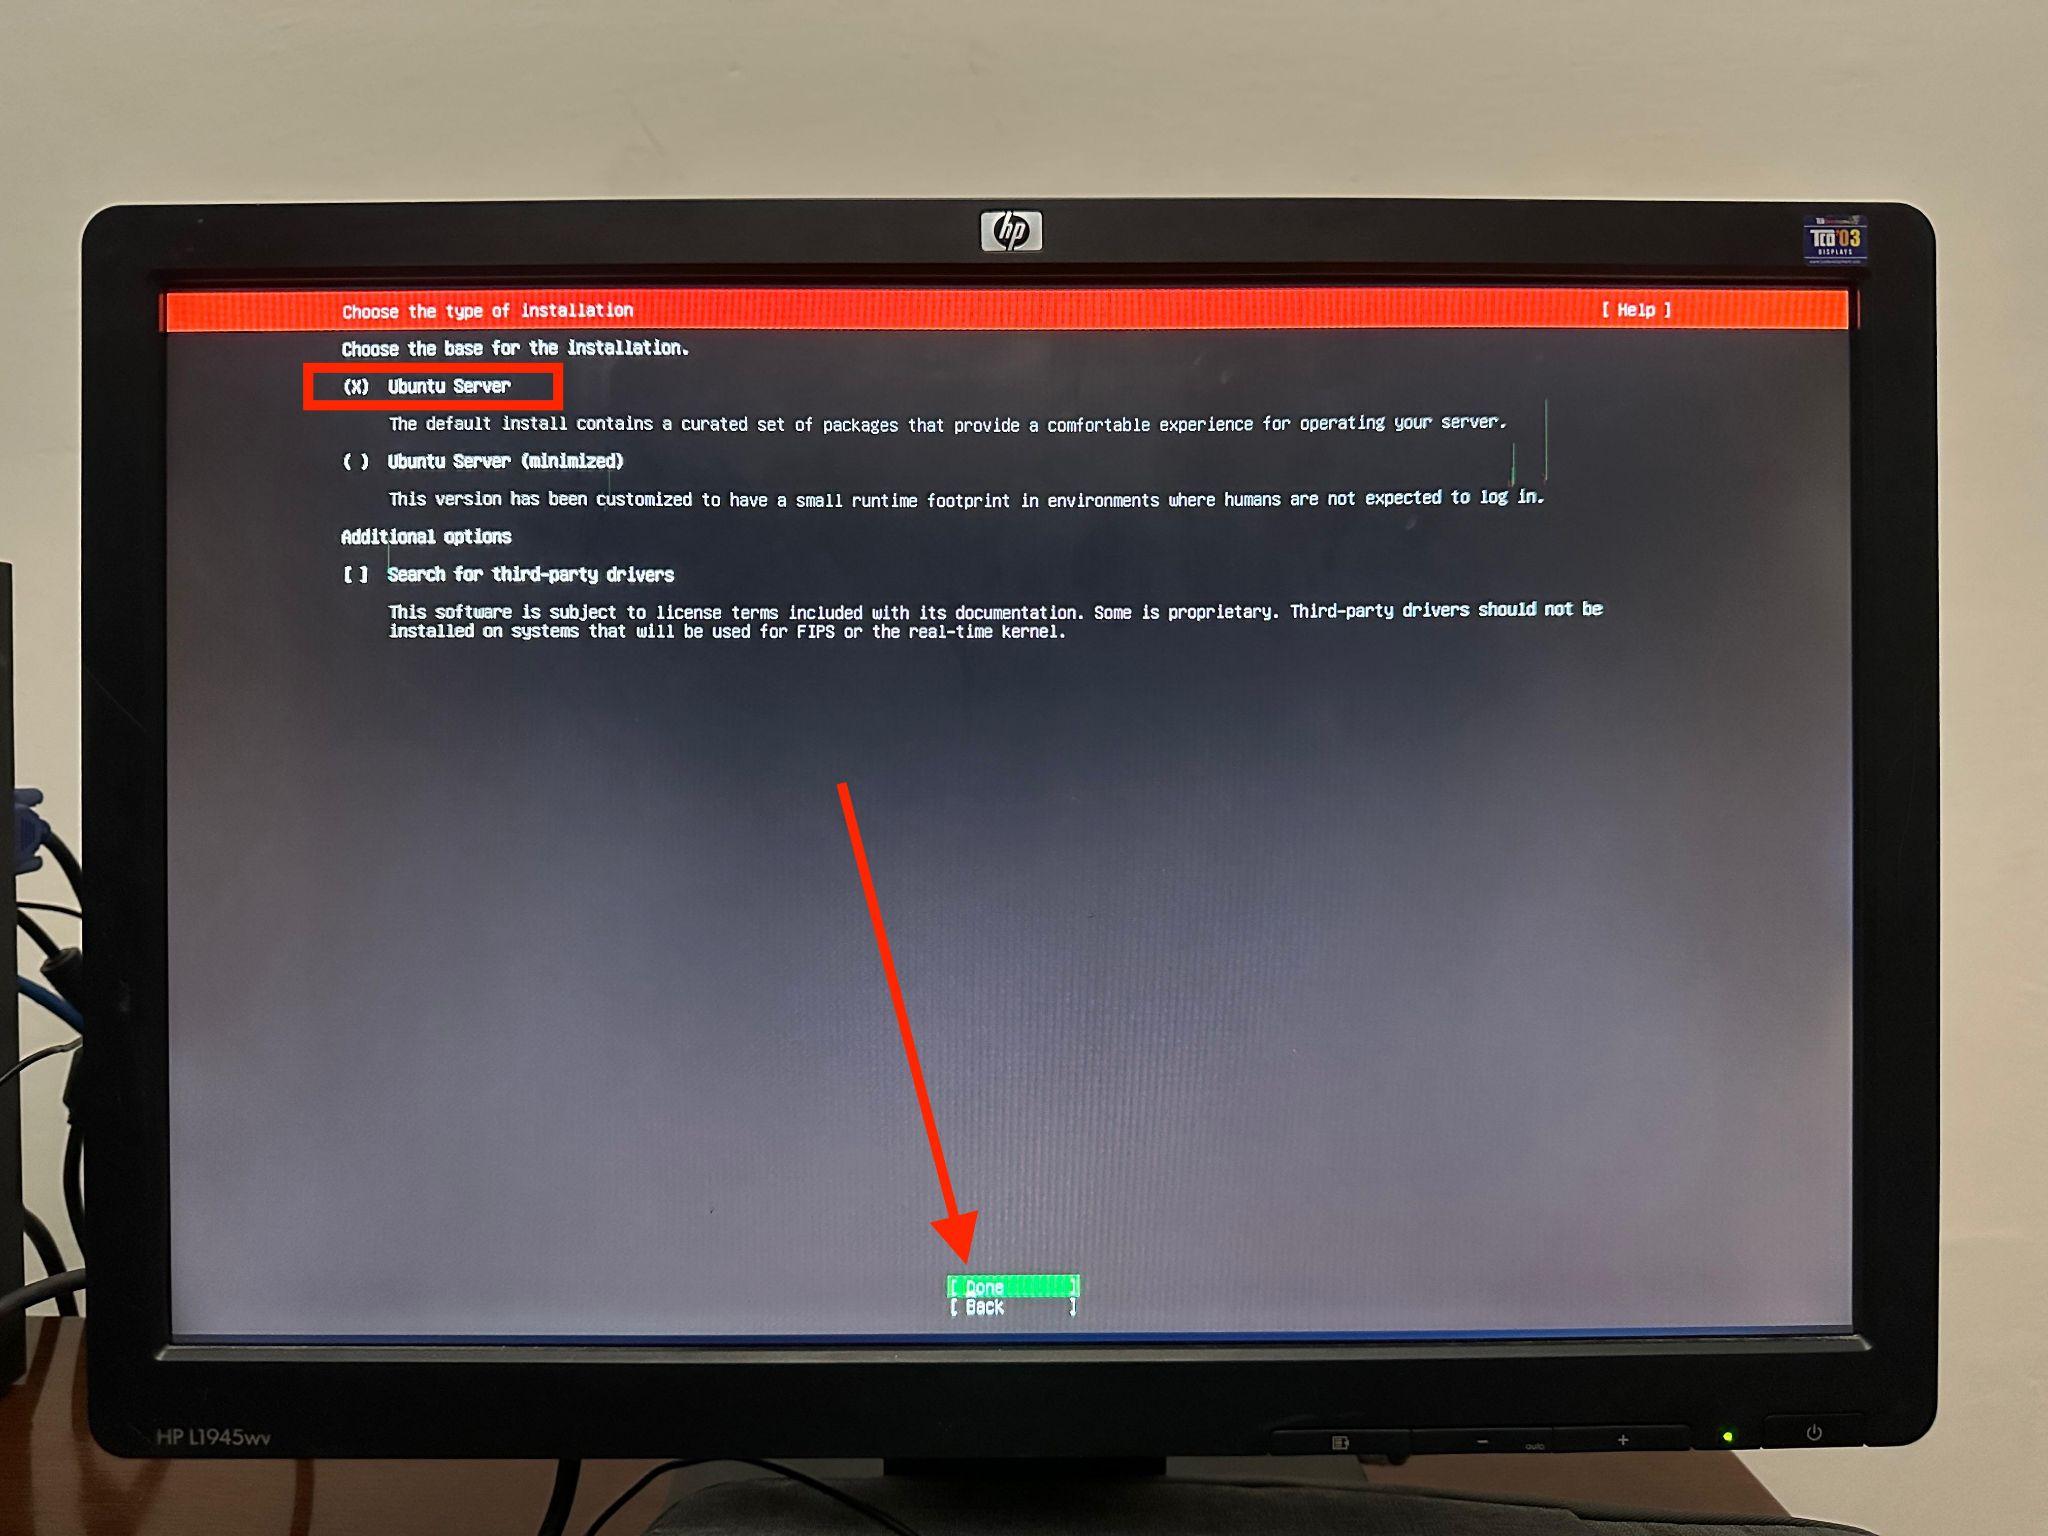
Step 8: Now, choose the installation type and ensure that “Ubuntu Server” is marked. After that select “Done”.
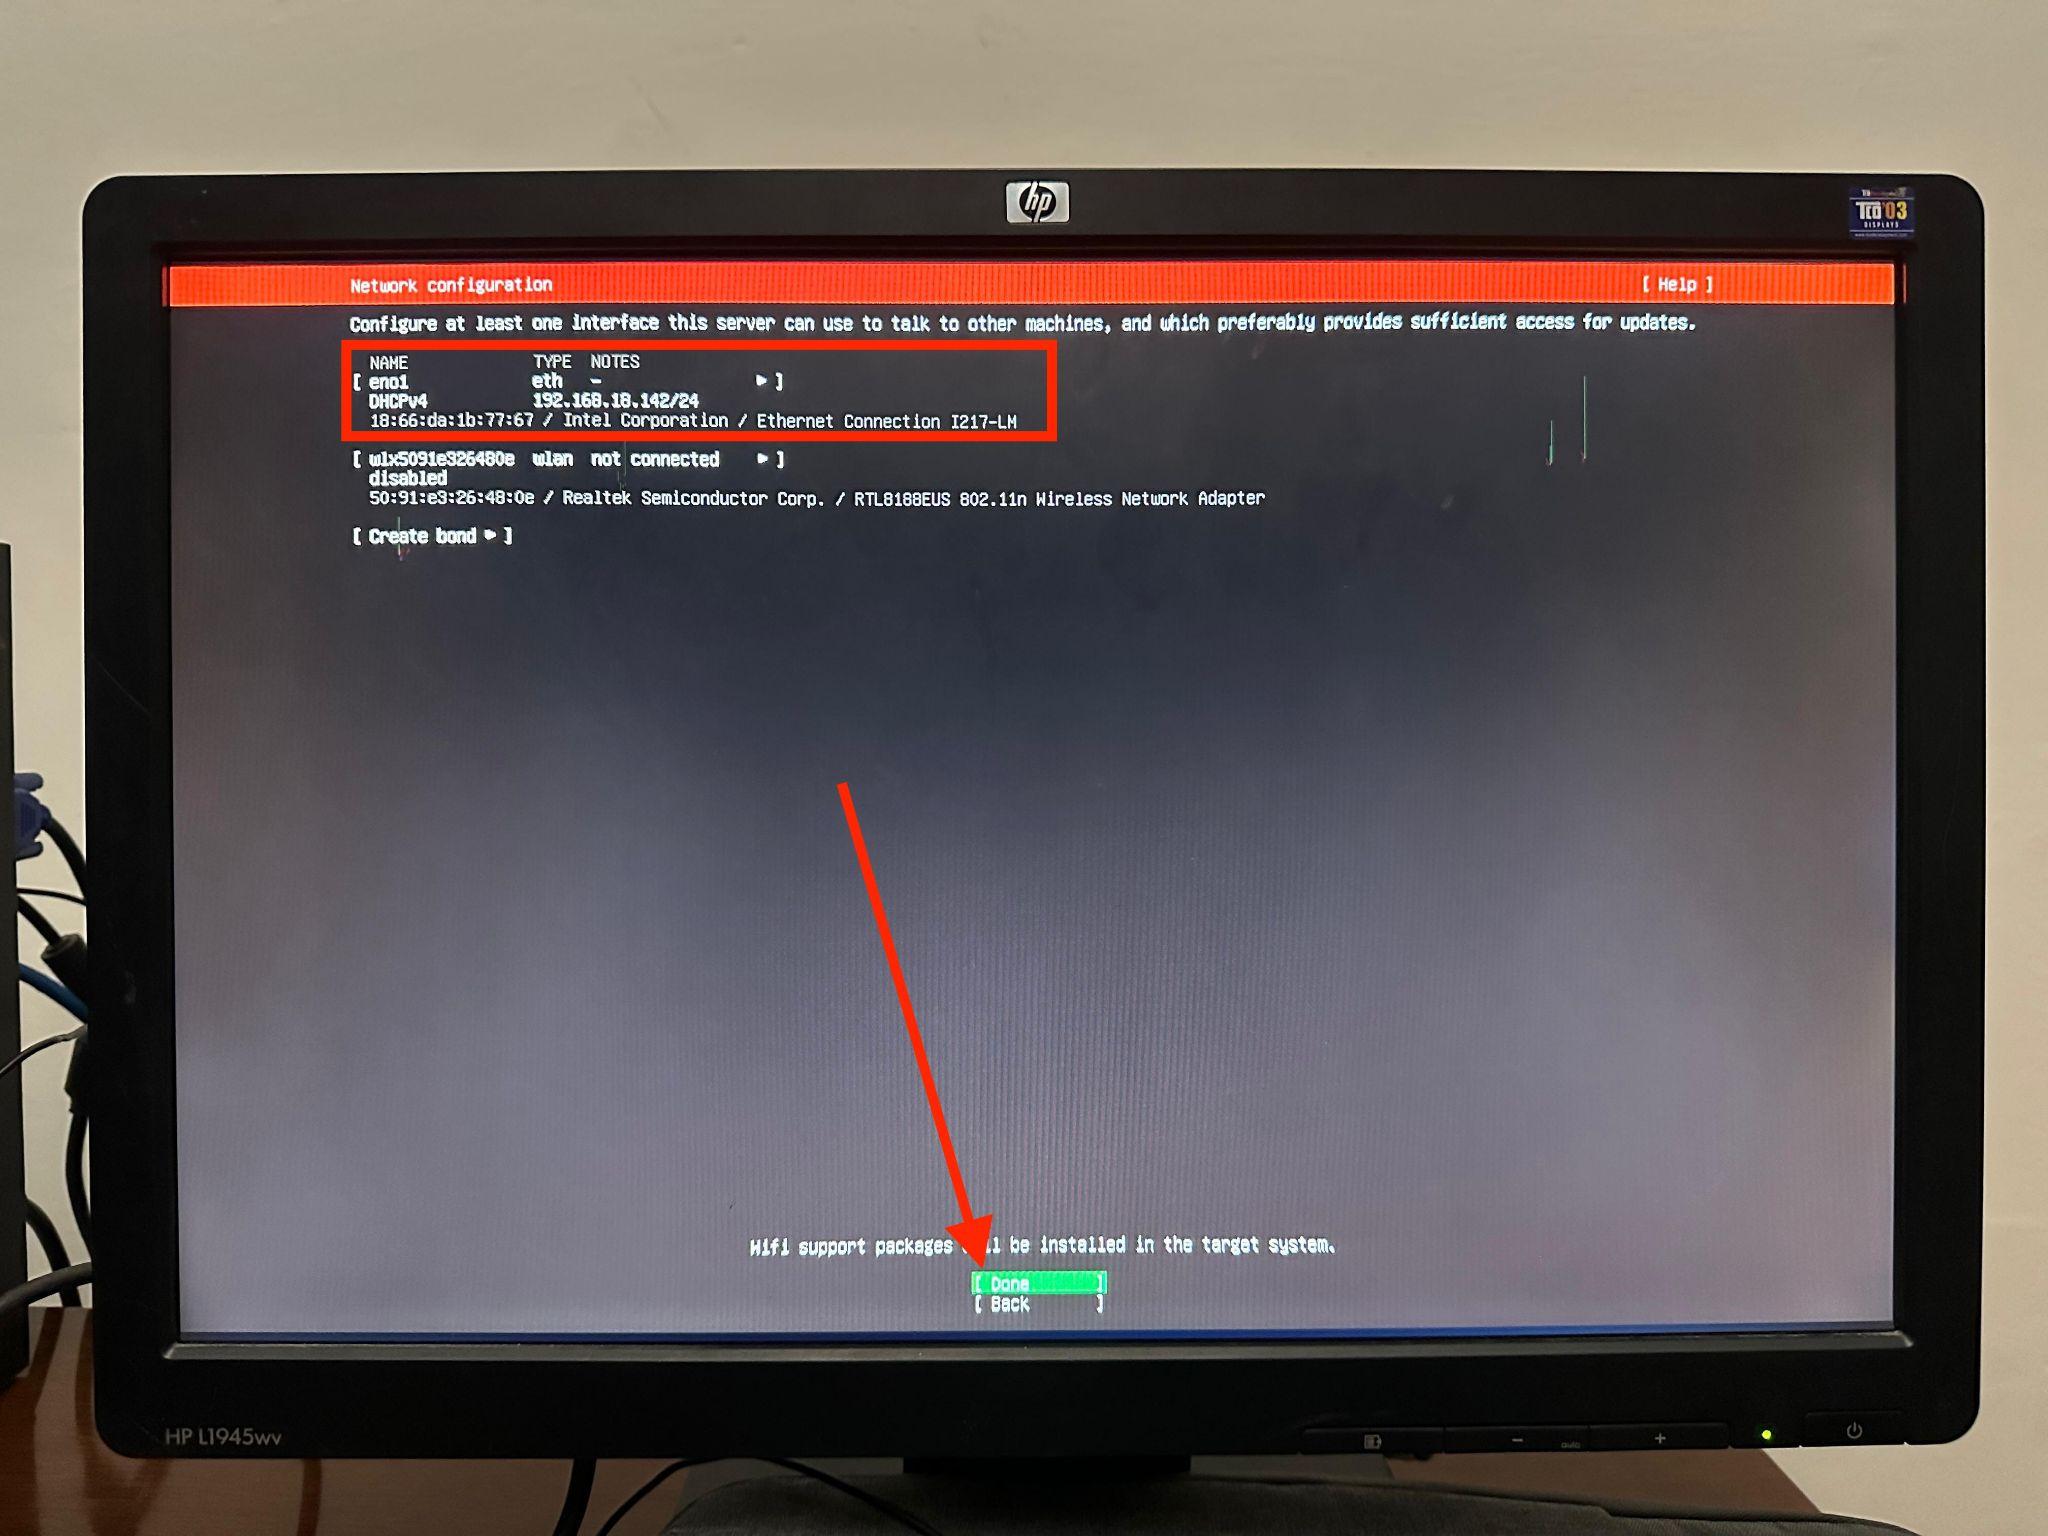
Step 9: Before this step, ensure that LAN is connected with your PC. In this step, if LAN is connected then it will be detected and you will be able to see the DHCPv4 IP Address. Select “Done” and hit Enter to go to the next step.
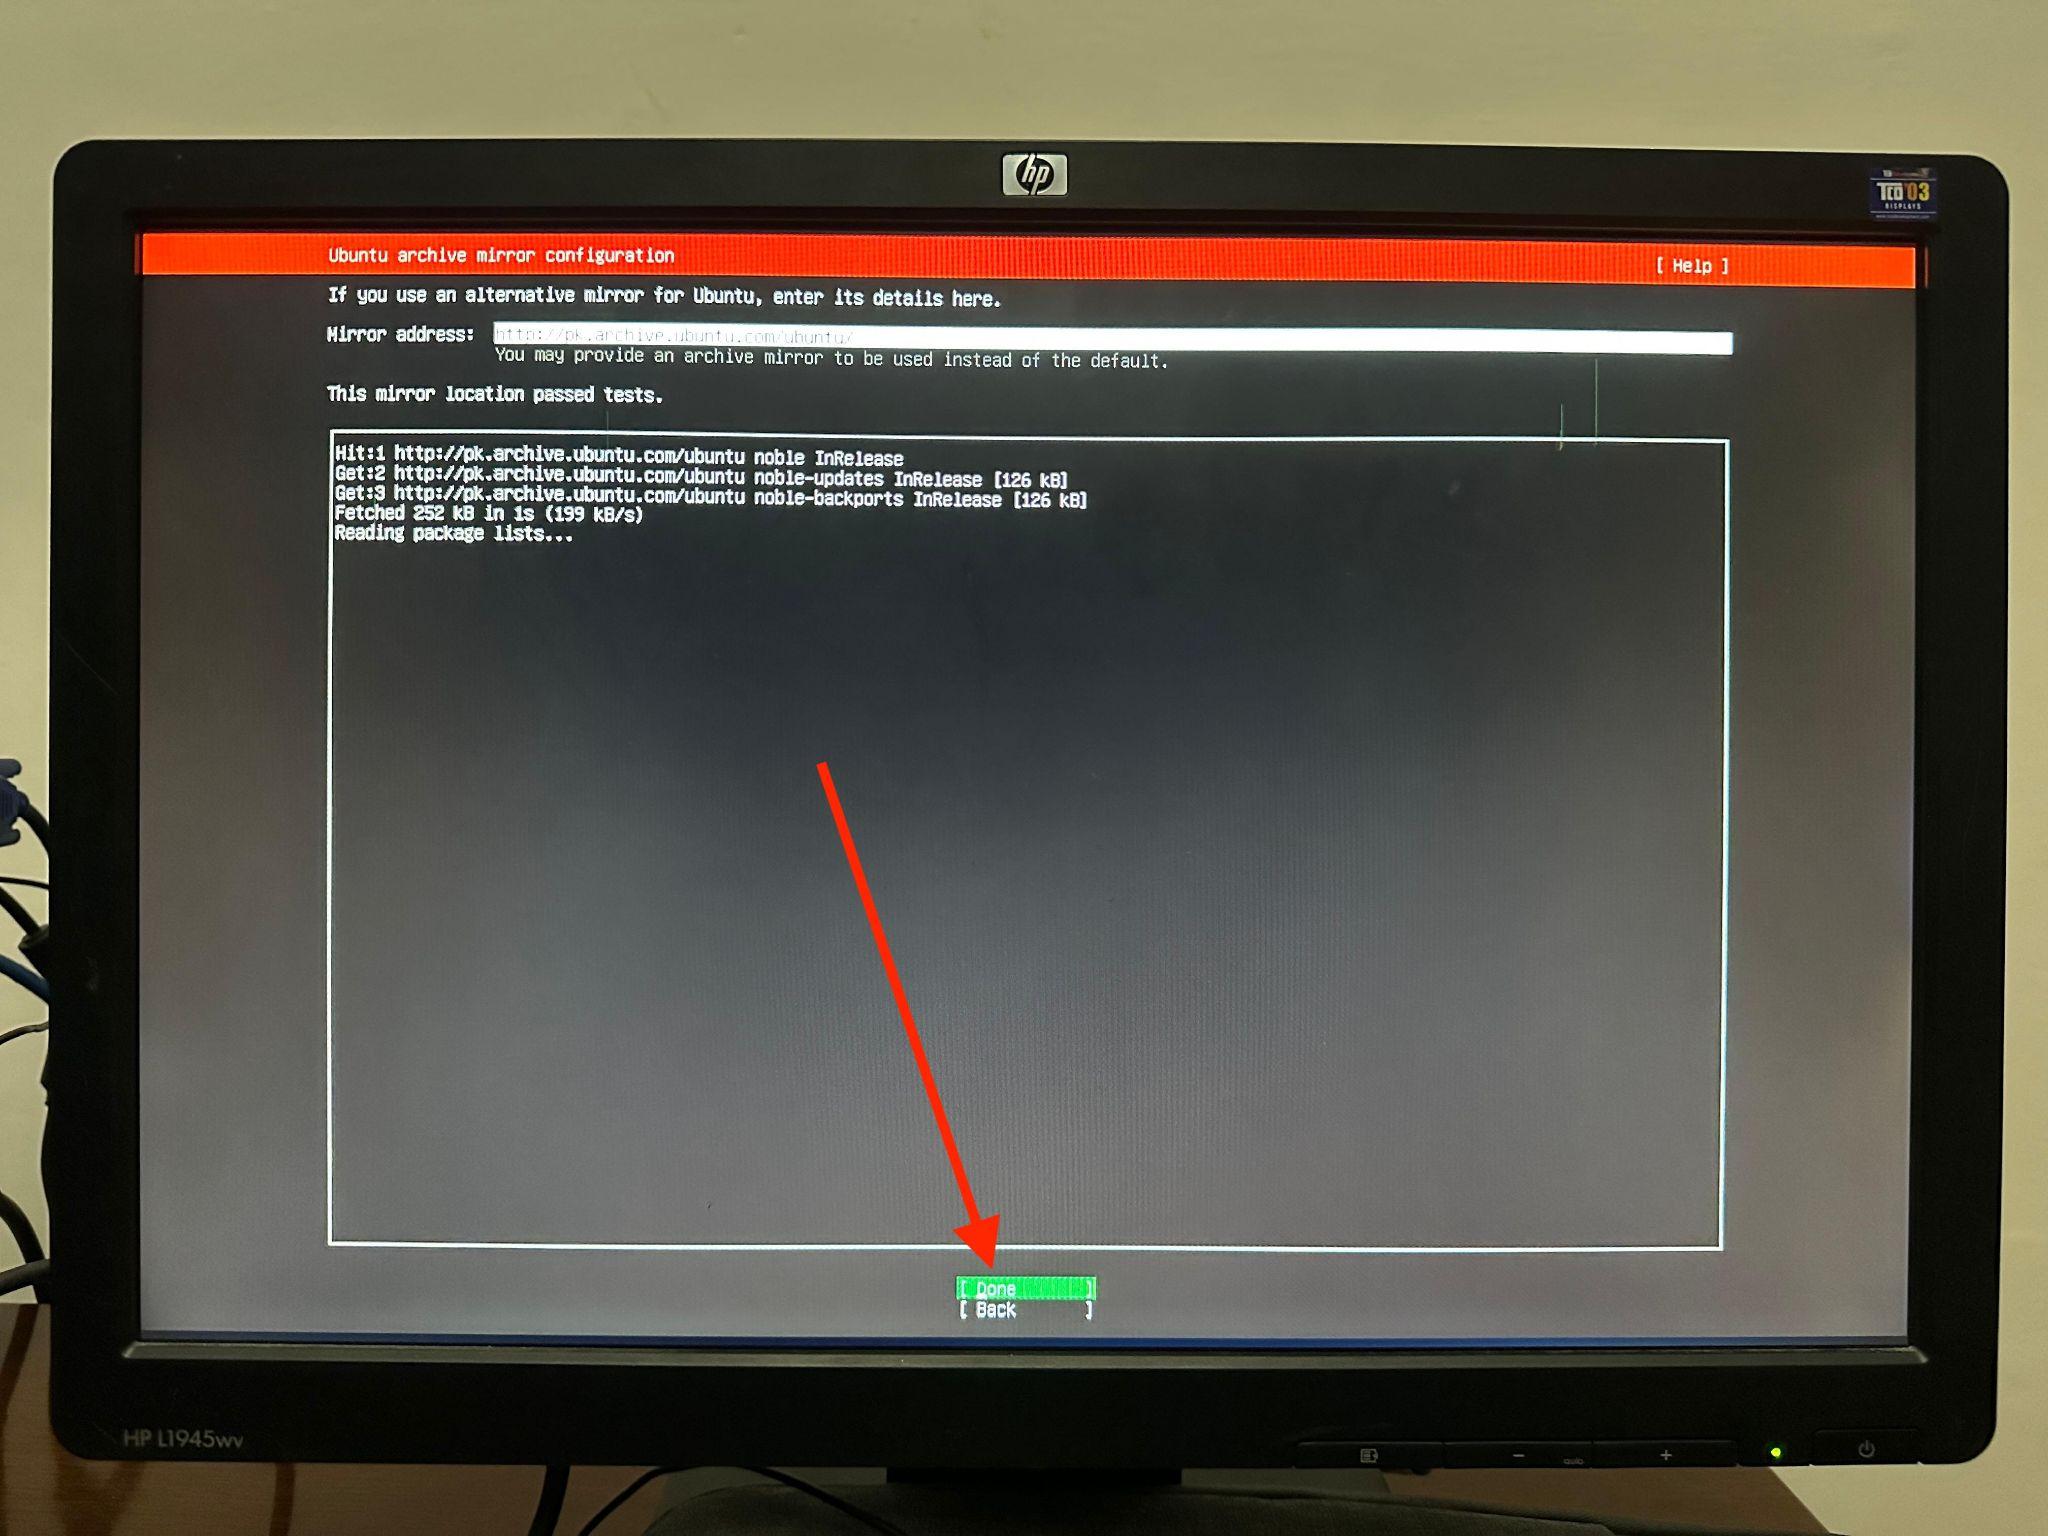
Step 10: Next is Ubuntu Archive Mirror Configuration, here just hit enter and it would automatically select the default mirror address and would fetch and install all required packages.
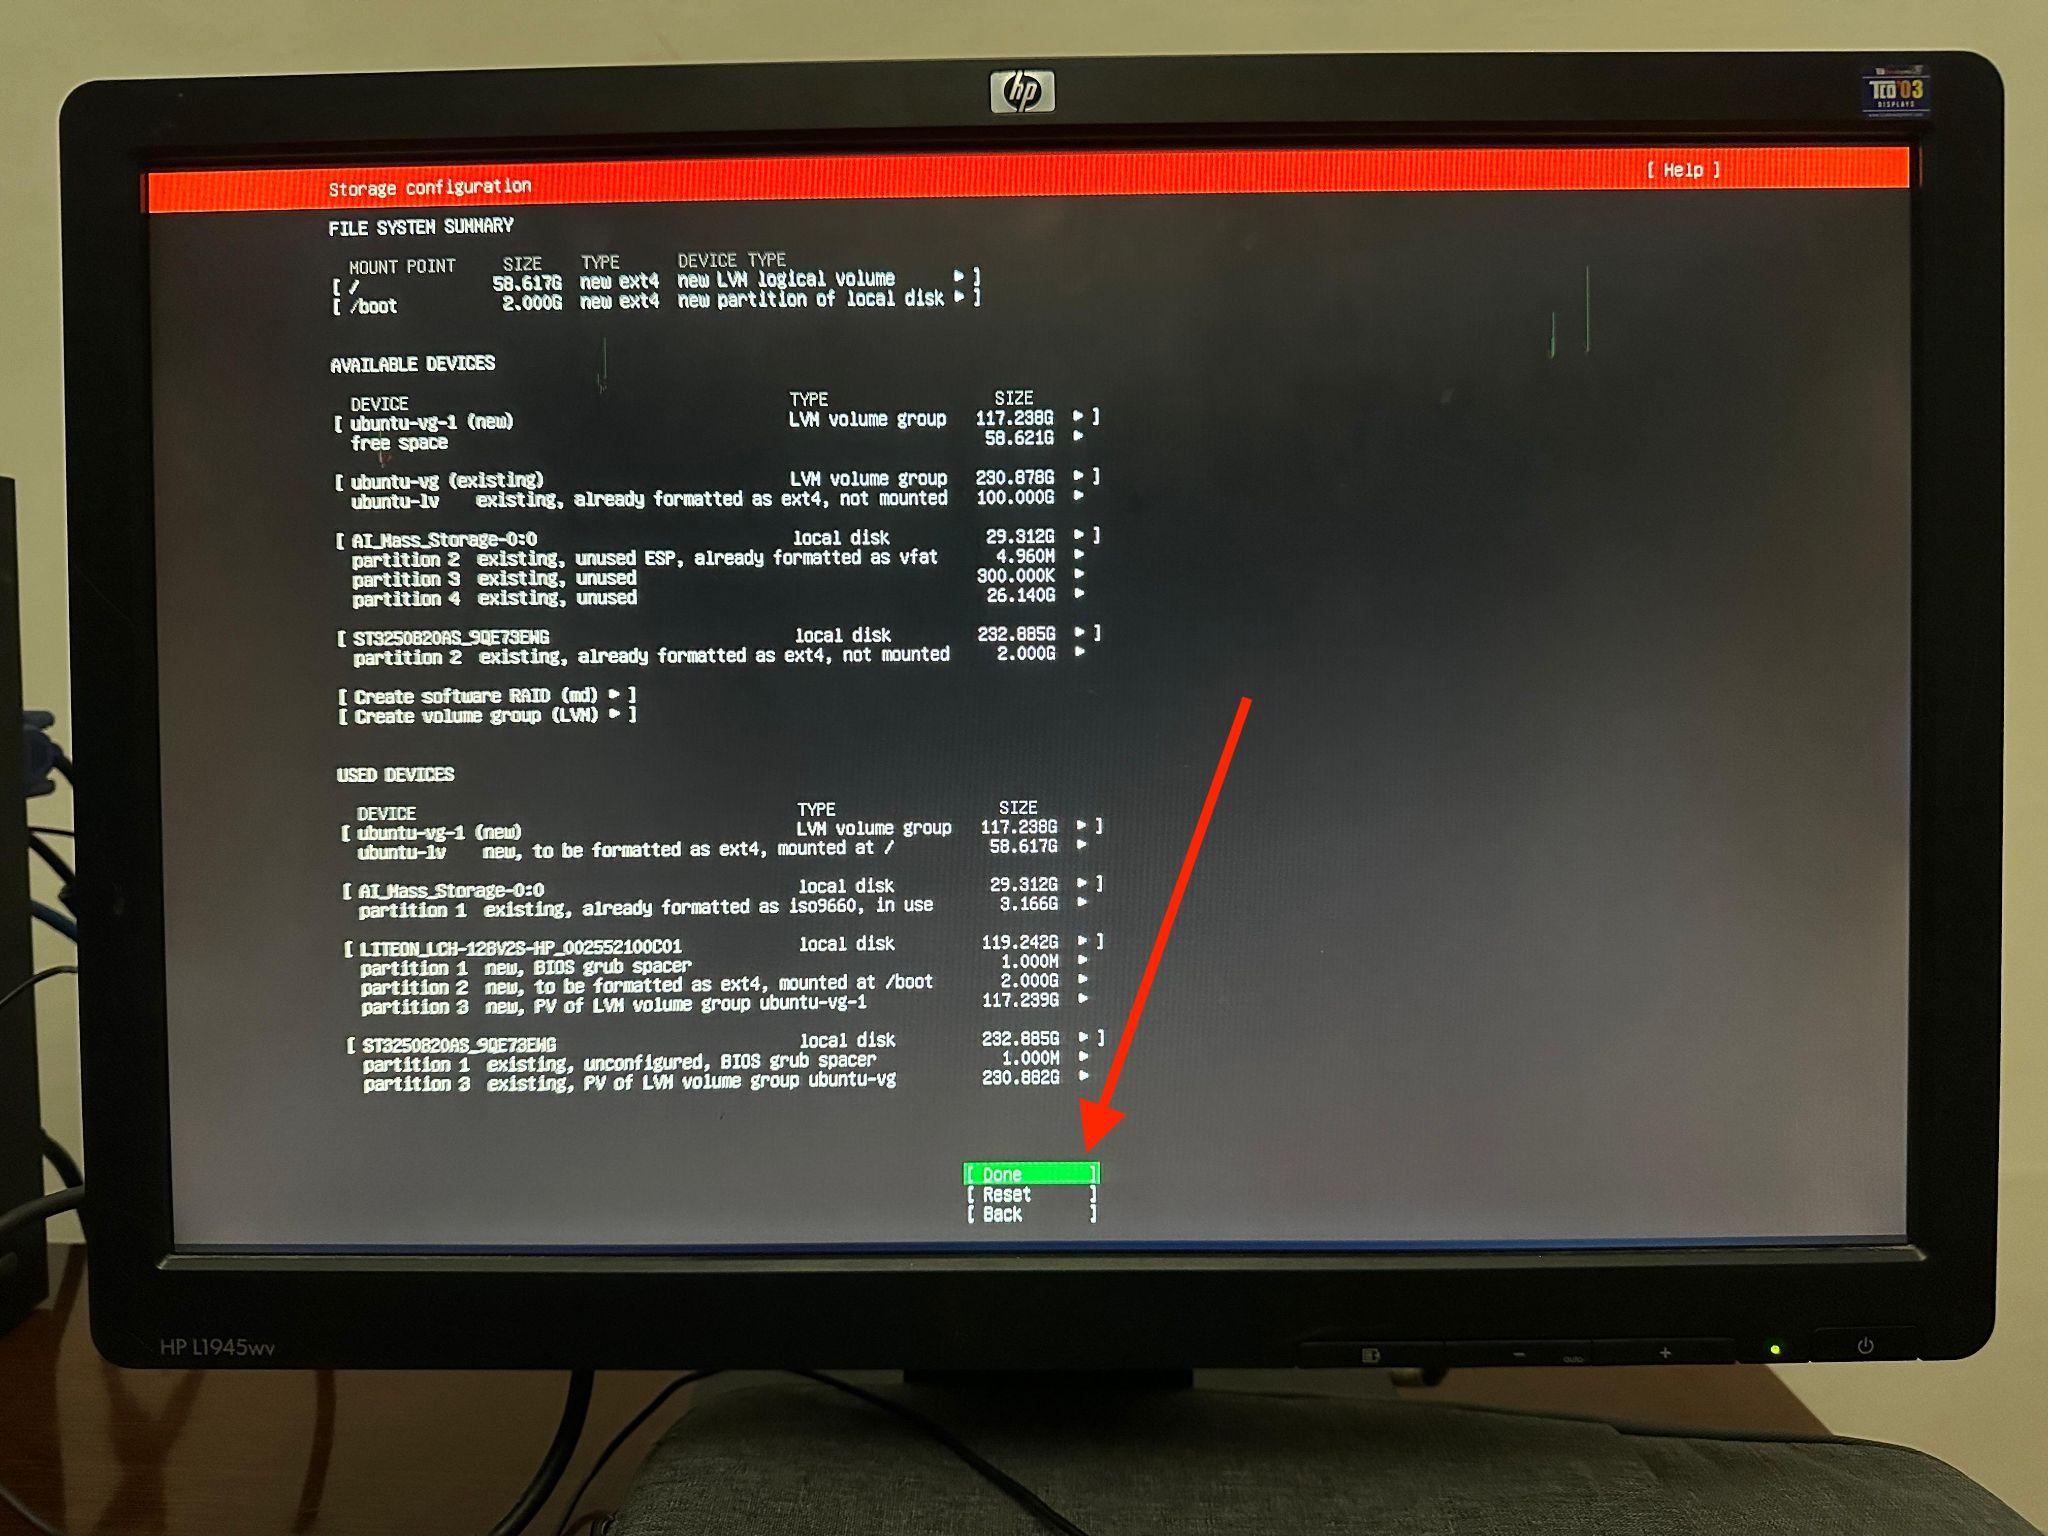
Step 11: Make sure that you do this step right. In storage configuration click on the disk space shown and you will see a drop down and in here select the disk space where you want to install Ubuntu server. I selected my SSD in my case where a corrupted Windows was already installed. After making your selection, be sure to select Done and move to the next phase.
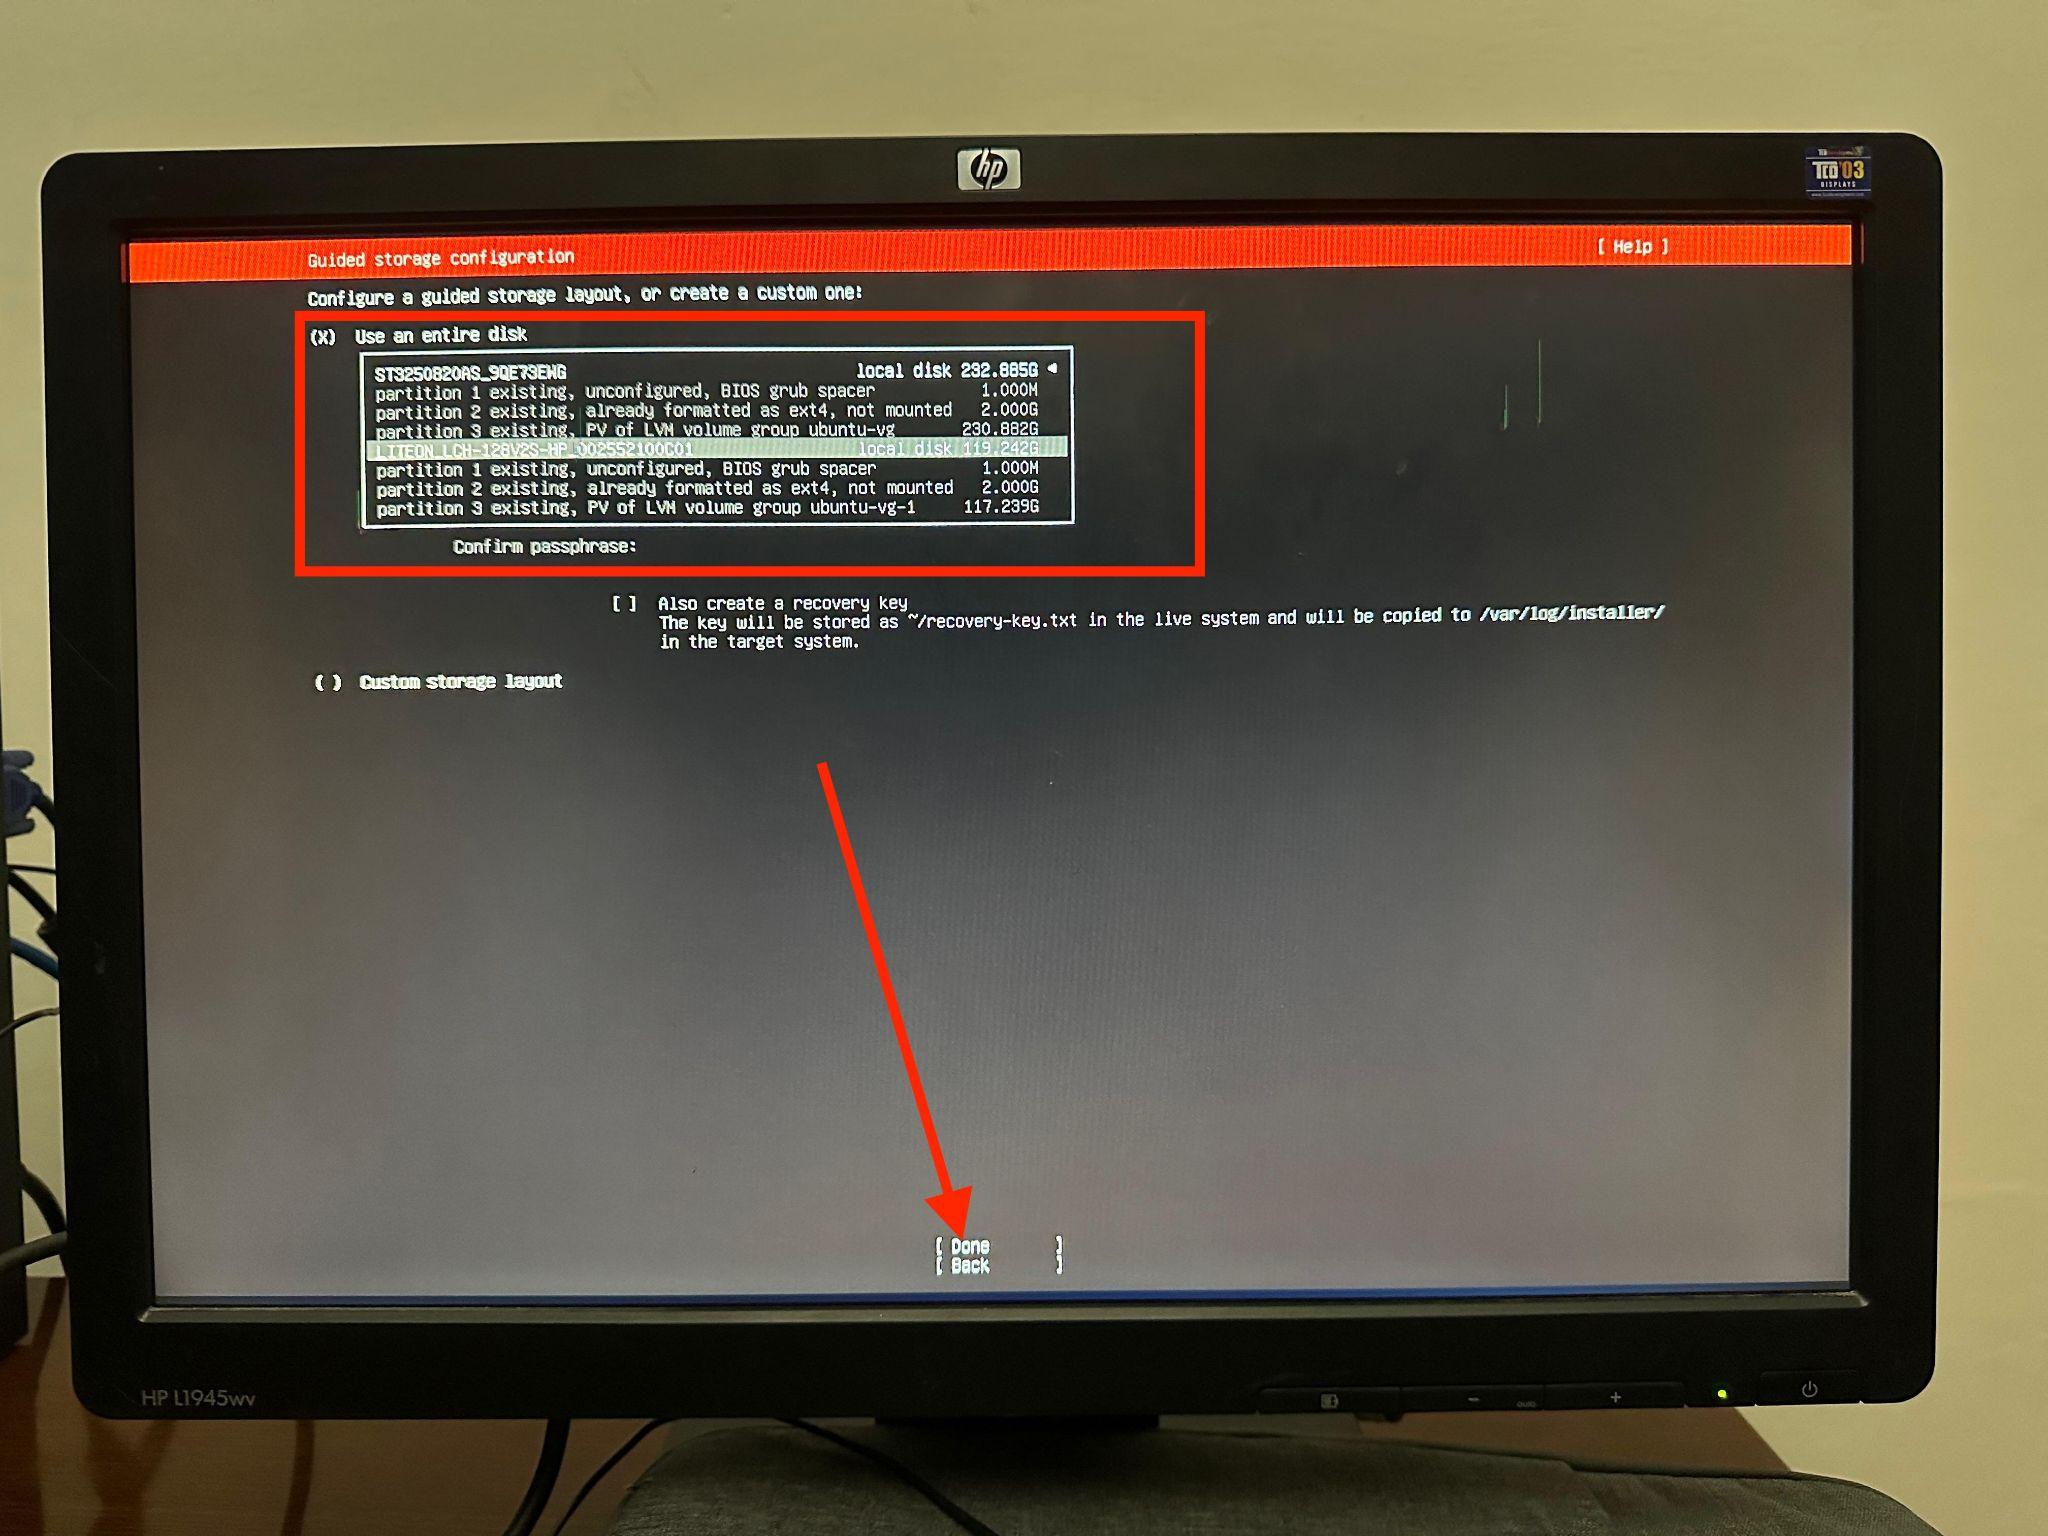
This is the final step where the Ubuntu server will erase your entire data and create a partition on the selected disk space so make sure you have selected the right one and then select Done.
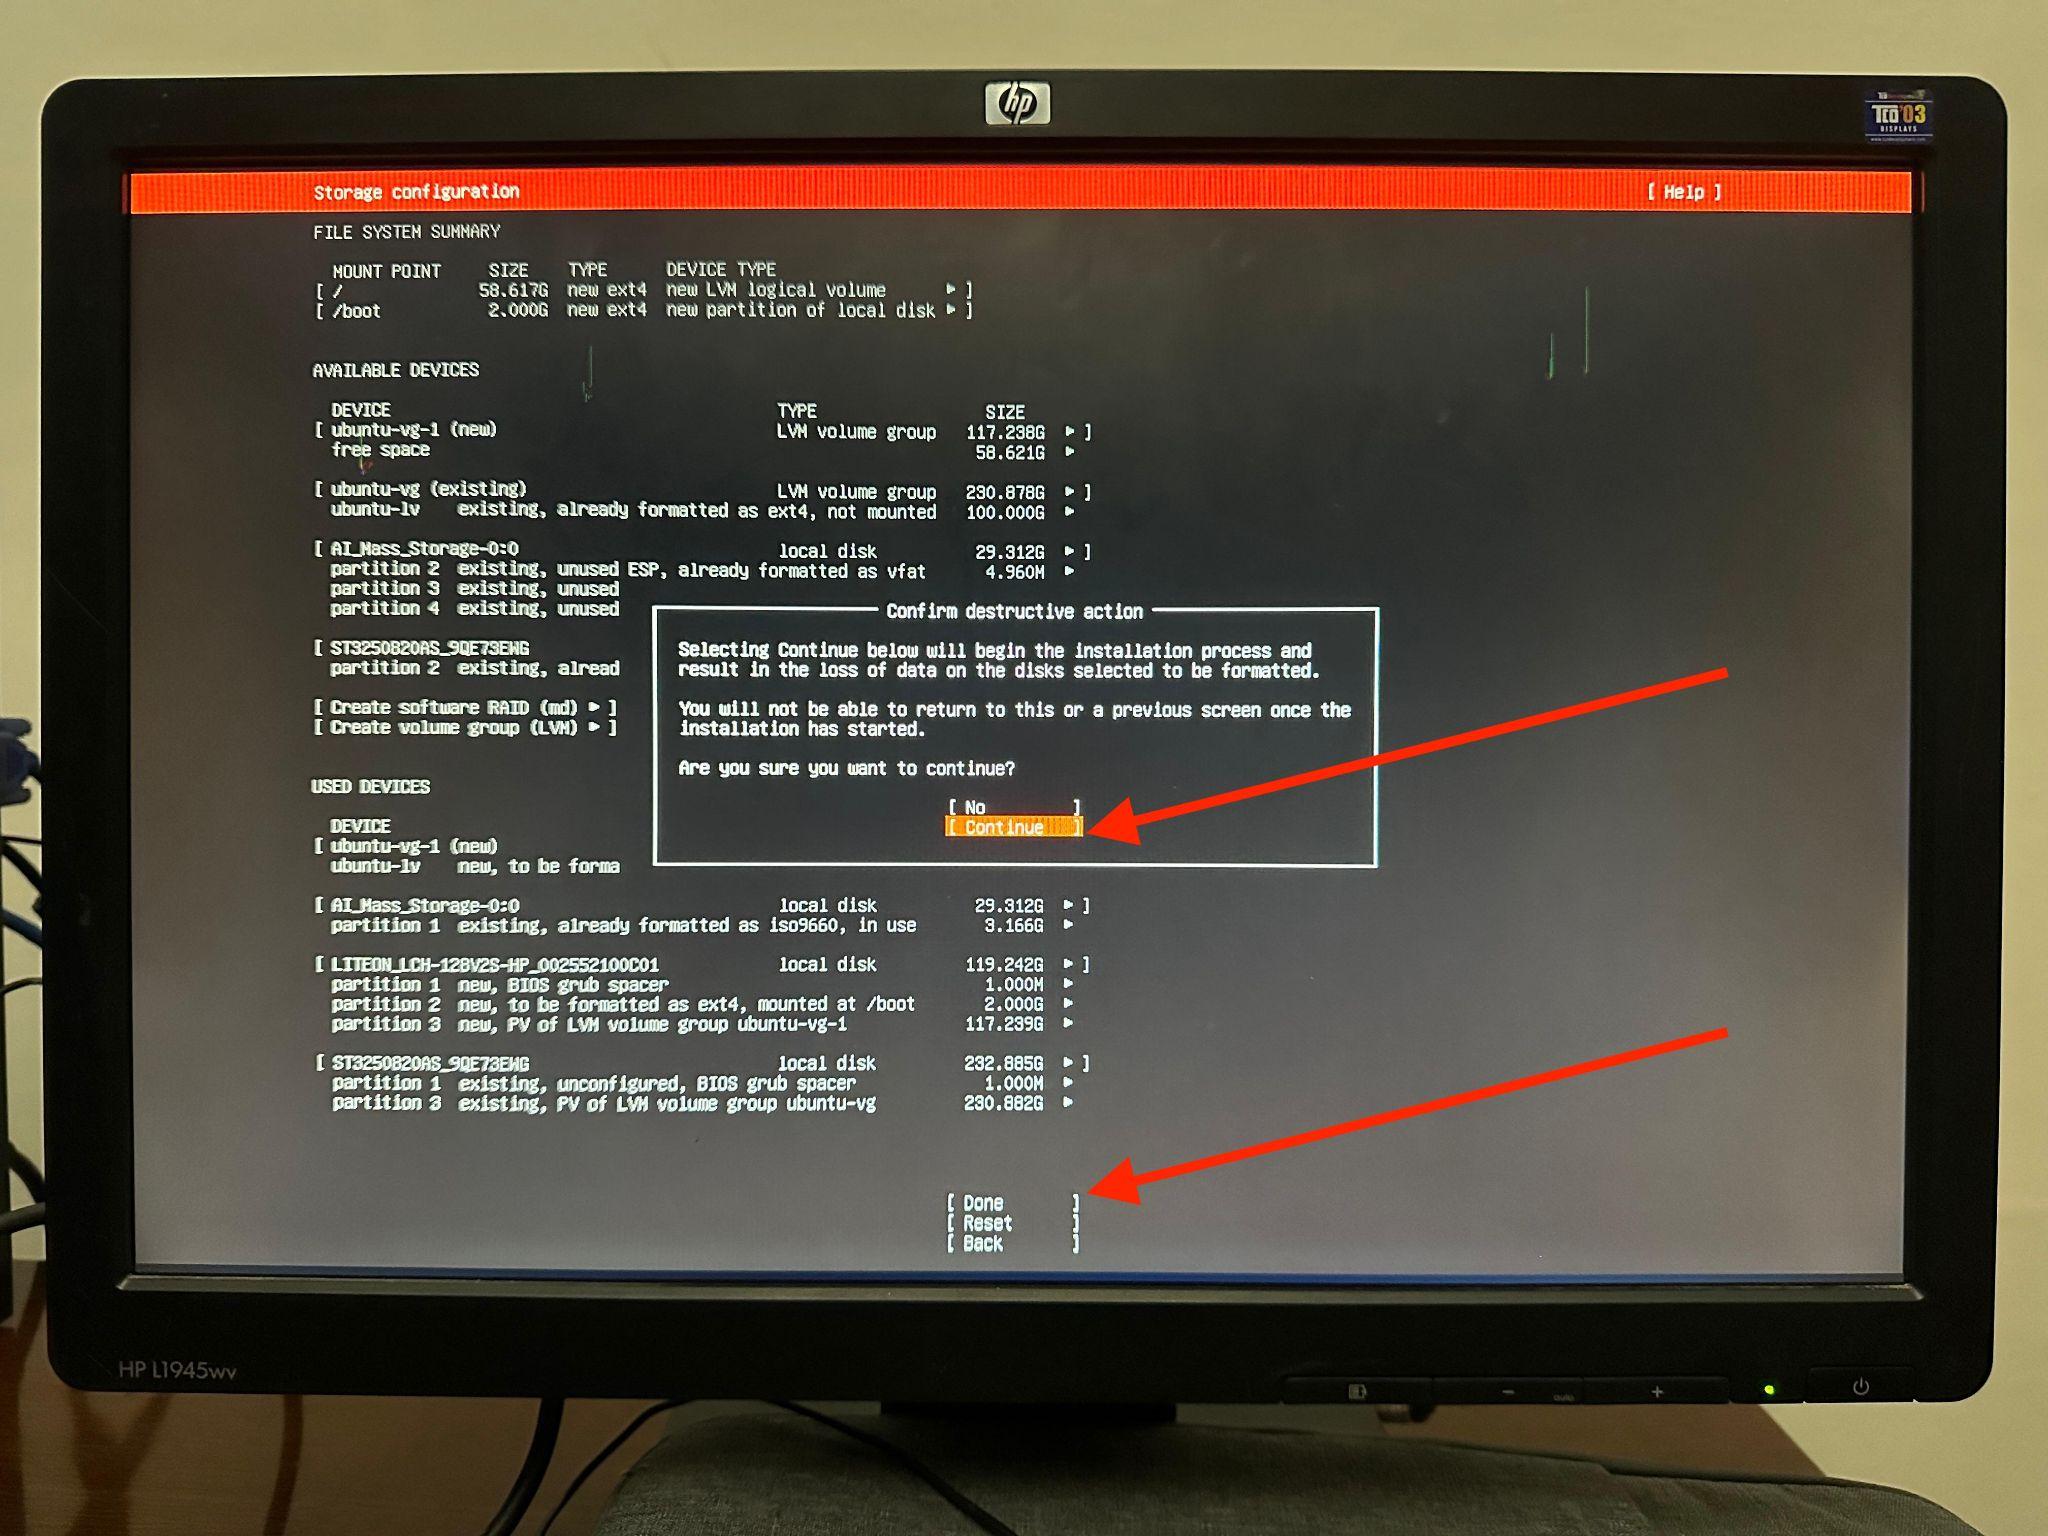
A pop up will appear telling you that it’s a destructive action and if you want to continue? You should select Continue and then Done.
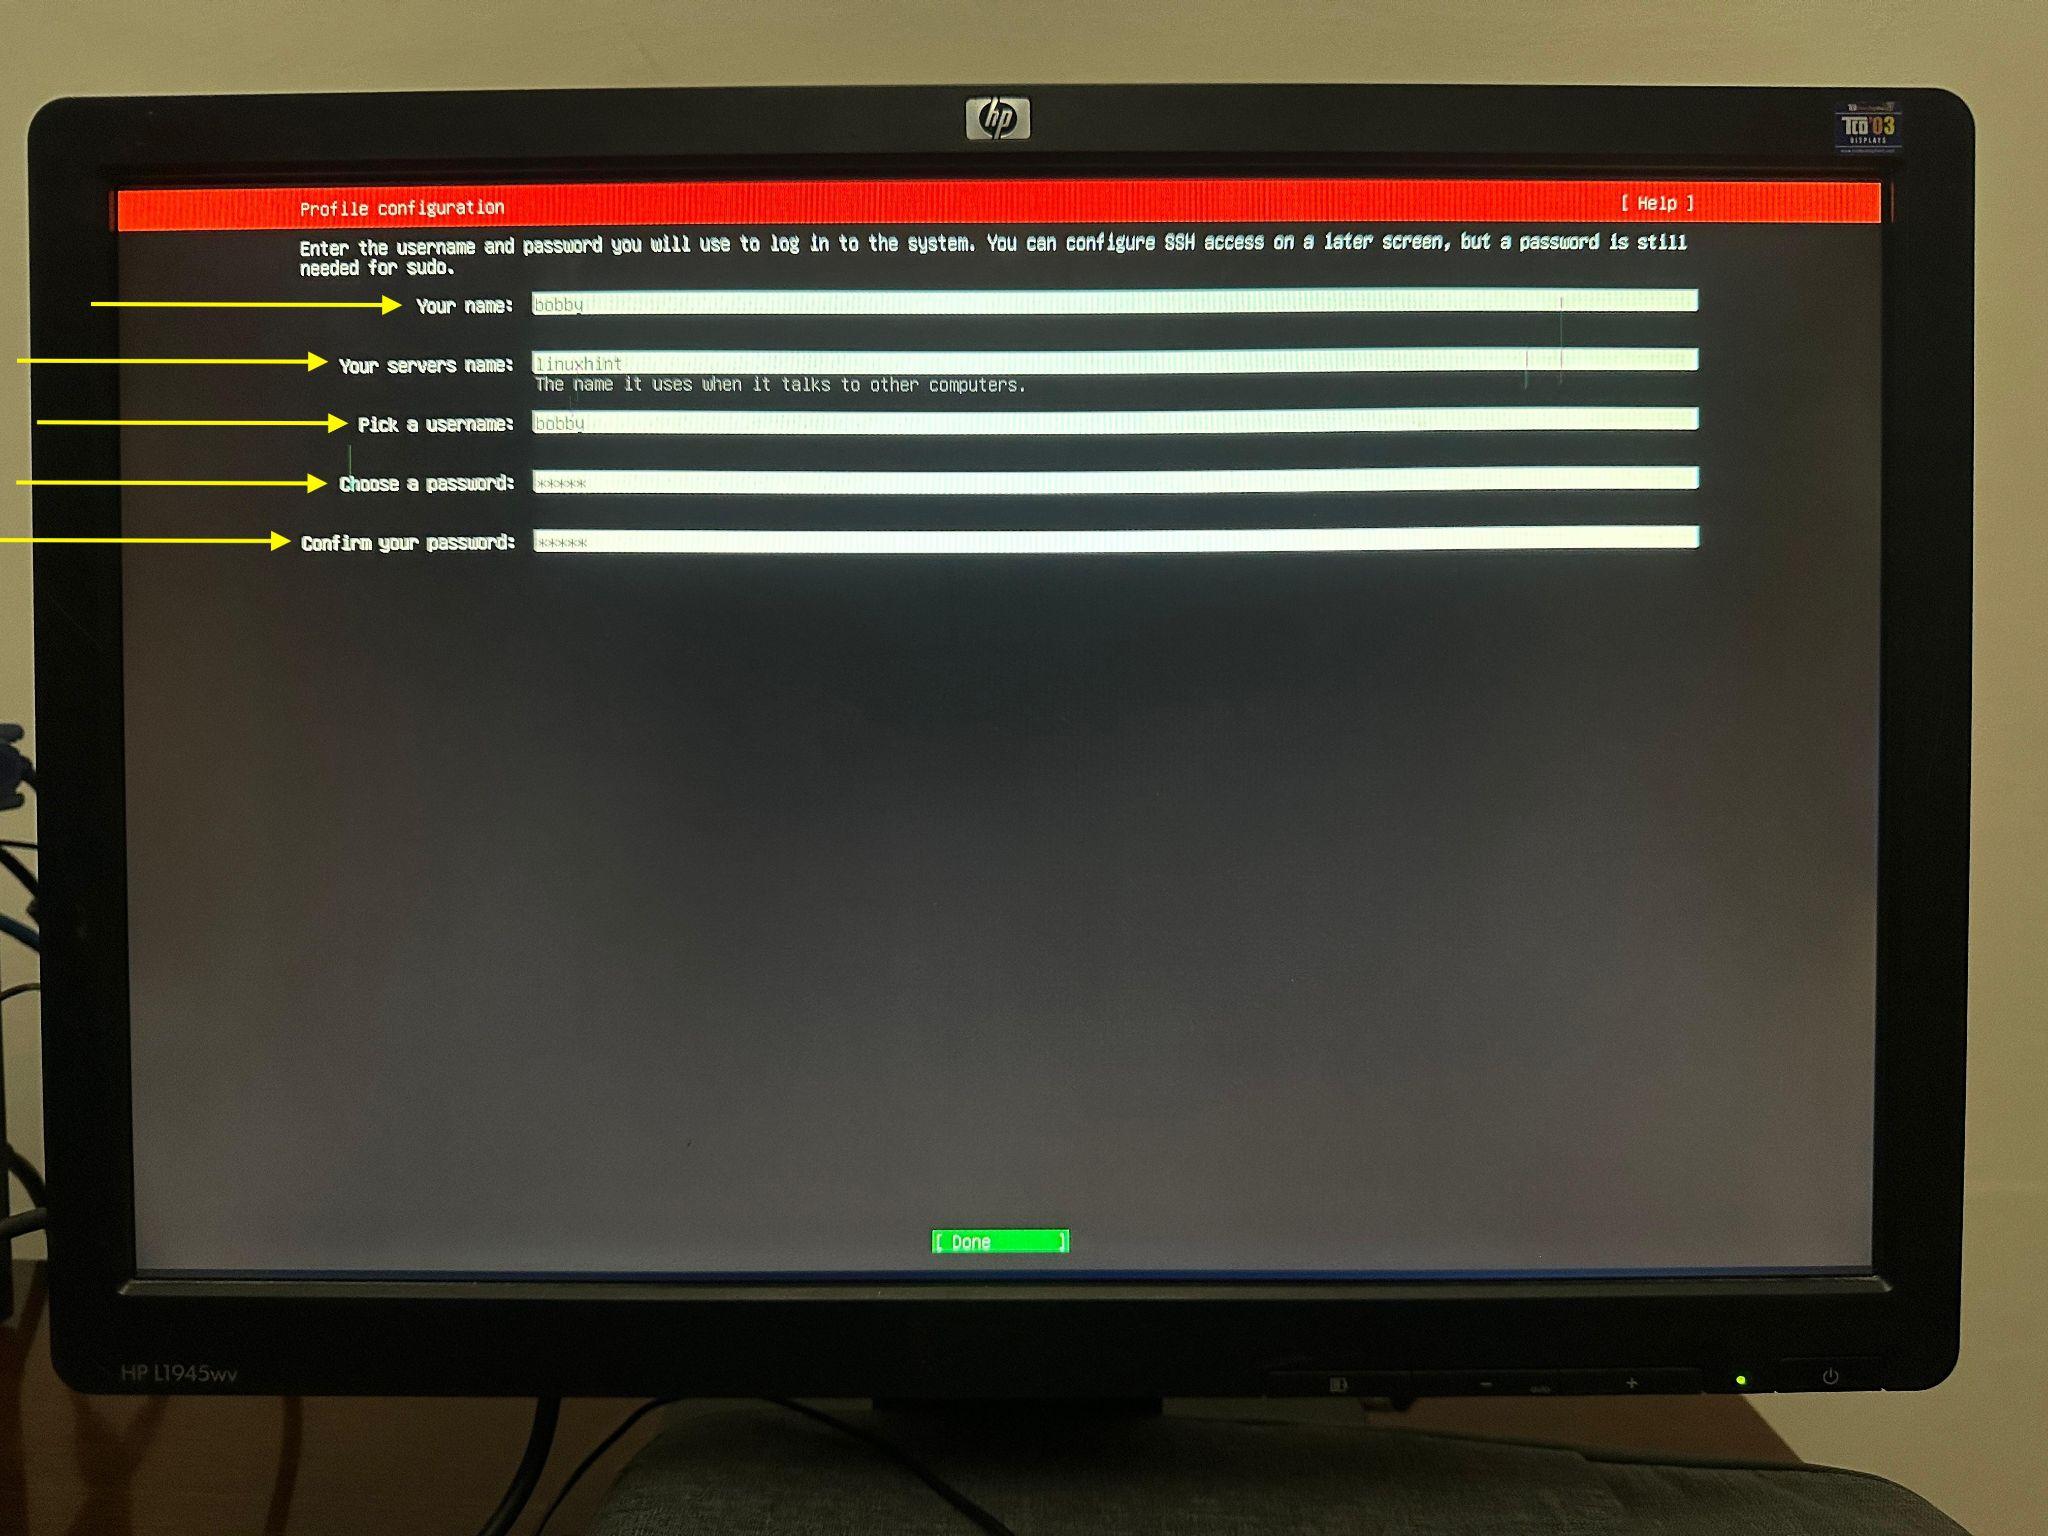
Step 12: Add your name, your servers name, your username and password.
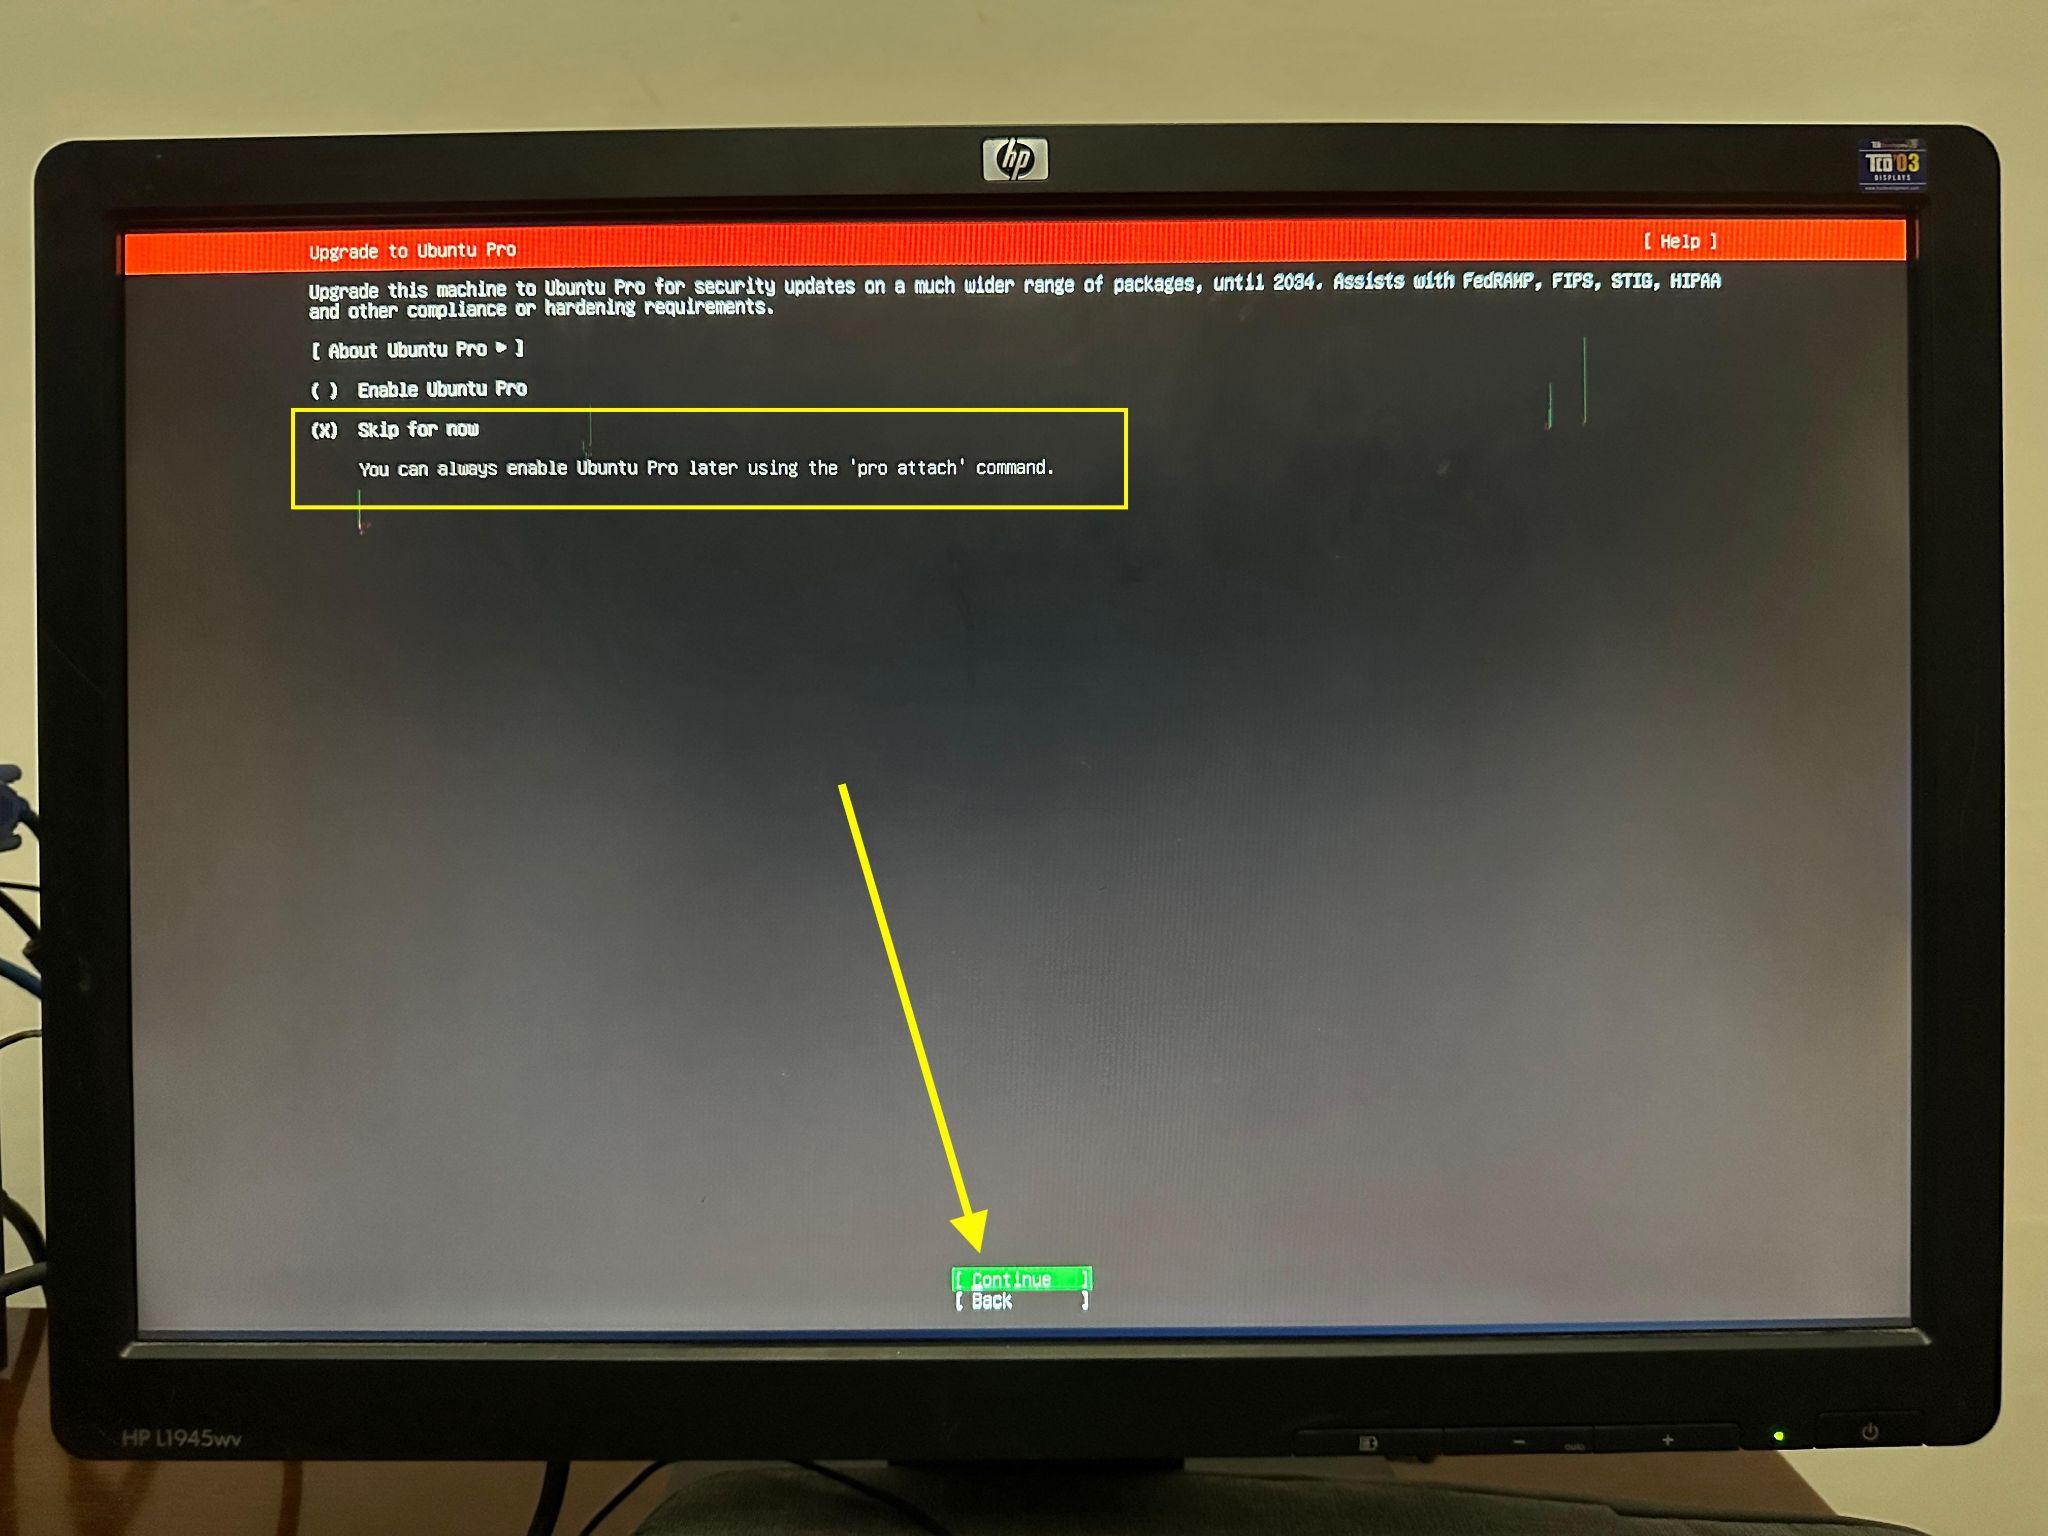
Step 13: In this step, it will ask you if you want to upgrade to Ubuntu Pro? In most cases, you might not need that, so just select “Skip for now” and select Continue.
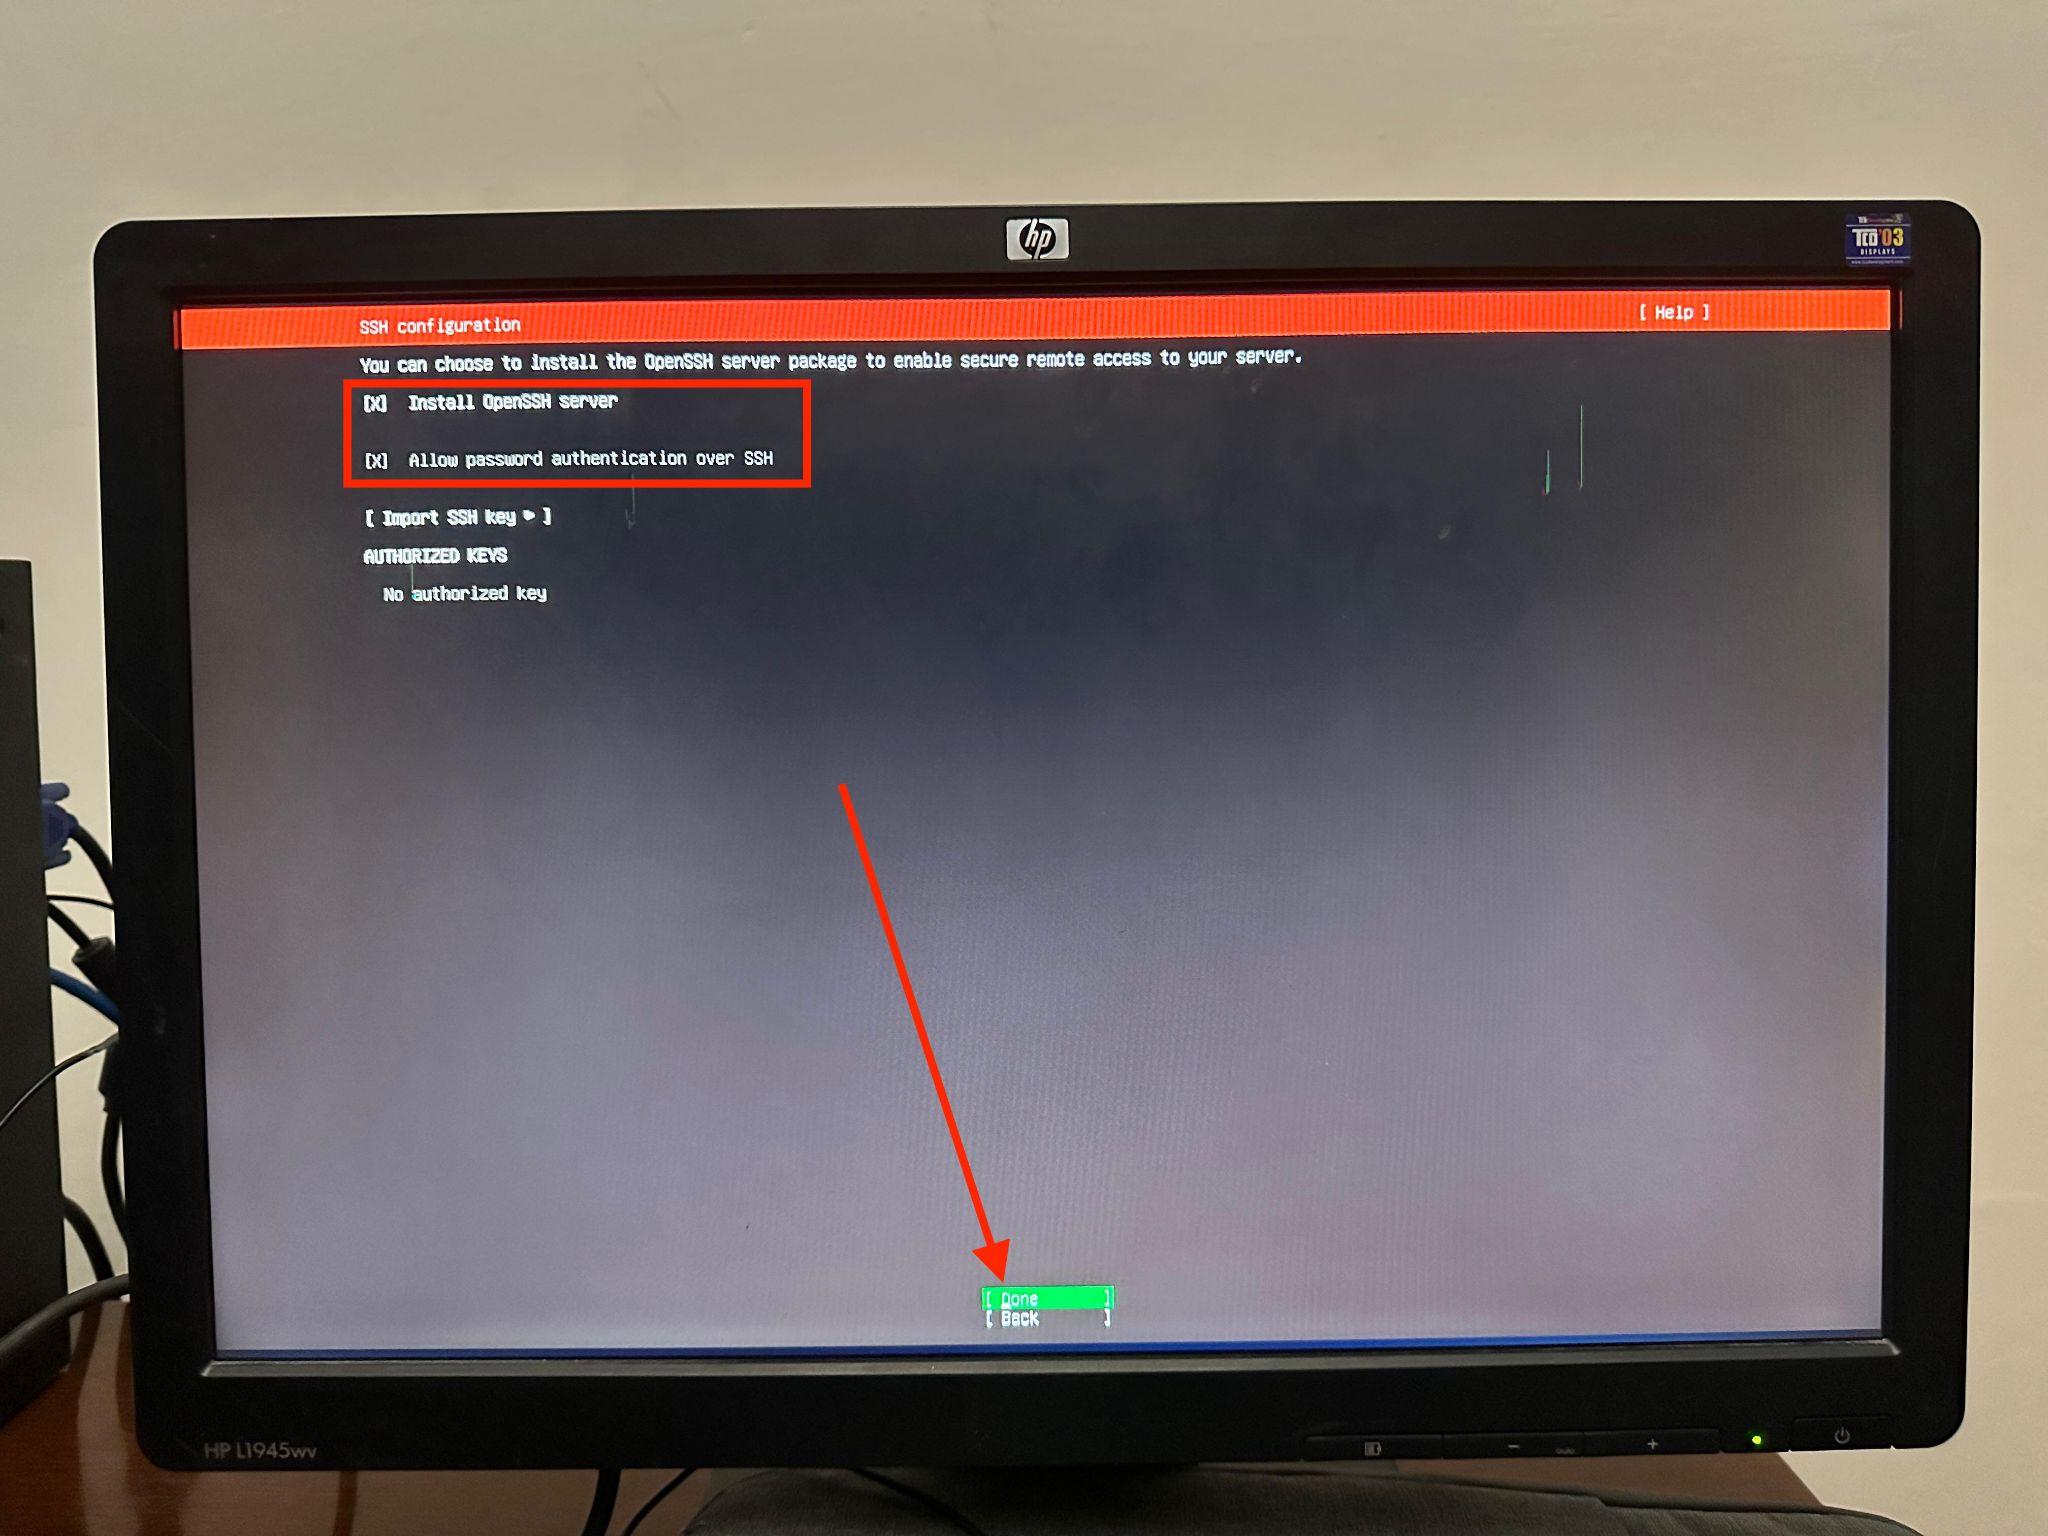
Step 14: Make sure your mark the selection for both Install OpenSSH server and Allow password based authentication options and then select Done.
Step 15: After Installation of OpenSSH server, it will install some more packages and it would take some time to do that. Once done, you will see the option to Reboot, just select that option Reboot now.
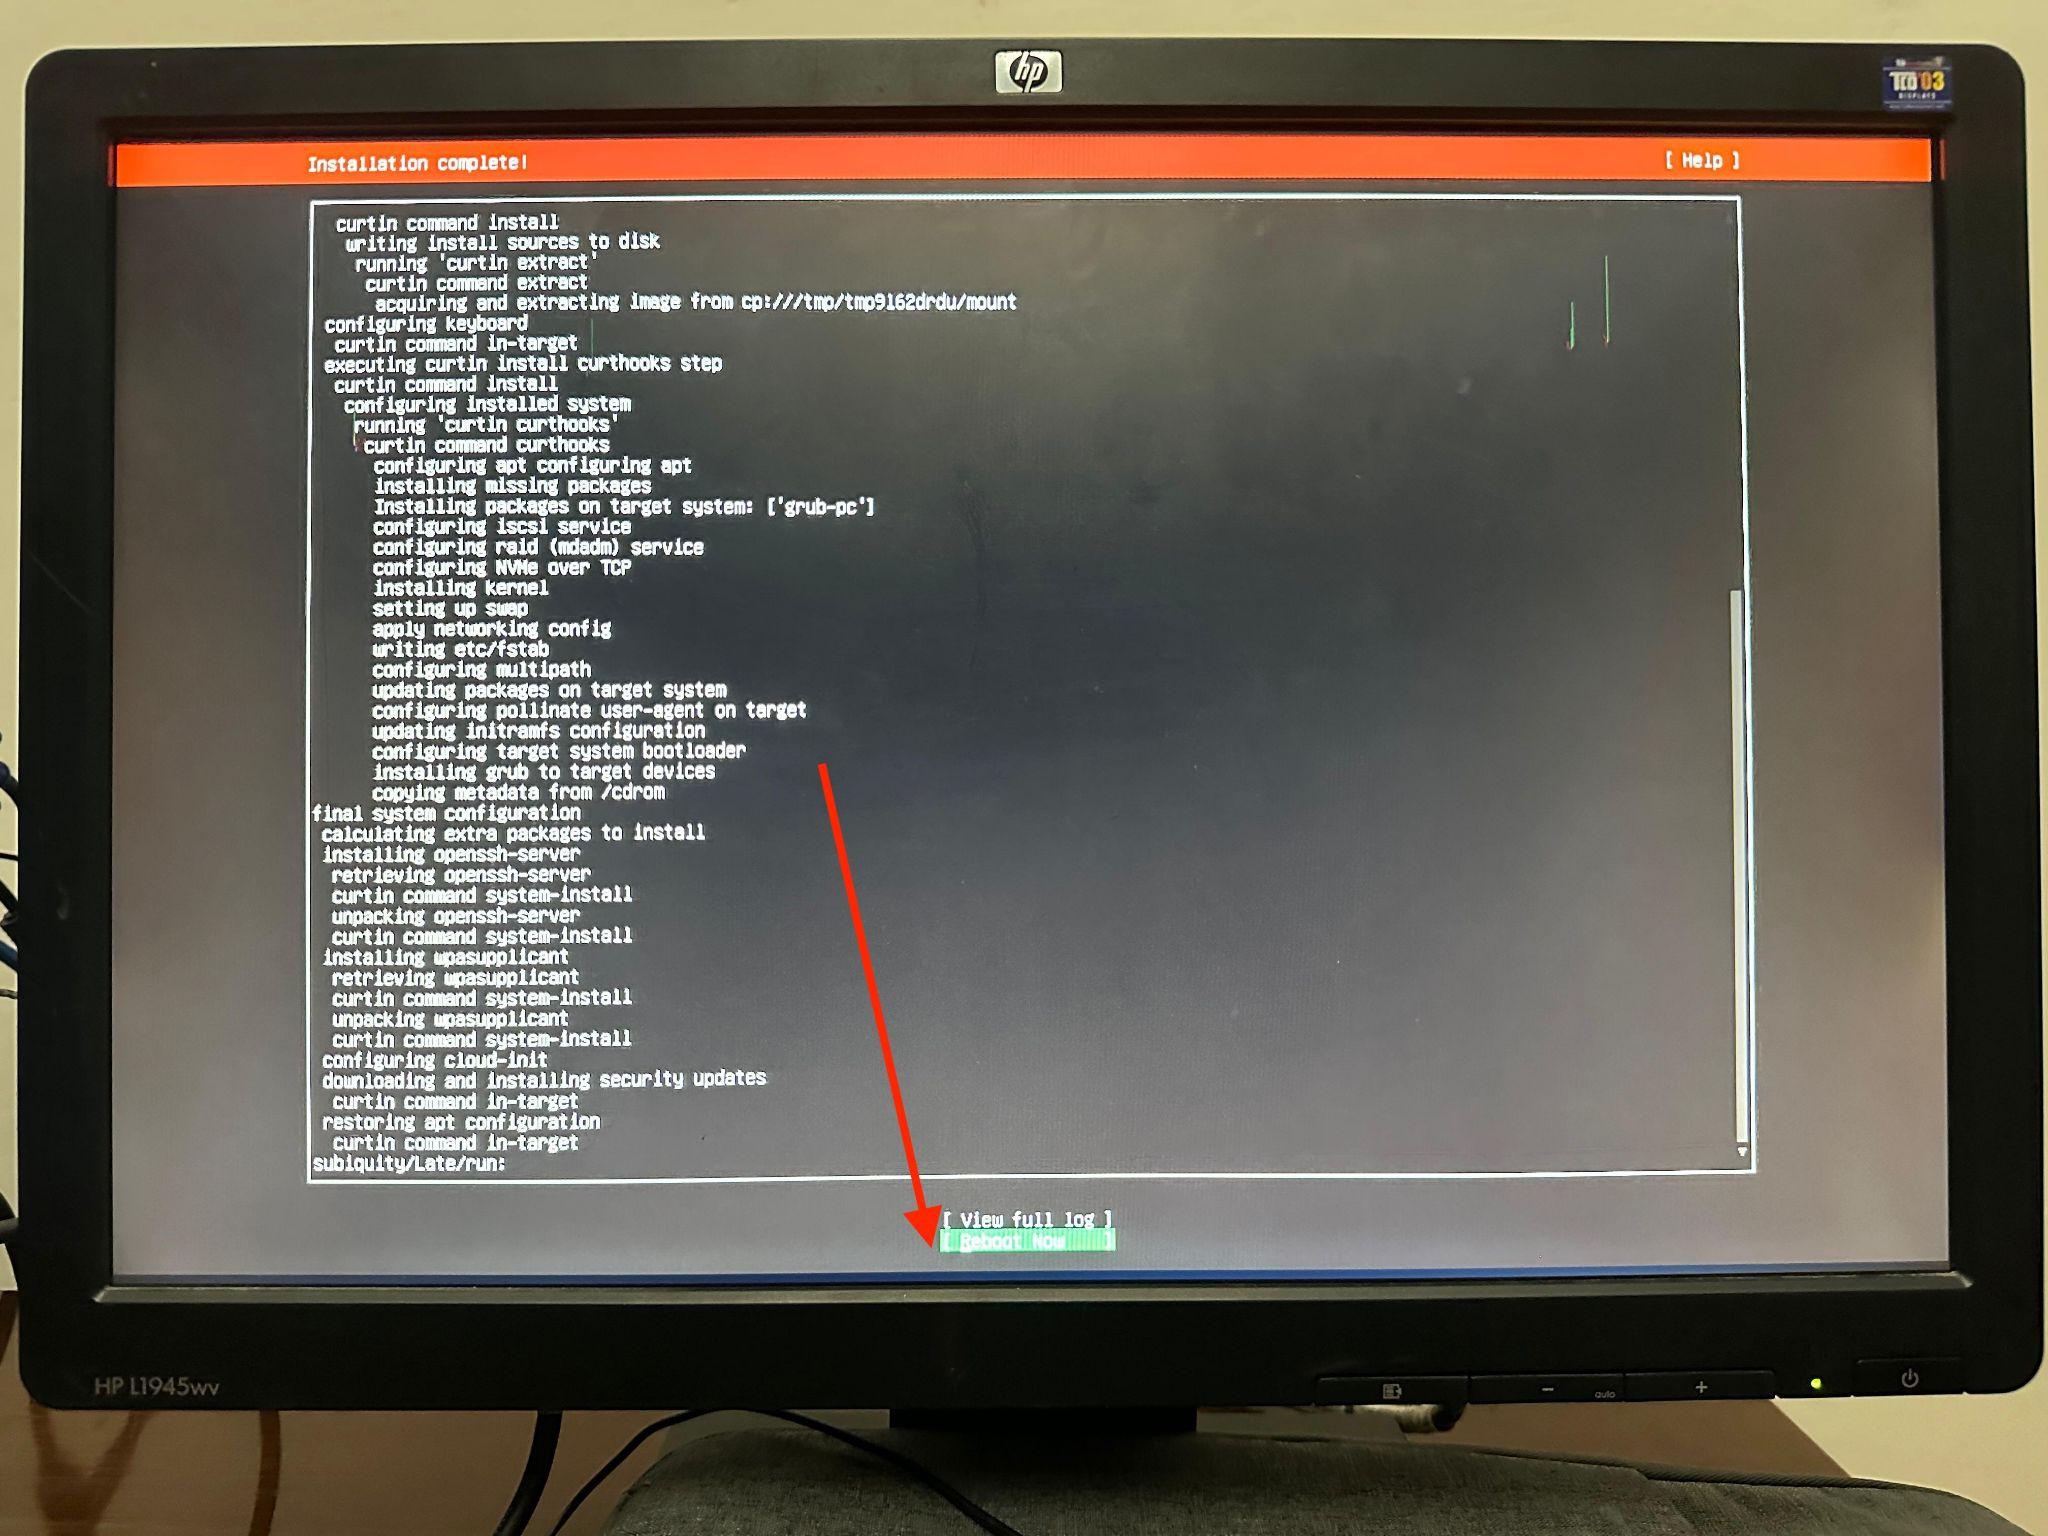
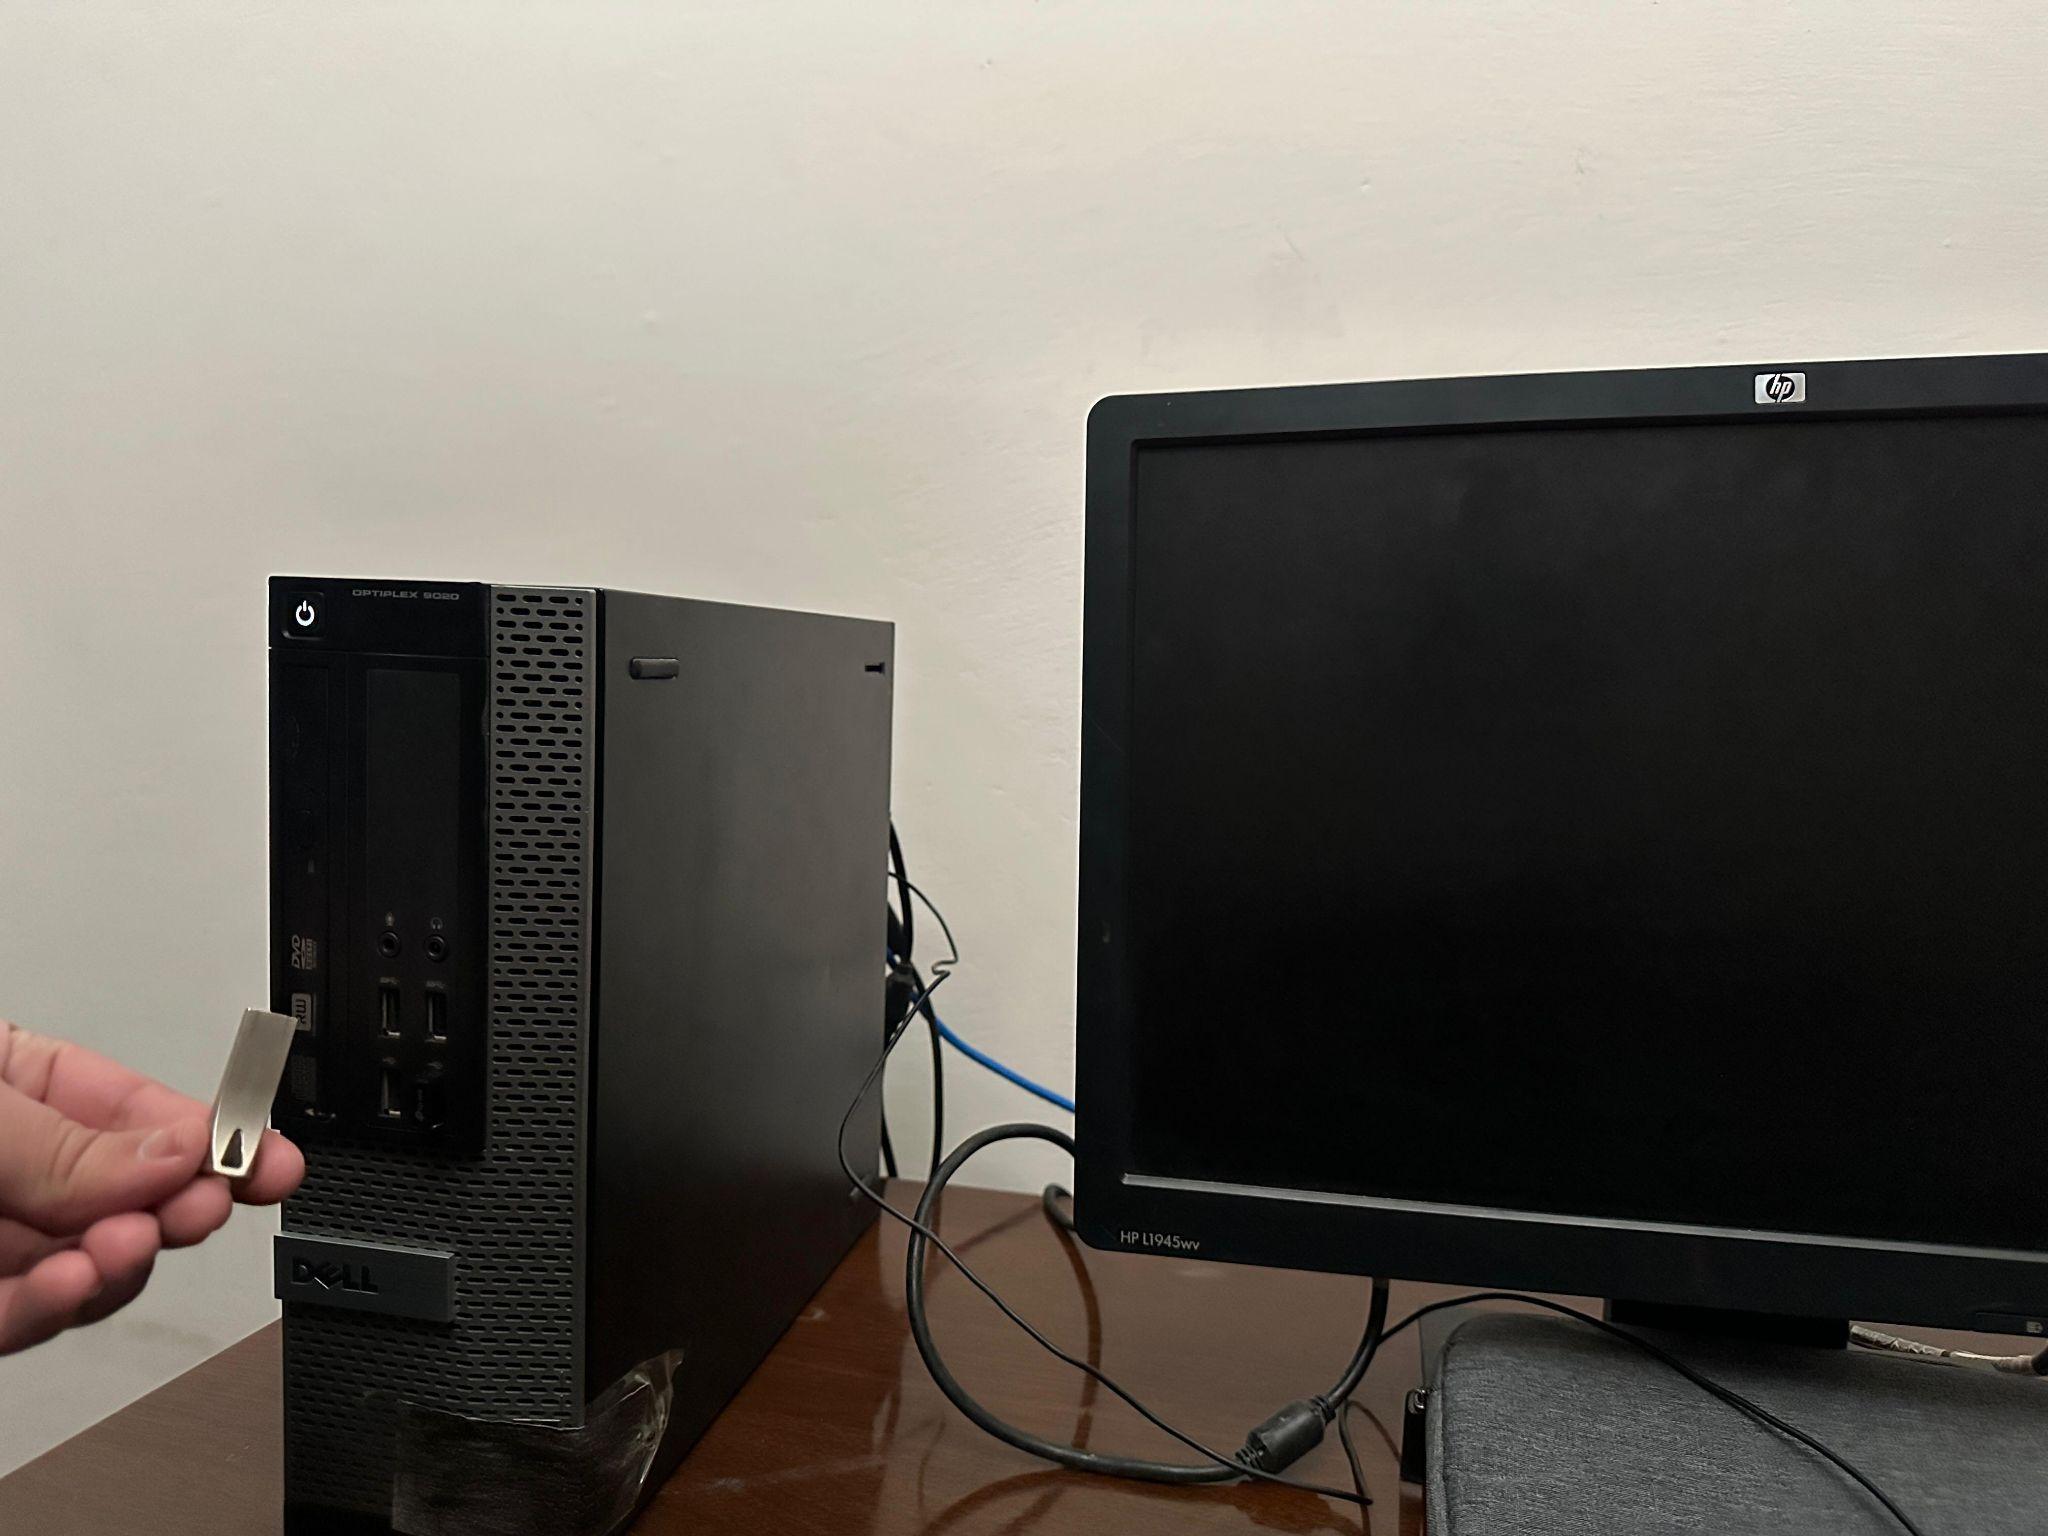
Make sure to remove the USB immediately afterwards.
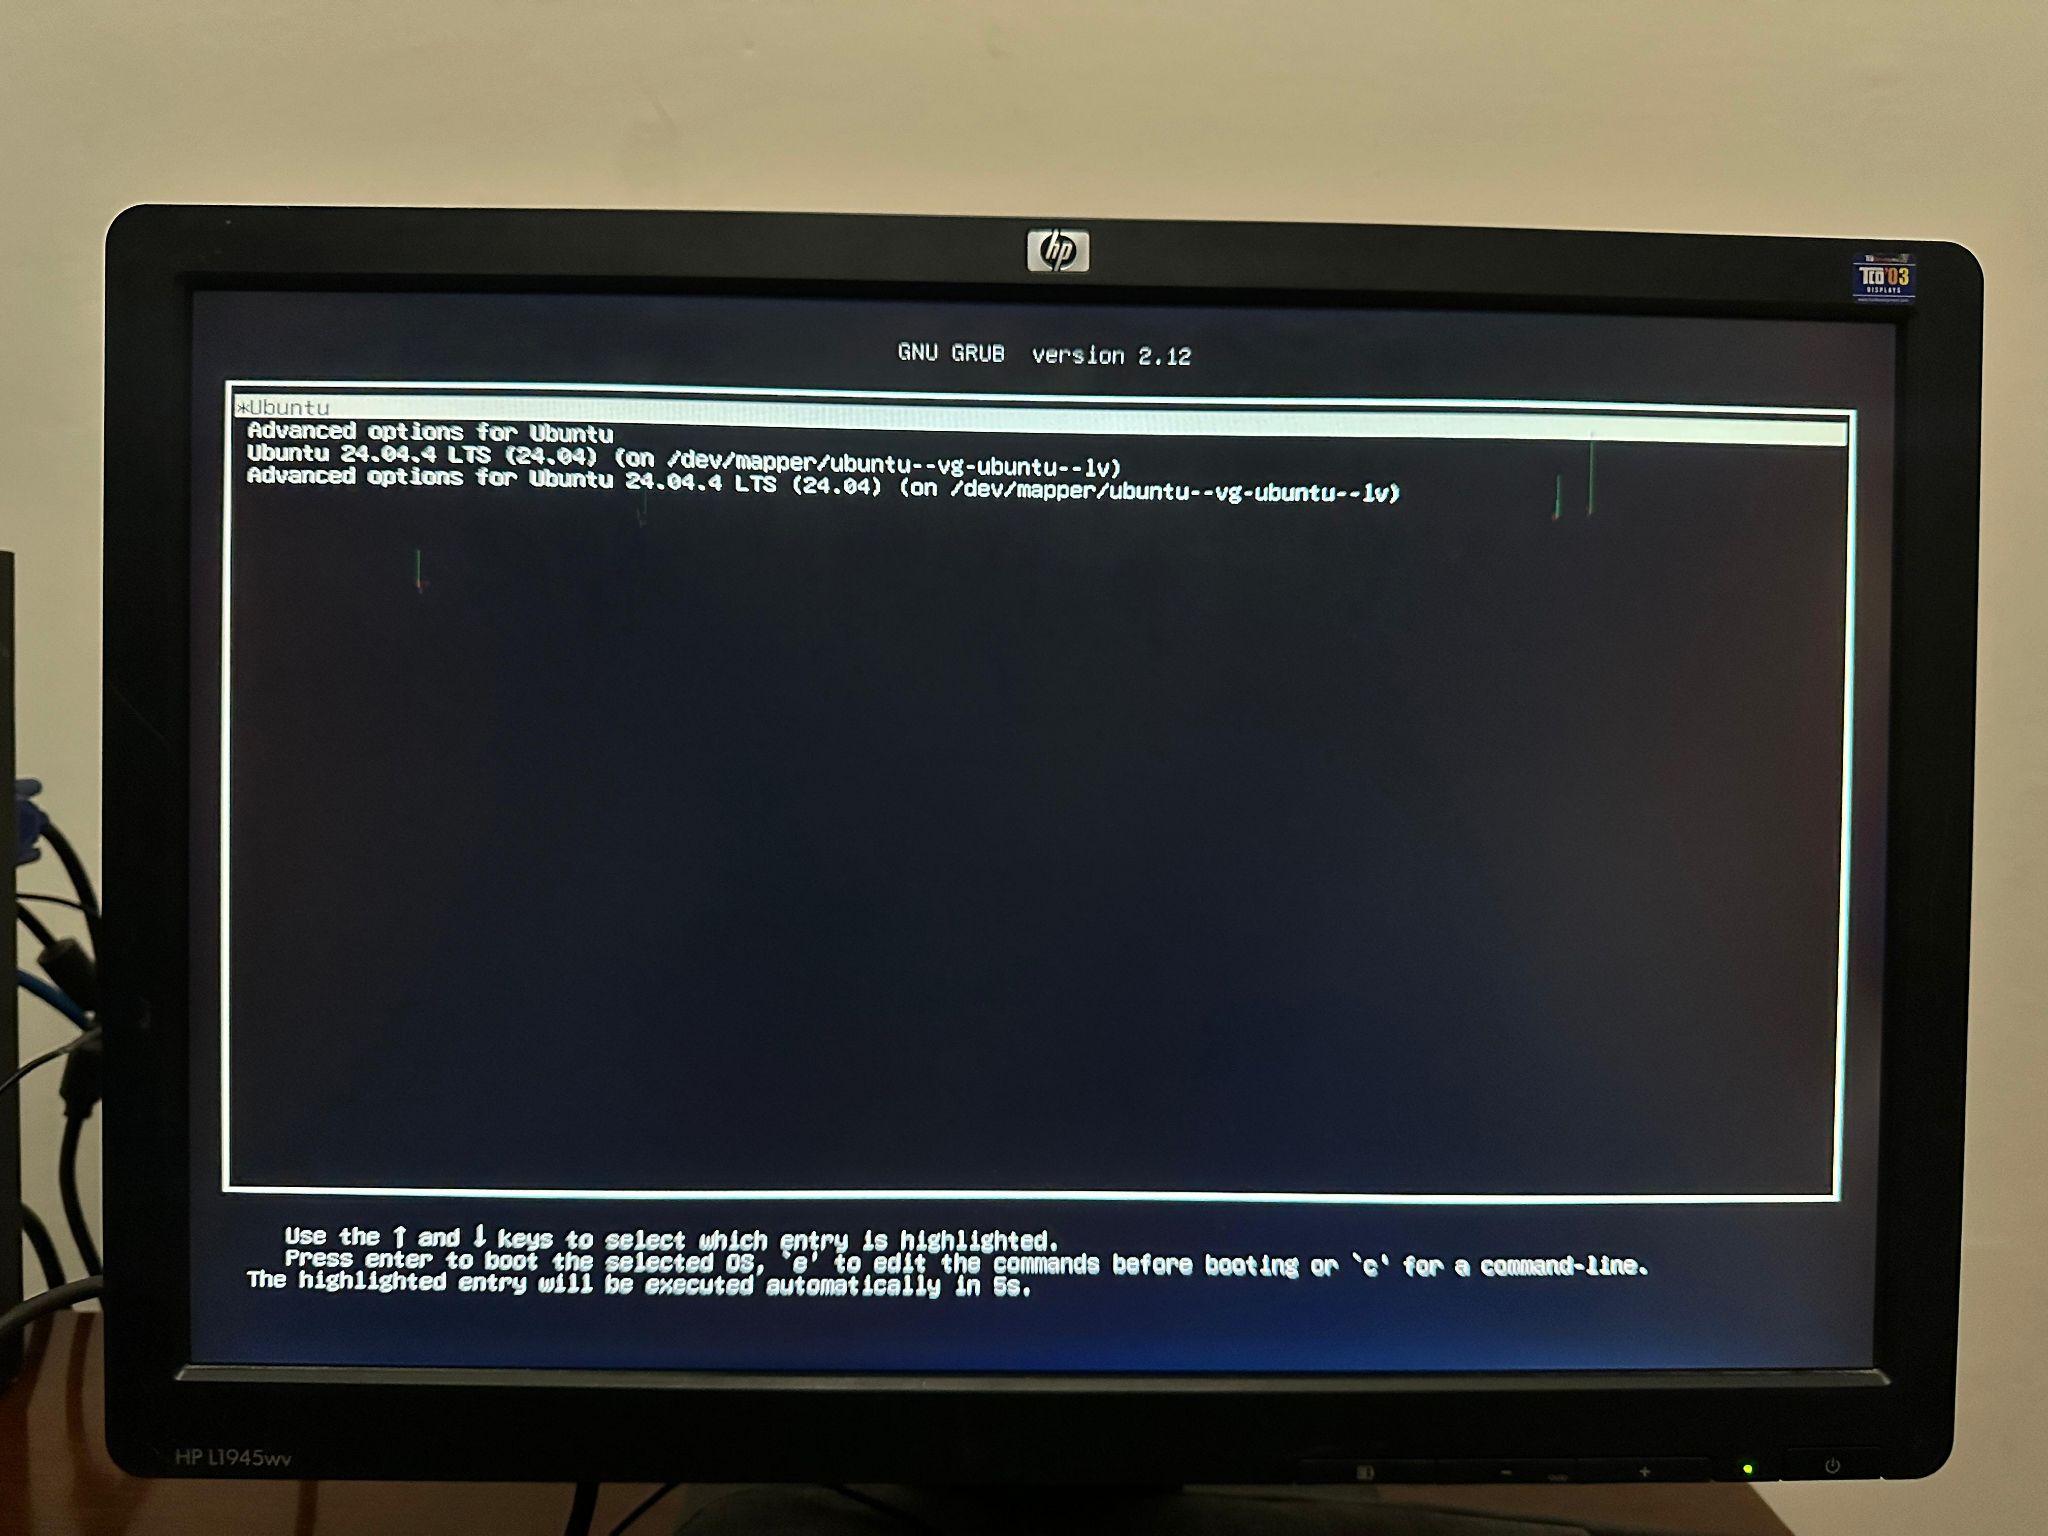
Step 16: Let Ubuntu server Reboot and you will see options like these, select Ubuntu on the top and now your server will be ready shortly.
Step 17: Just enter your username and password and it would give your machine’s IP address on the screen when you login for the very first time.
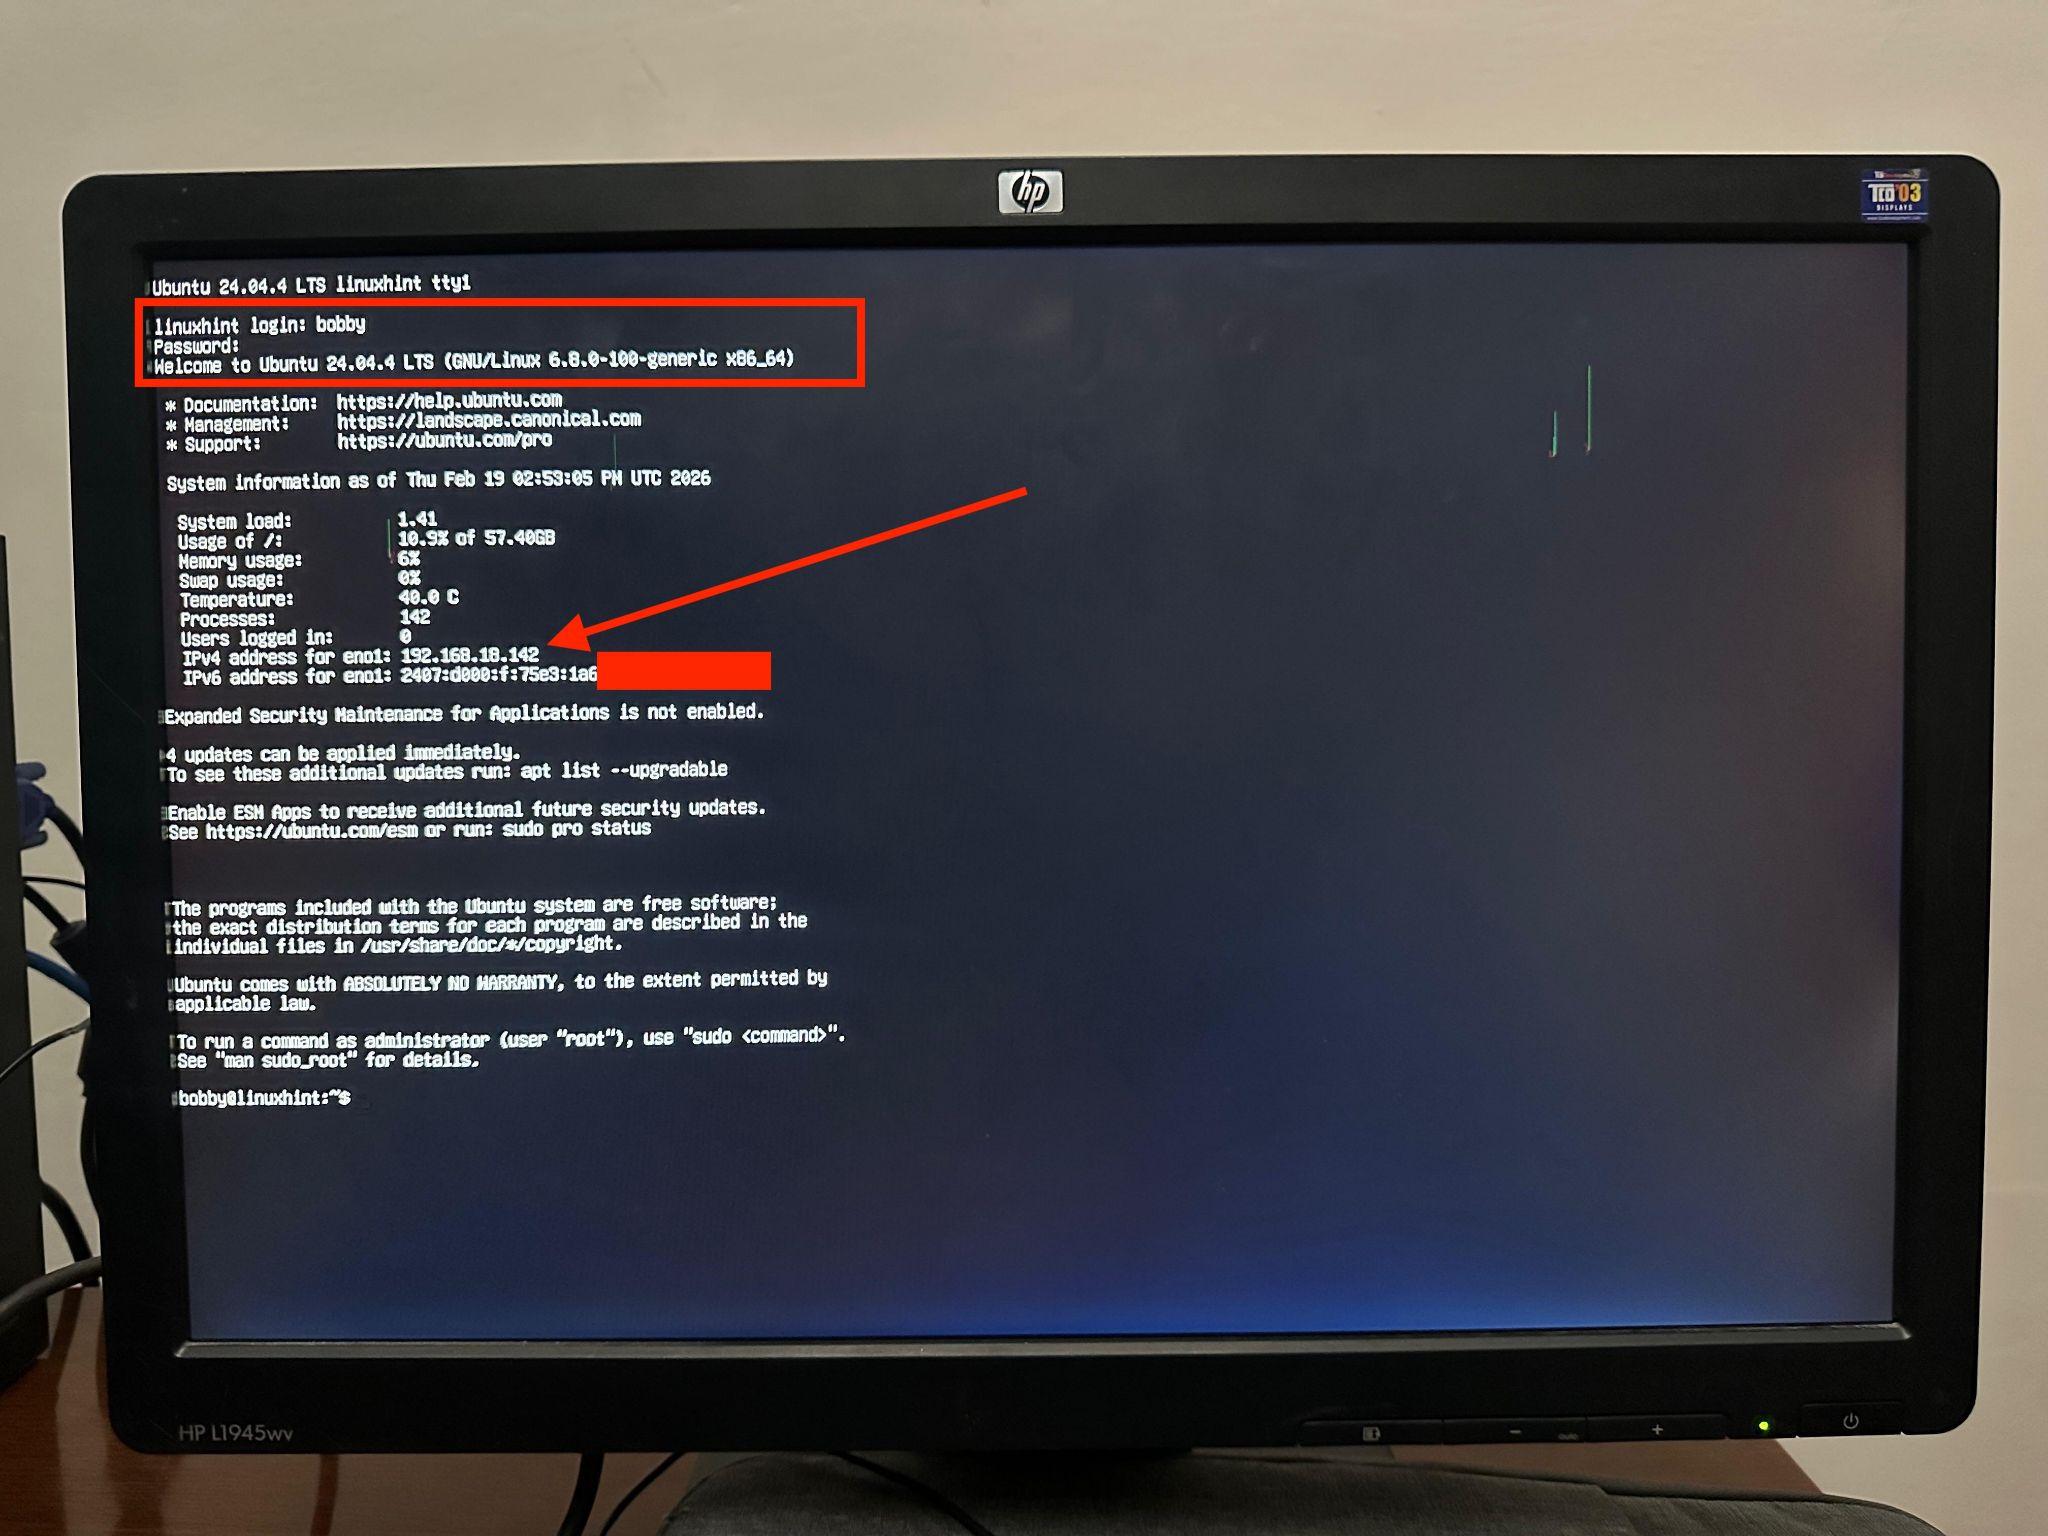
If for some reason you skip noting down your IP then you can always find it with following commands:
OR
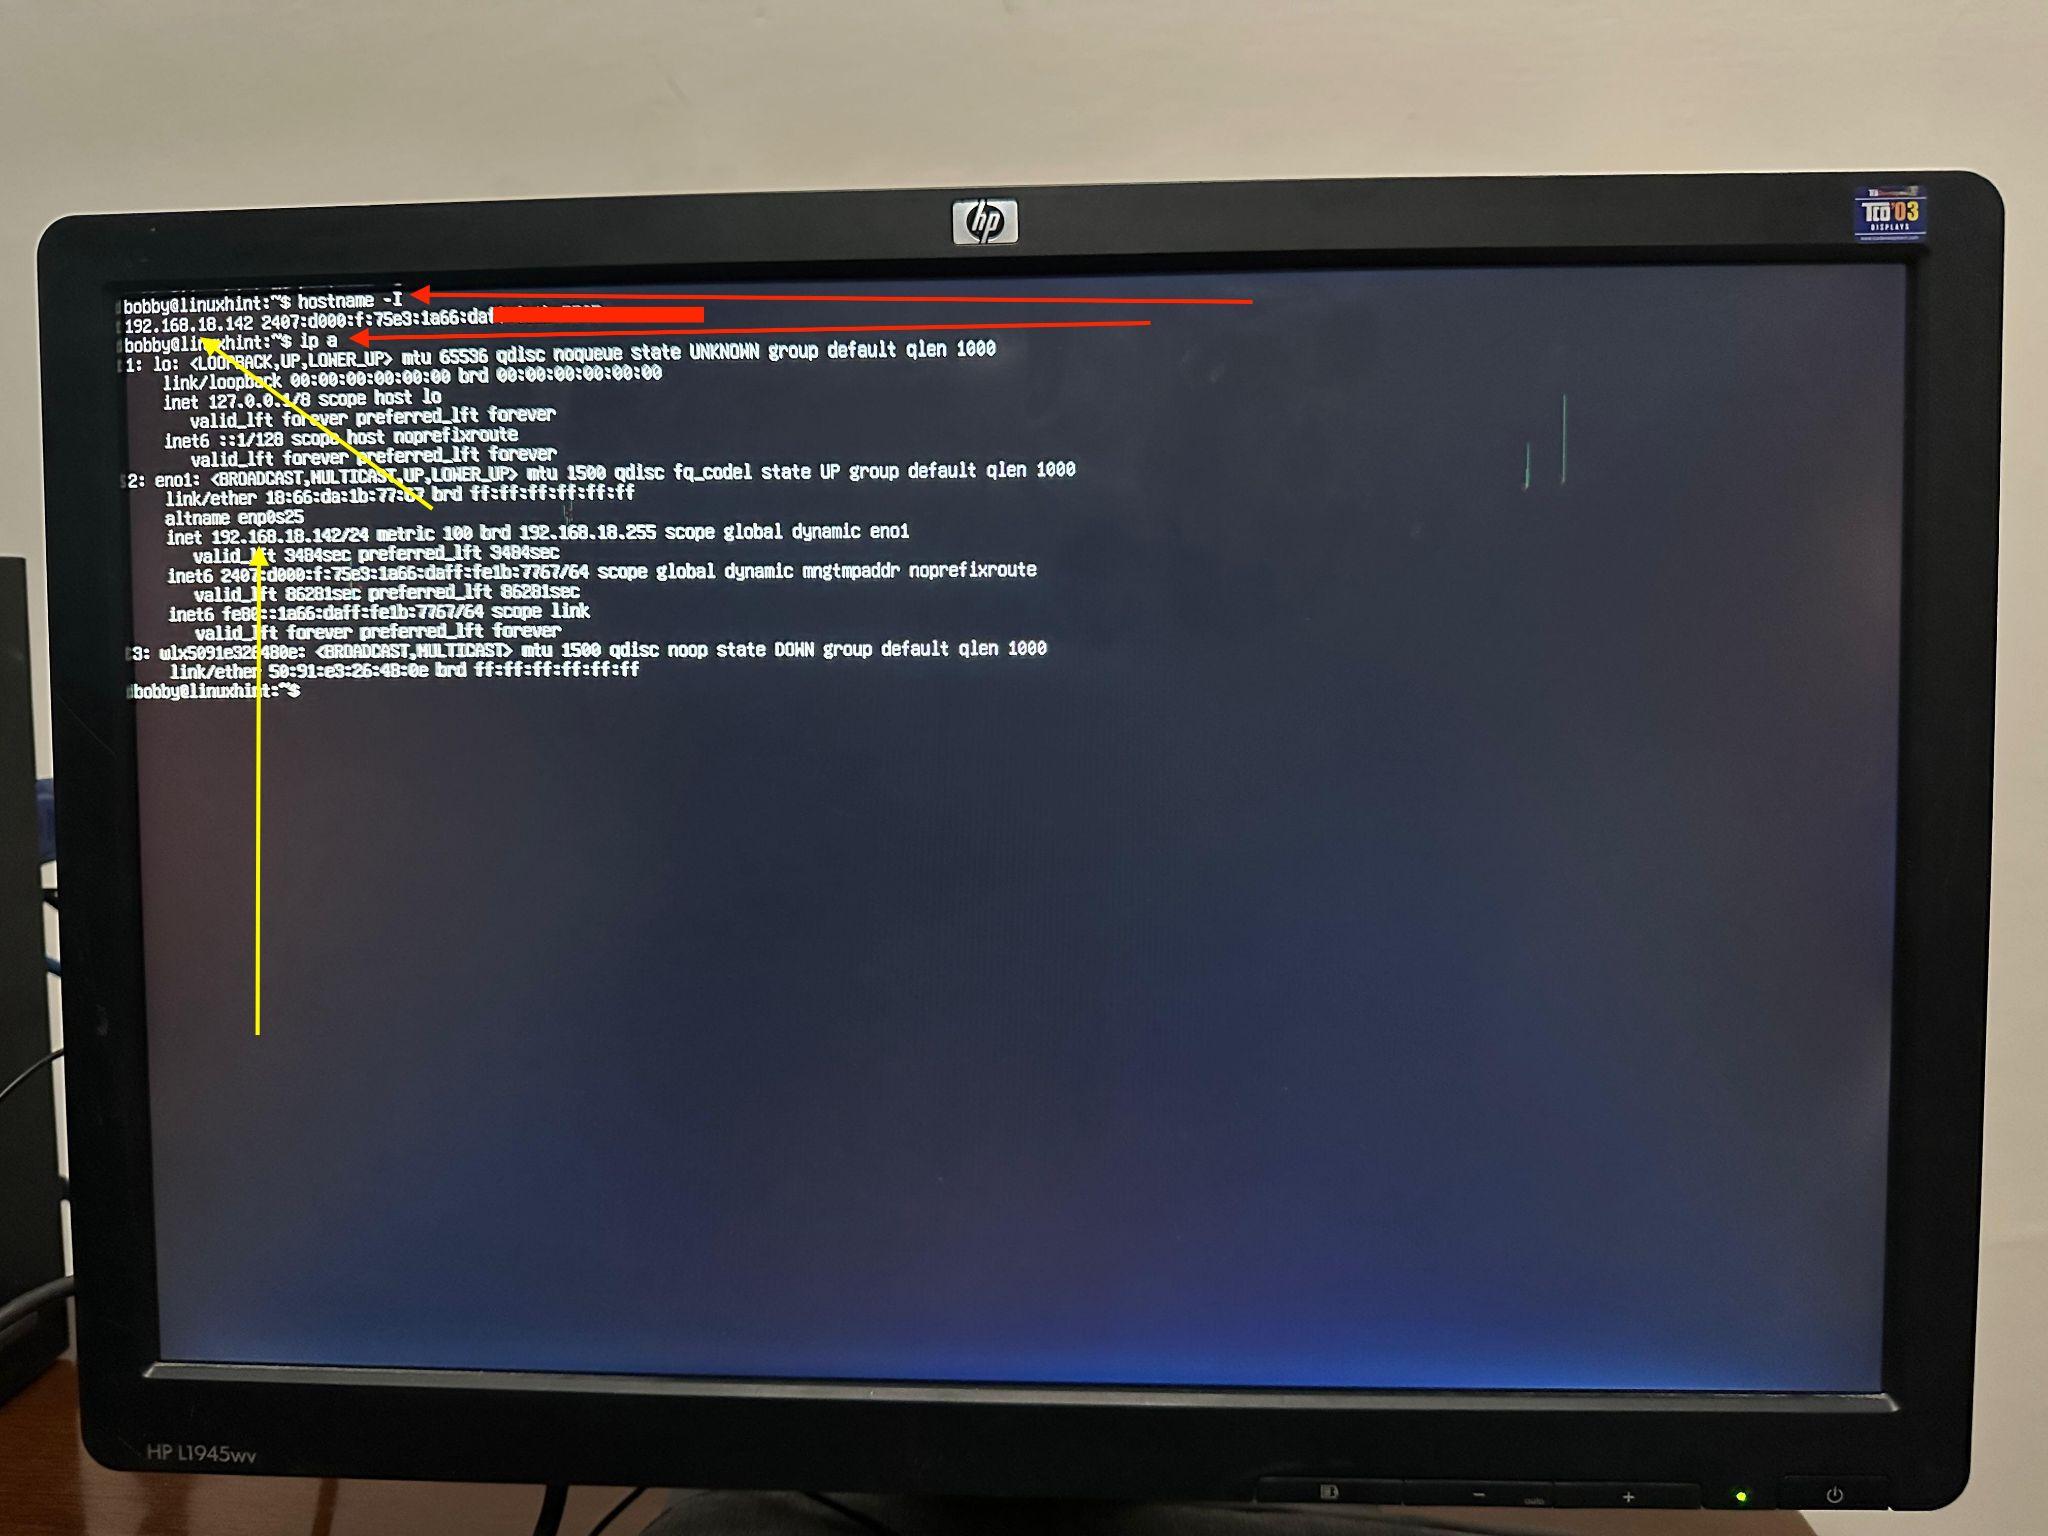
Red arrows in screenshots point towards the commands and yellow arrows point towards the IP address. When running “ip a” command then make sure that you look for inet, remember that inet 127.0.0.1 is simply the loopback address, you need something that starts with 192.168.x.x.
That’s it, Ubuntu server installation has been successful now.
5- Connect to the Server Using SSH
Now to connect to your server using SSH, ensure that SSH client is installed on your host machine. On most linux distros and Mac OS it’s already installed by default. If you are using linux and it’s not already installed then you can always install it by running this command:
sudo apt install openssh-server
In my case, it was already installed on my macbook air so I went ahead and wrote the command in my terminal:
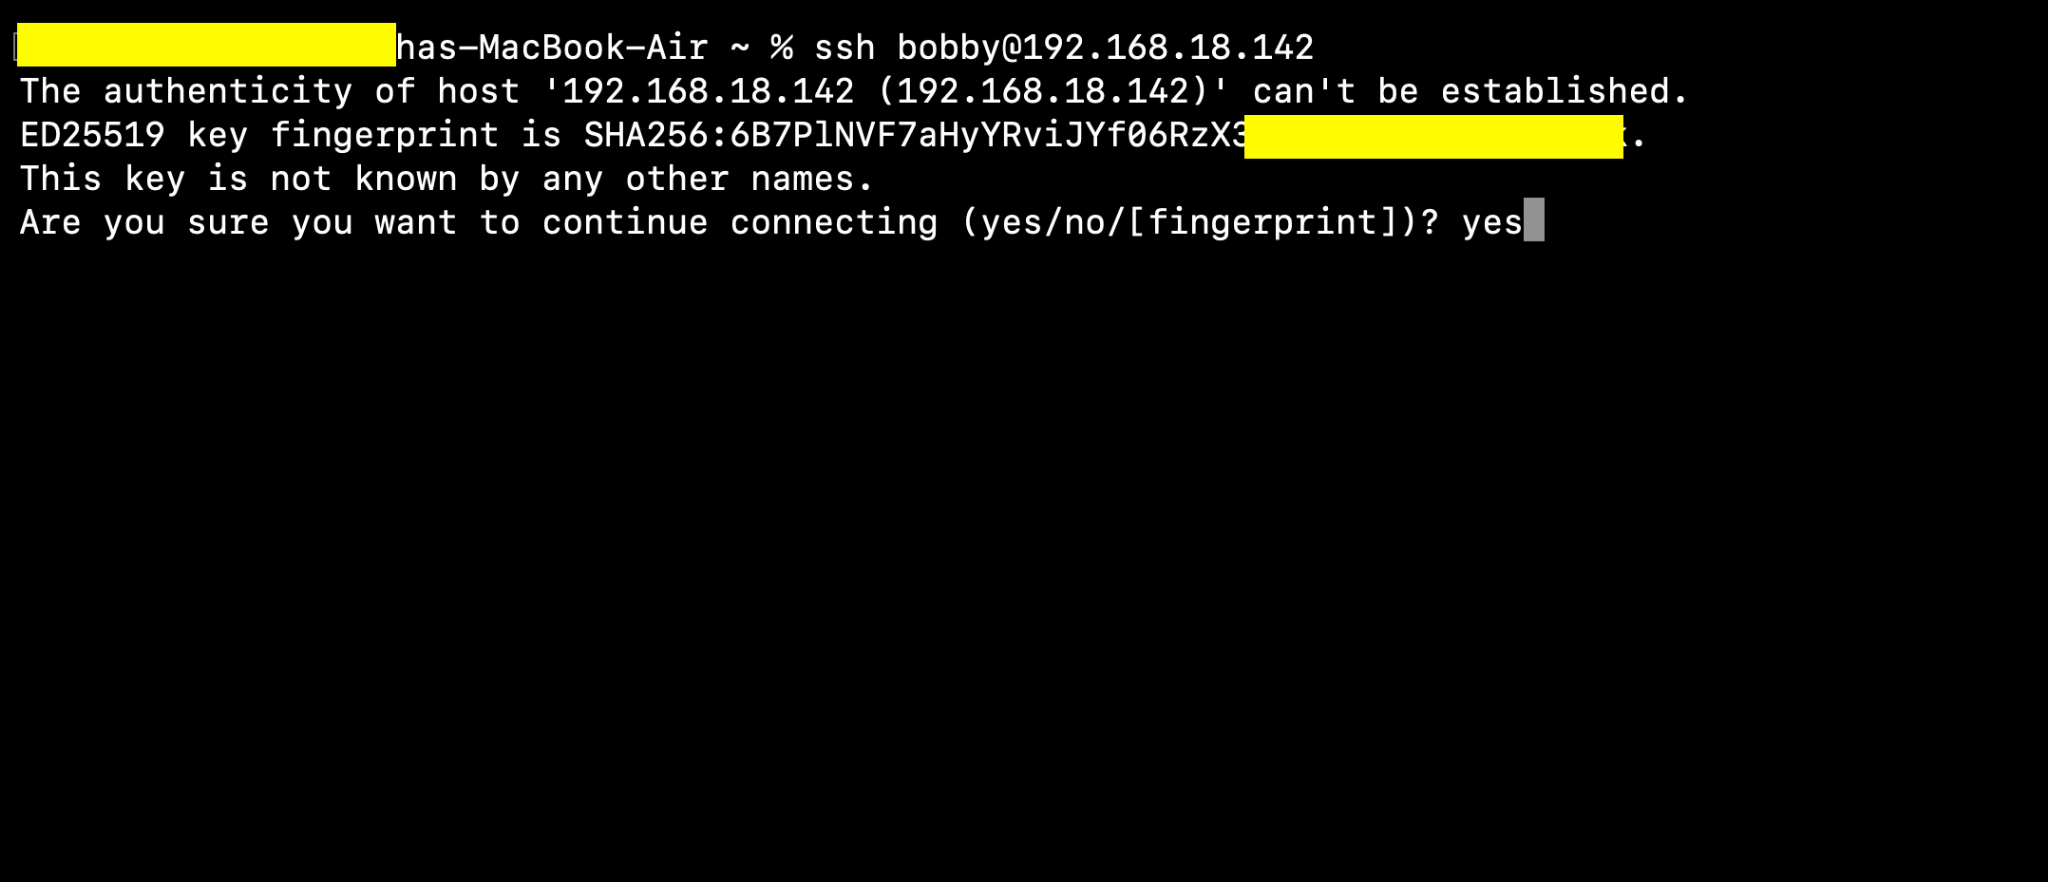
It’d ask you to continue connecting, just say yes and then it would ask you for the password, you need to enter the password of your server to which you are connecting and it would connect and give you a result like this. Replace bobby with your user name and ip address with your ip address.

Now, you are literally inside your server. Your host machine’s terminal is now your server’s terminal and whatever changes you make here will be made to your server.
6- Convert the NAS to Headless Mode
Since you have made your SSH connection using your server’s IP address so now, you can remove your keyboard, mouse, monitor or any accessories attached because now you won’t need them. You just need a system unit, power connection and LAN cable.
Note: You might need to use static IP or DHCP reservation if you want a stable remote access.. I have been using my server for a couple of weeks and my IP address hasn’t changed since then. It changed only when I reinstalled the OS, likely due to the expiration of DHCP lease because the server was offline during installation so the router likely reassigned the IP address. Look into that when you are working on your NAS.
7- Create a Shared Directory
We are going to create a shared directory on our server and this directory will be exposed to all users in the network and everyone connected will be able to make changes to that shared directory. To create a shared directory, we will use this command:
mkdir -p ~/server-data/shared
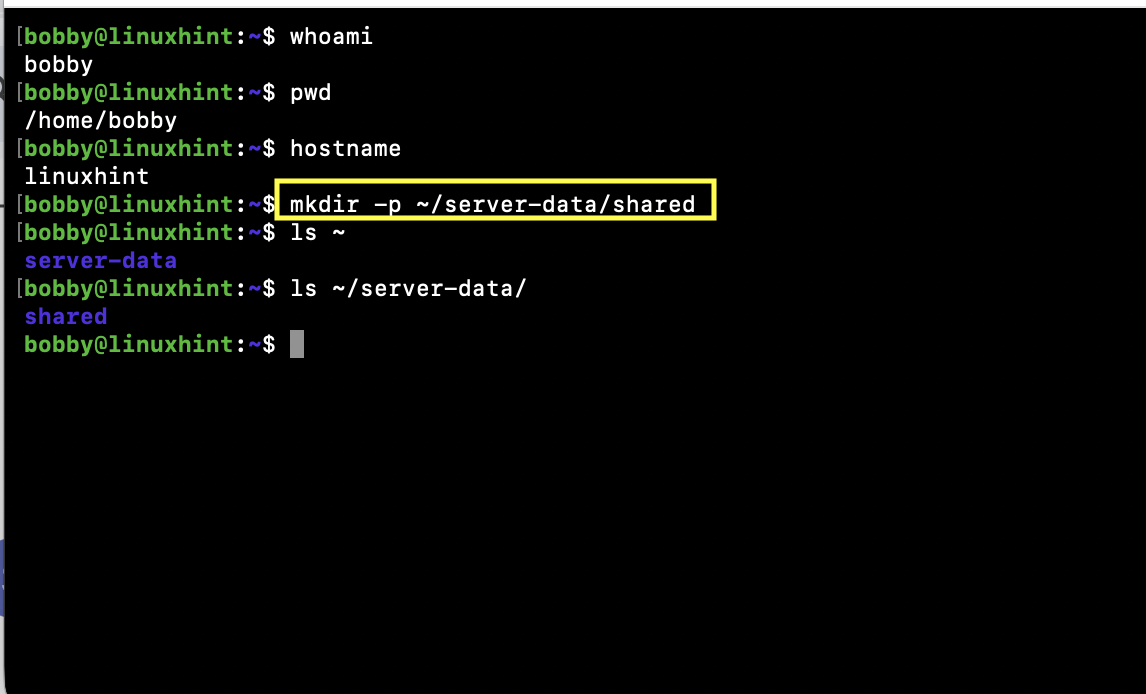
Note: We are going to install and use Samba for file sharing, keep in mind that Samba does not create storage for us, it just shares the files. So we have to specify a directory that is specifically for sharing files on our NAS server. If you are thinking why we didn’t just pick up our home directory, technically we can do that but it’s not a secure thing to do as all your config files and other important files will also be exposed to your network which is not a best practice and you don’t want to do that.
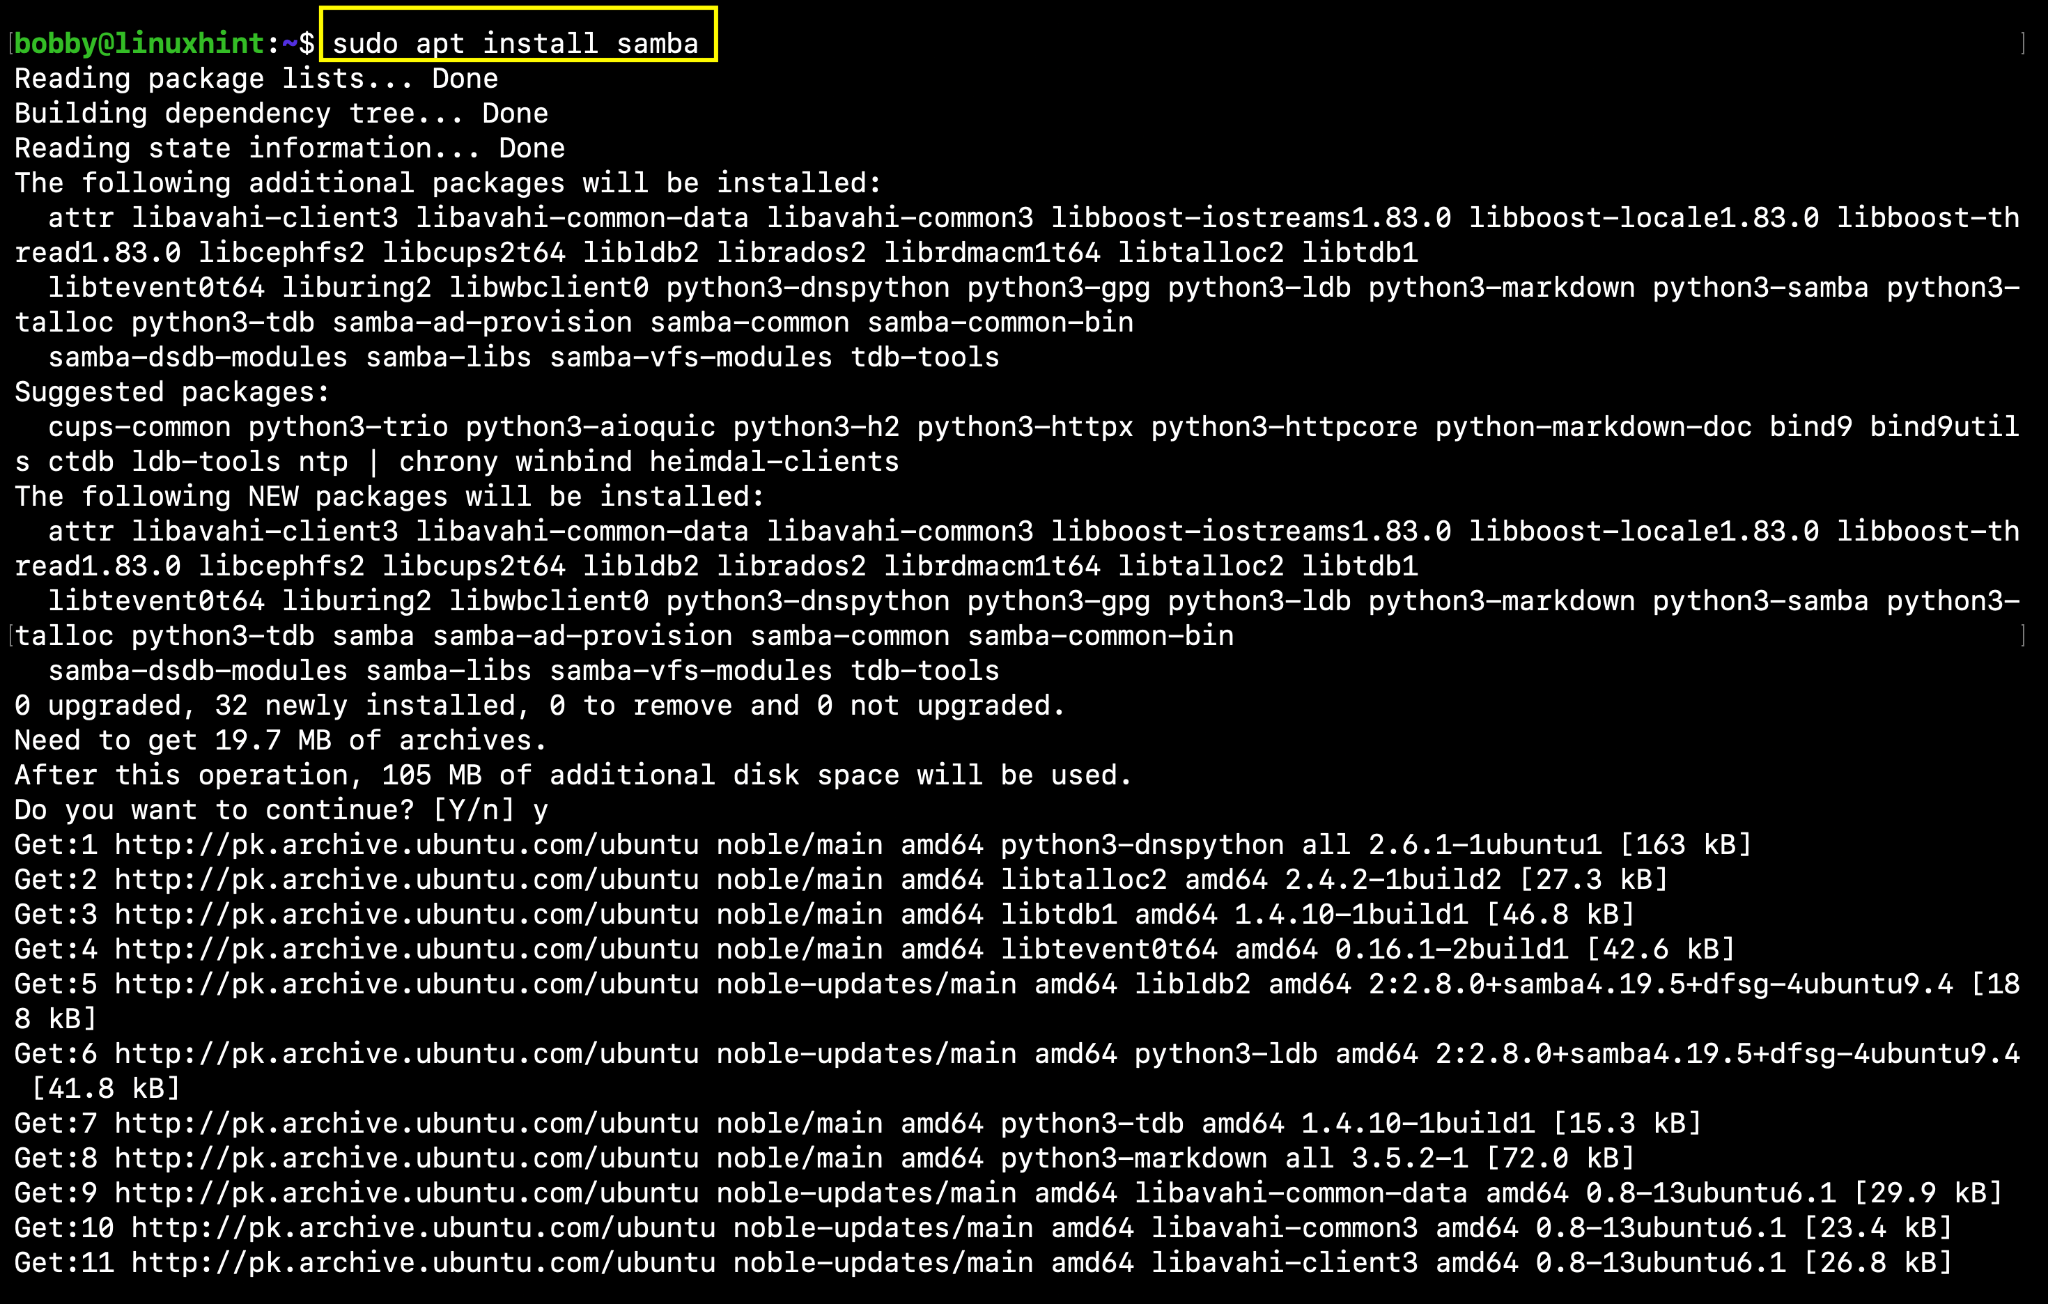
8- Install and Configure Samba
Samba is a file sharing tool and we install it on server with this command:
Next up we need to edit the configuration file of samba but before that we need to follow best practices, create a backup of the configuration file just in case.
cp /etc/samba/smb.conf /etc/samba/smb.conf.bak
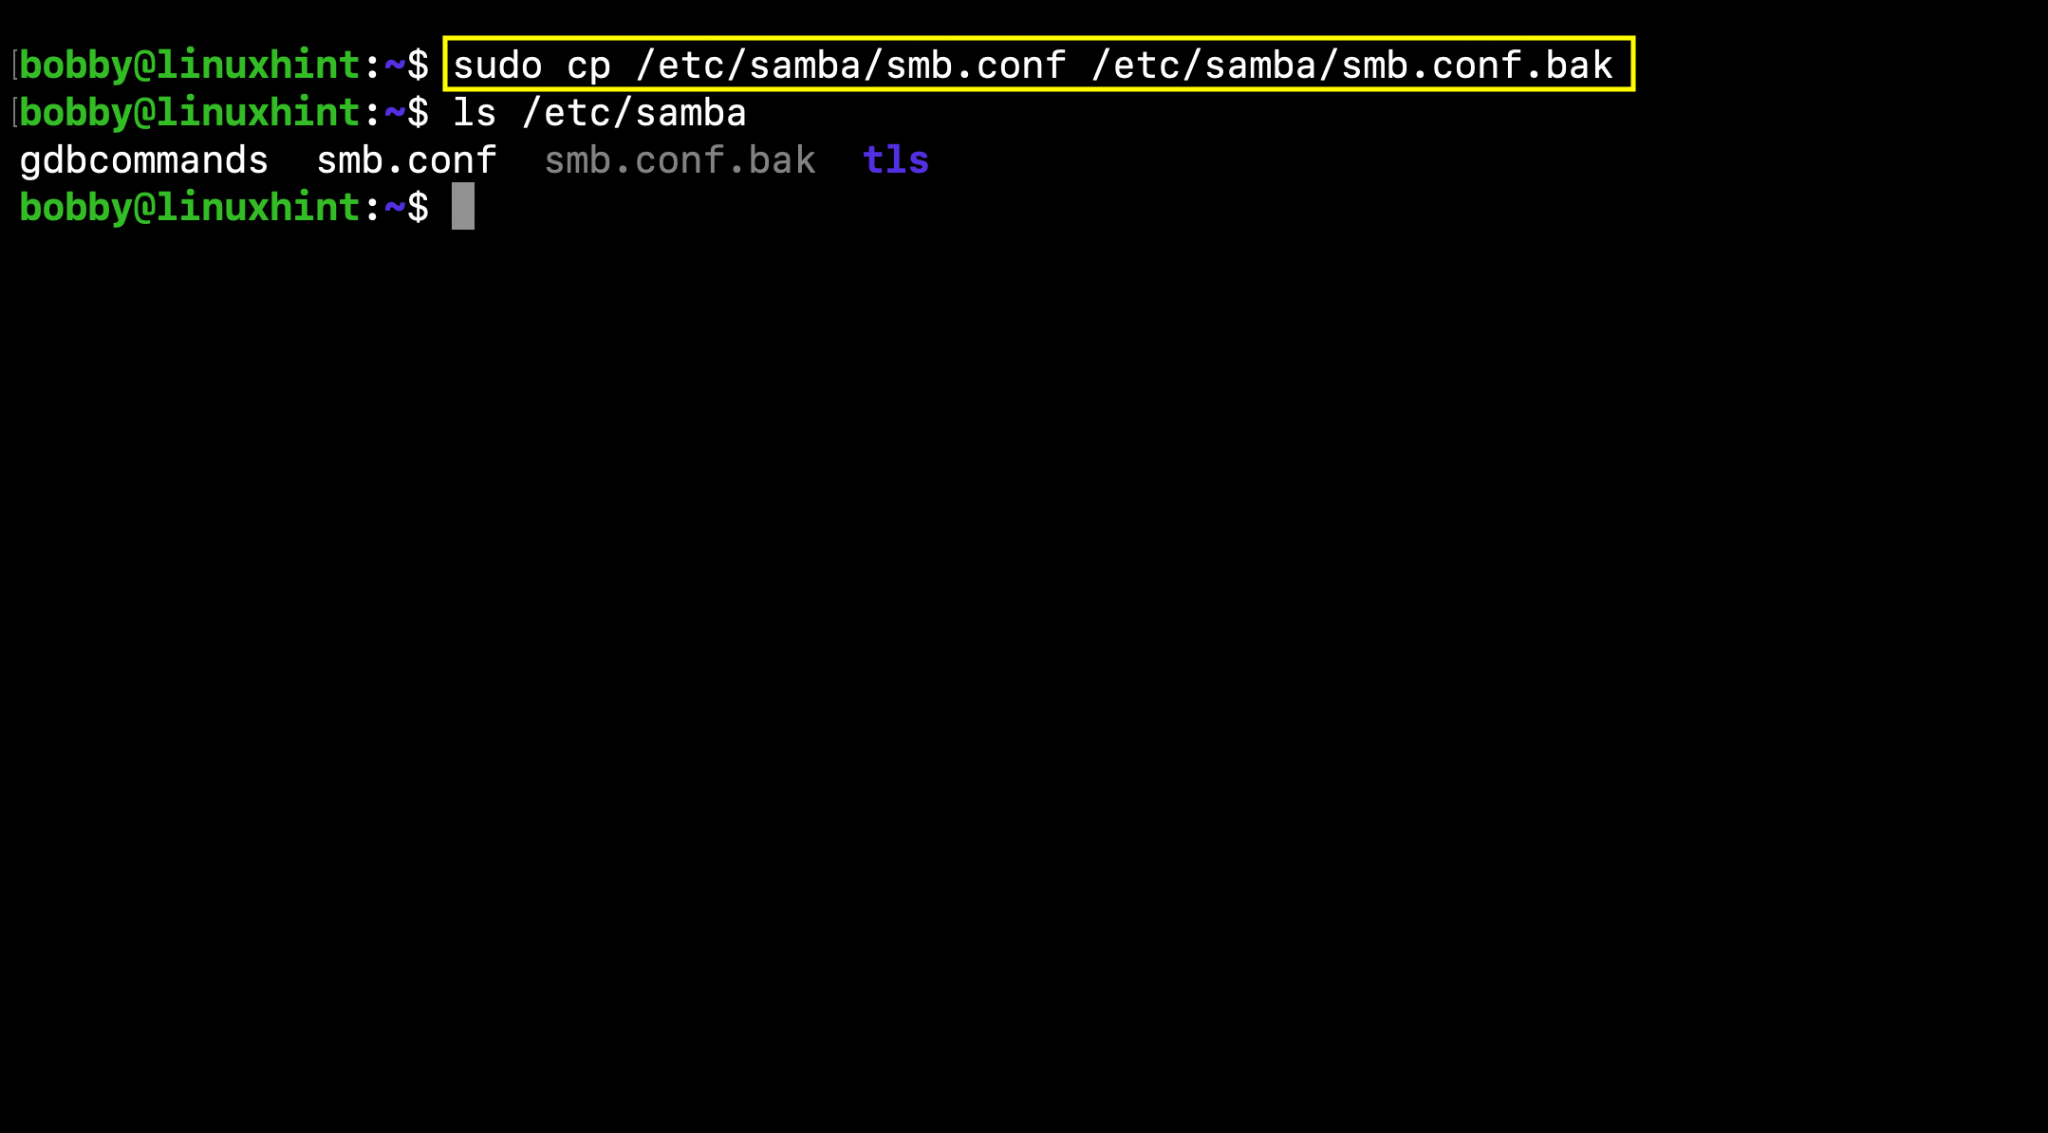
Now go ahead and edit the configuration file:
sudo nano /etc/samba/smb.conf
Now at the end or at the bottom of this config file, add this:
(Shared)
path = /home/bobby/server-data/shared
browseable = yes
read only = no
guest ok = no
create mask = 0664
directory mask = 0775
valid users = bobby
It would look something like this: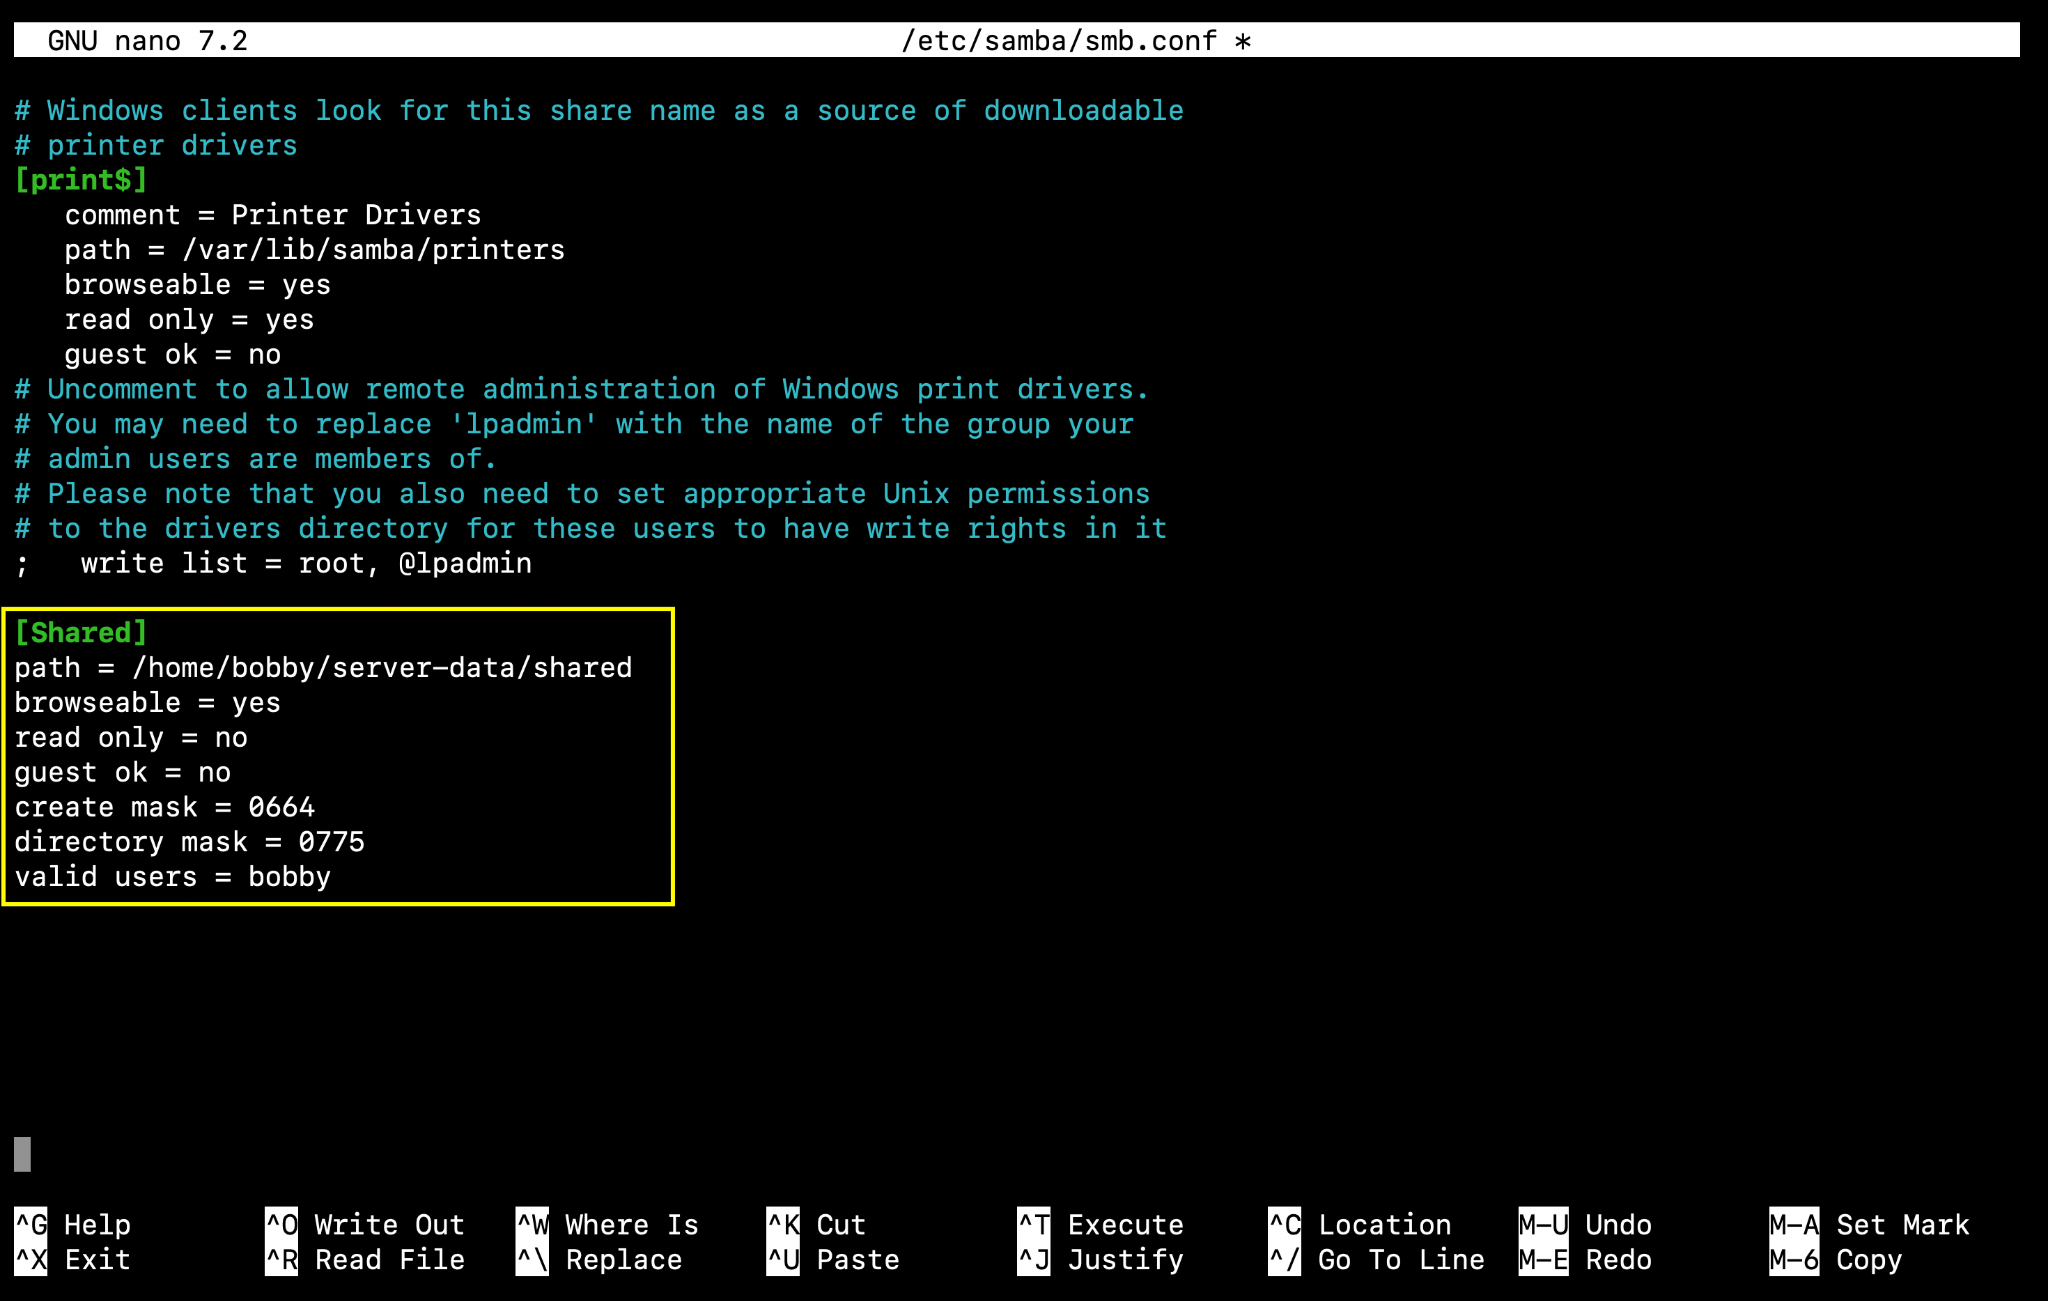
These are some permissions and conditions we are setting up inside the config file. We don’t want to keep it read only means other connected users can edit or delete or add new files. Also we are setting up the file and directory permissions inside the shared directory. Finally, we are telling samba to only connect to user bobby within the NAS server because we have a shared directory inside bobby’s home directory so it’s pointless to have more valid users.
CTRL + O and CTRL + X to come back to the terminal window.
Now you need to test if the file has been configured successfully. Run in the terminal:
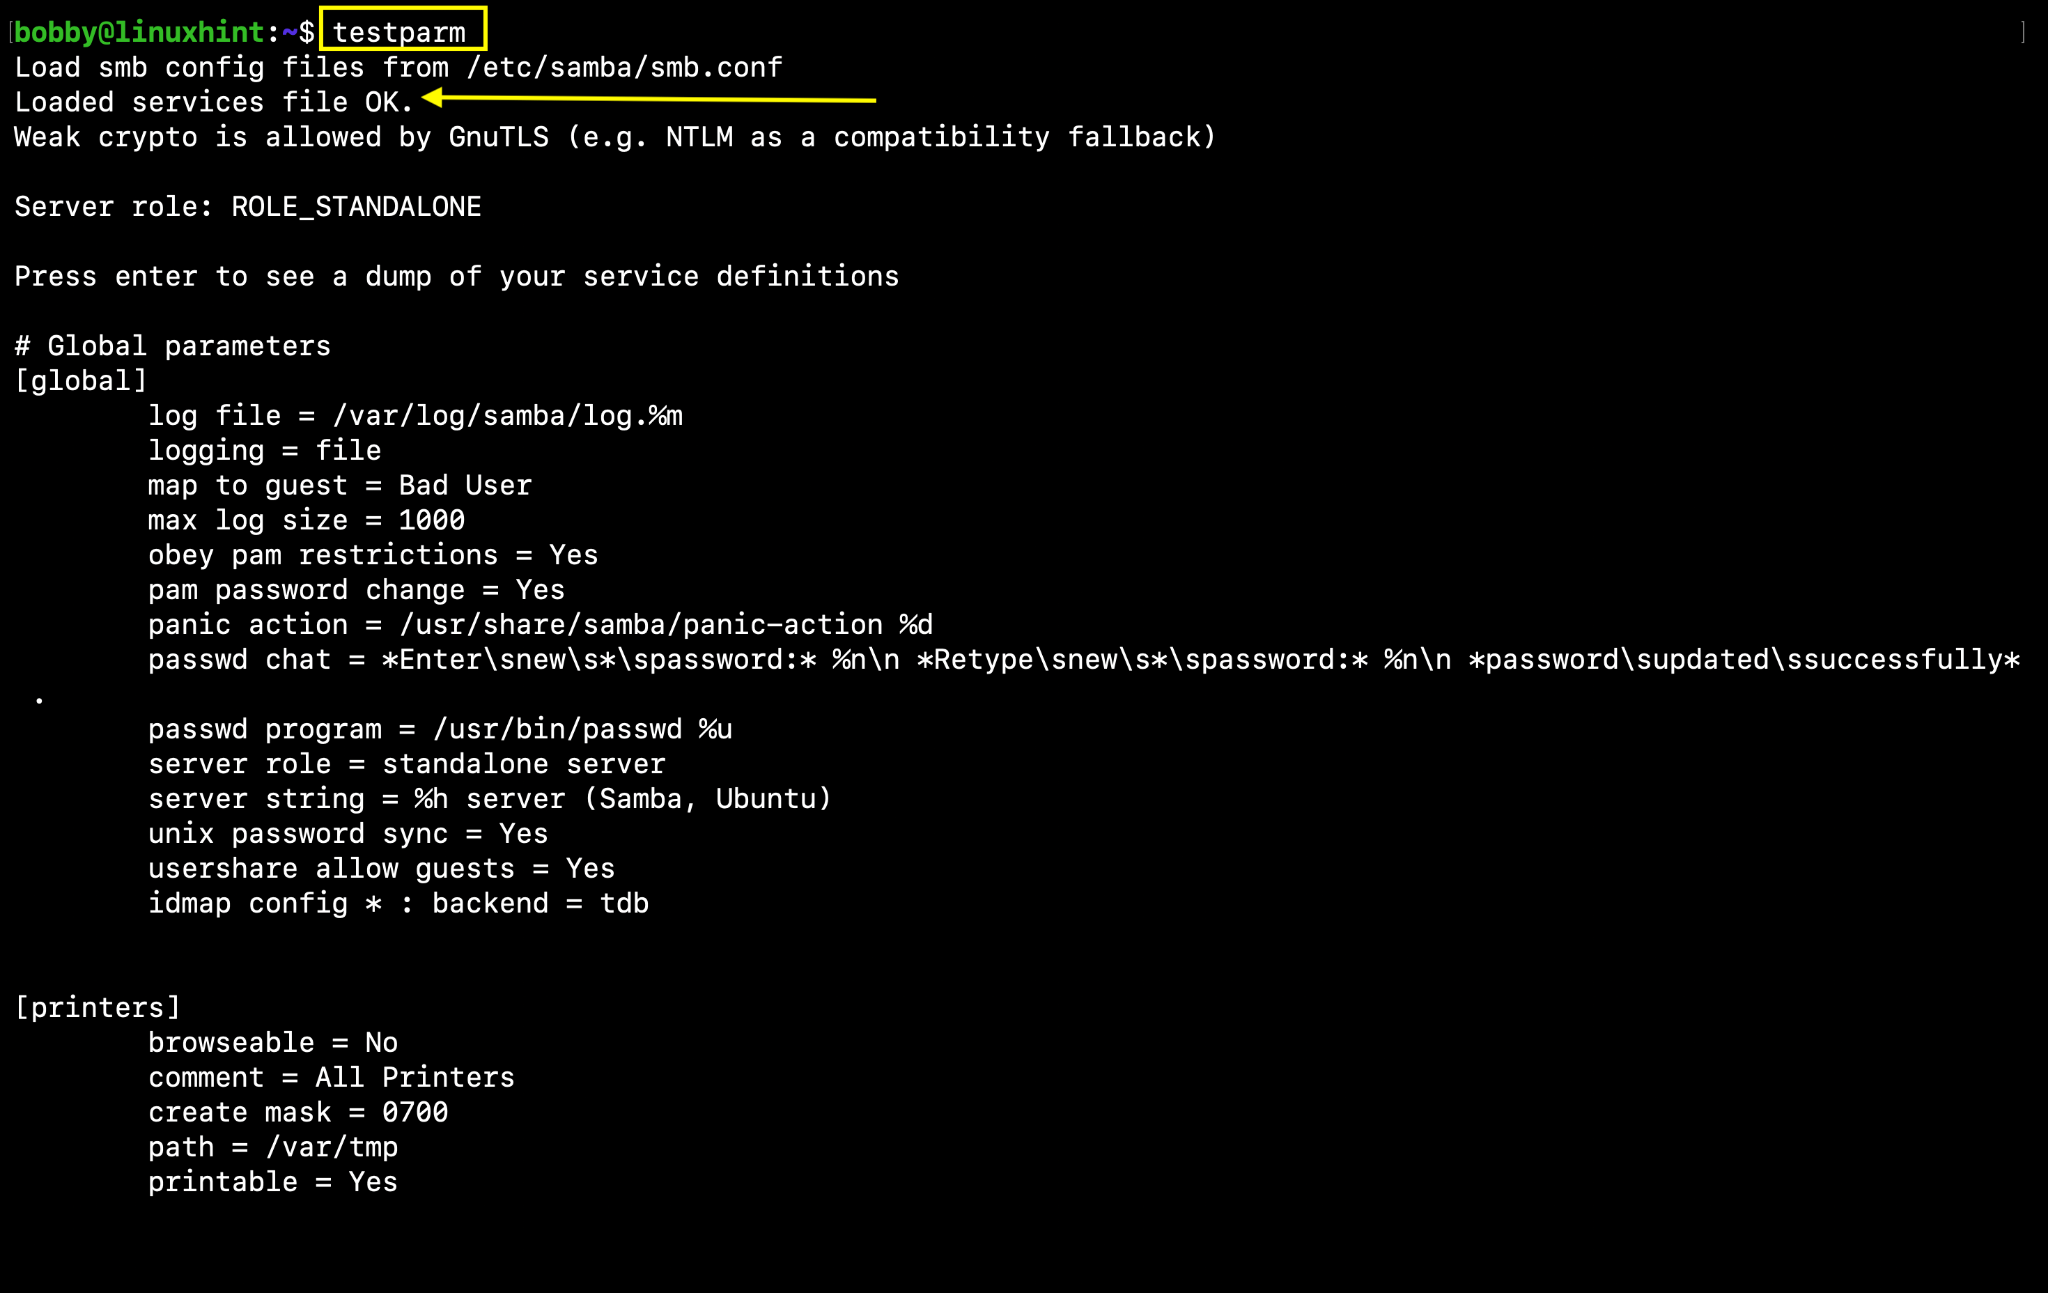
All we are looking for here is: Loaded services file OK.
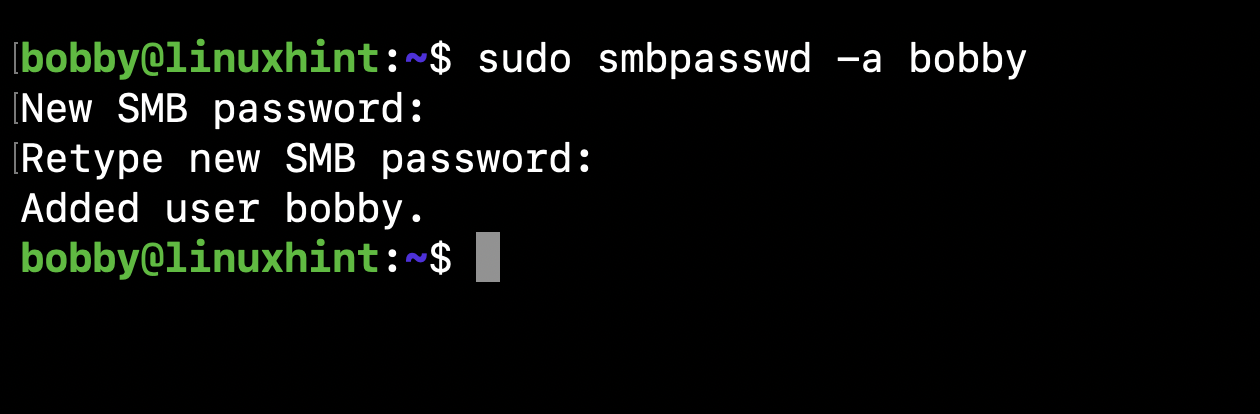
Now let’s setup samba password:
bobby is the username here that we wanna add to samba and this is the user for which we wanna set up a new password.
Now we need to check if ufw is active or not:
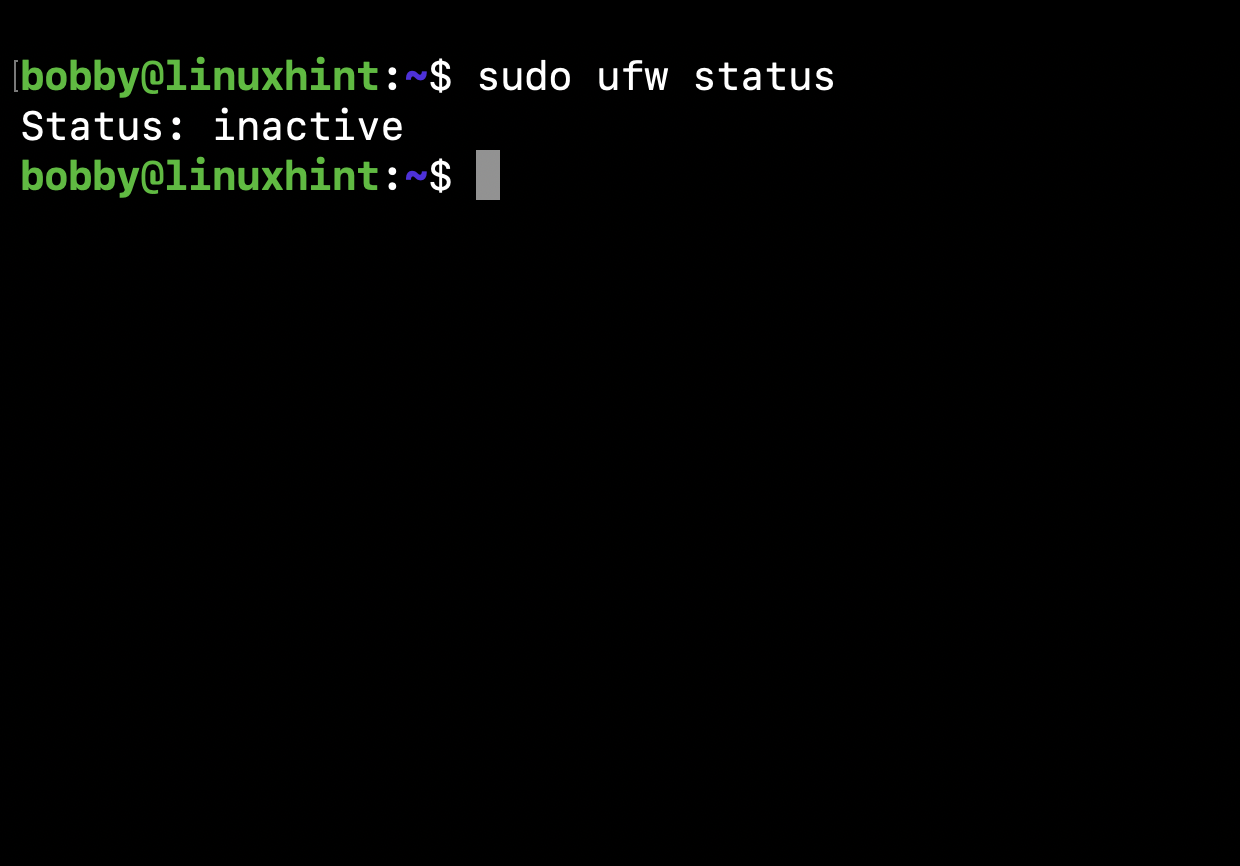
As ufw is inactive, we really don’t need to do anything here. If ufw would have been active then in that case you’ll simply use the command to allow samba through the firewall:
9- Connect to NAS from Different Devices (Linux, MacOS, Windows)
So, you can now connect to your NAS from your native device and have a shared directory visible to you in your native OS’s interface where you can copy paste or drag and drop your files which then would be available to all other devices connected with NAS as this directory is the central directory in the NAS and is accessible to everyone connected in the real time.
A- Connect to NAS from Linux
Go to your Files then Network and enter your IP address like this:
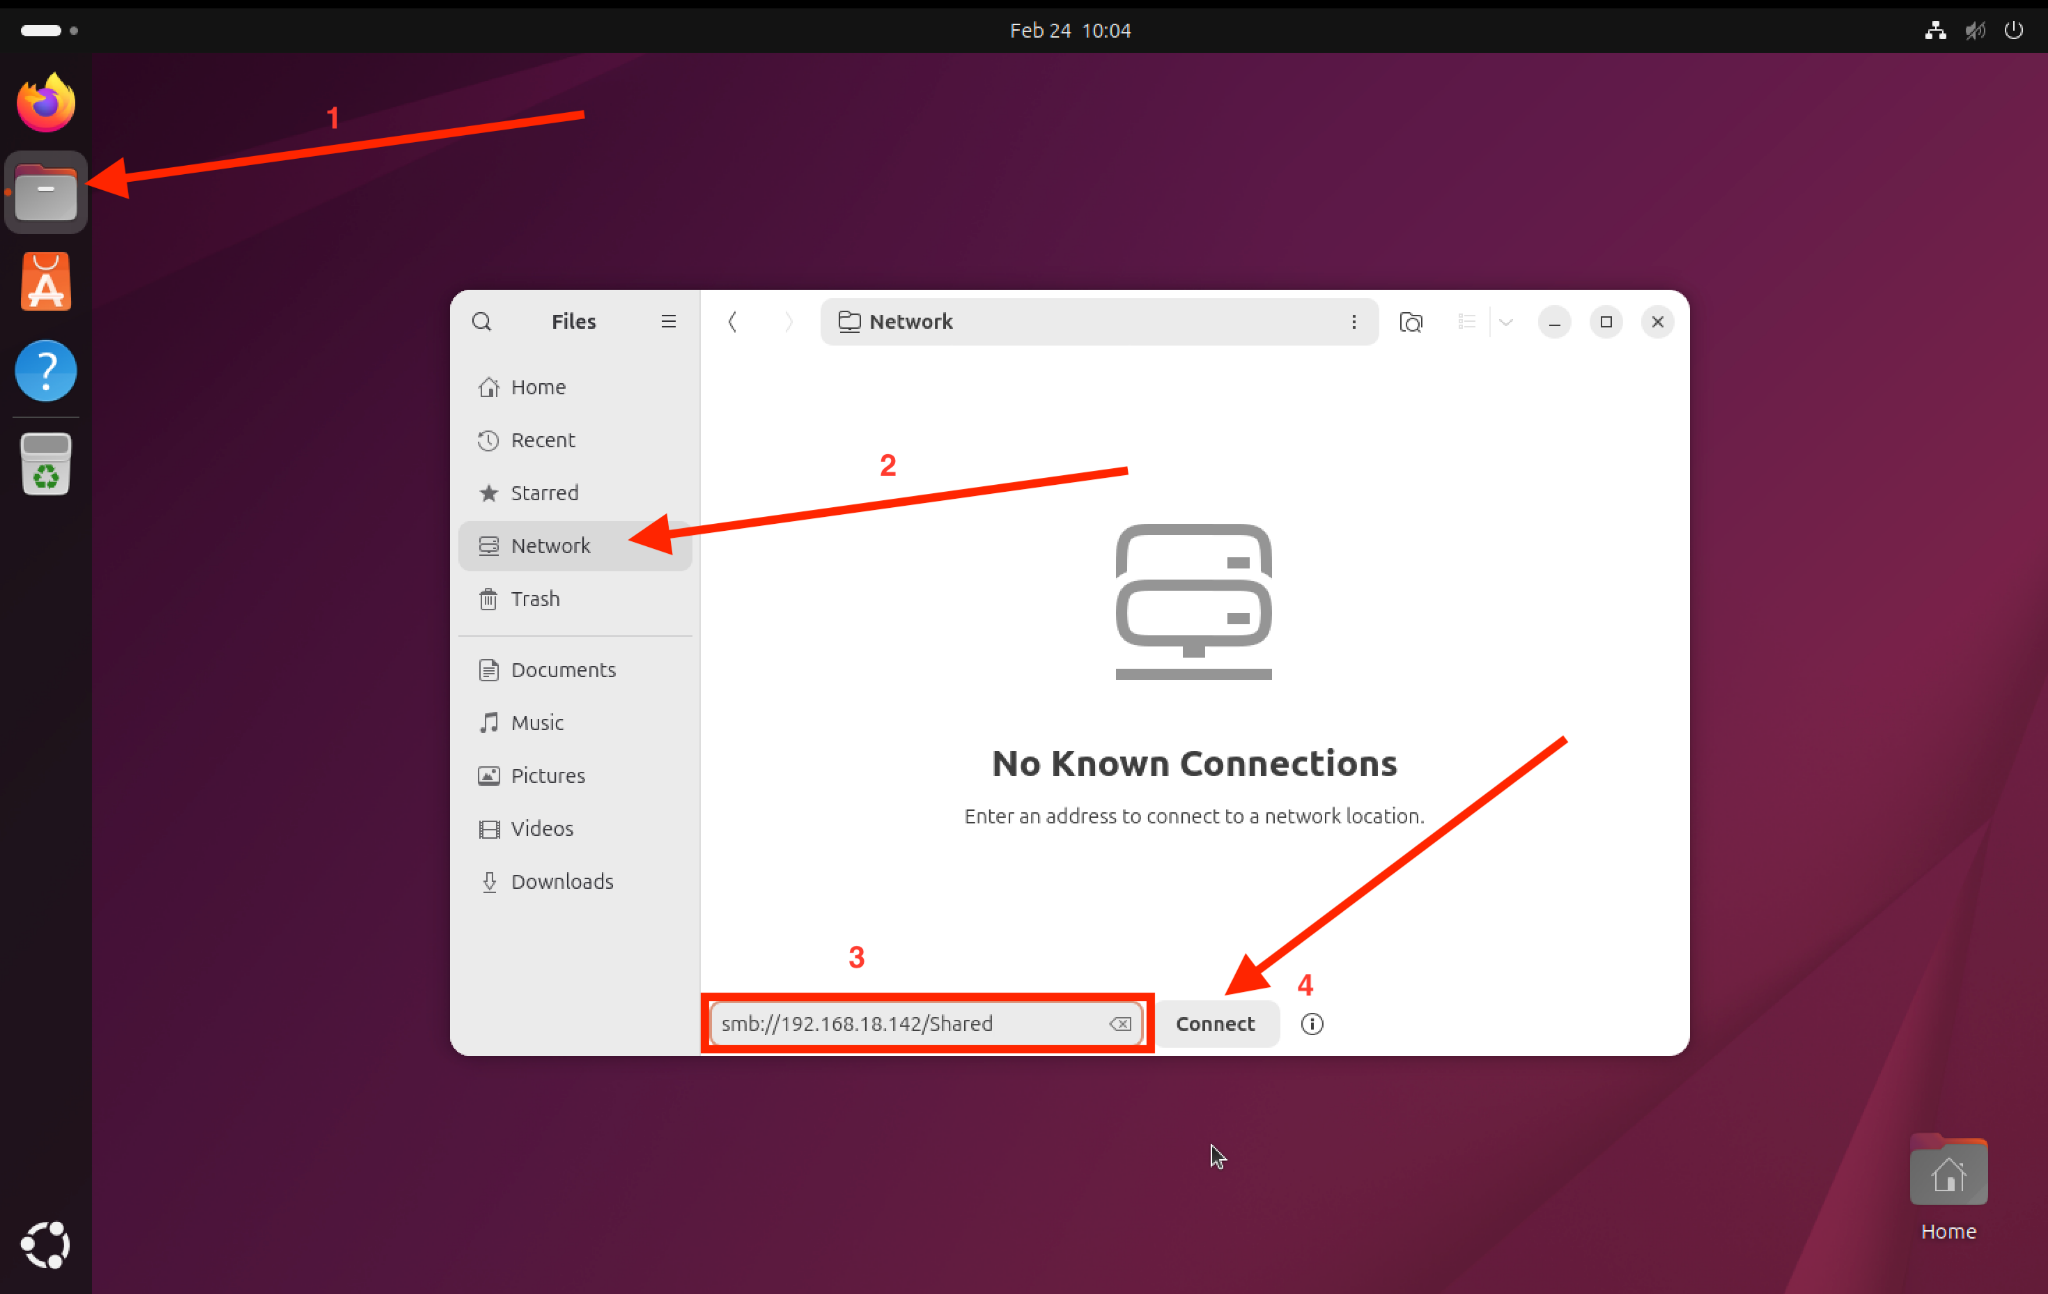
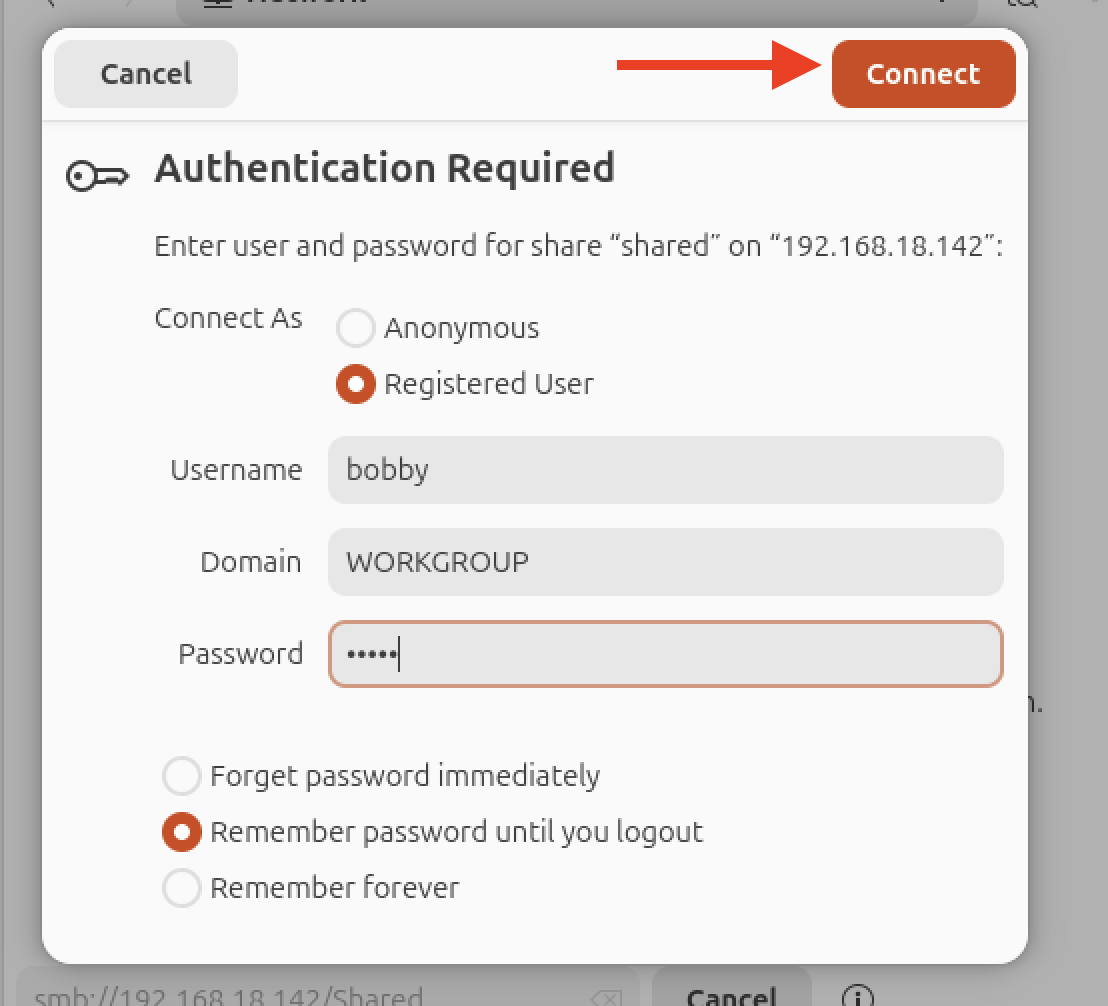
Click on Connect and there comes a Pop Up where you need to select Registered User and then you enter your username and password and click on Connect again.
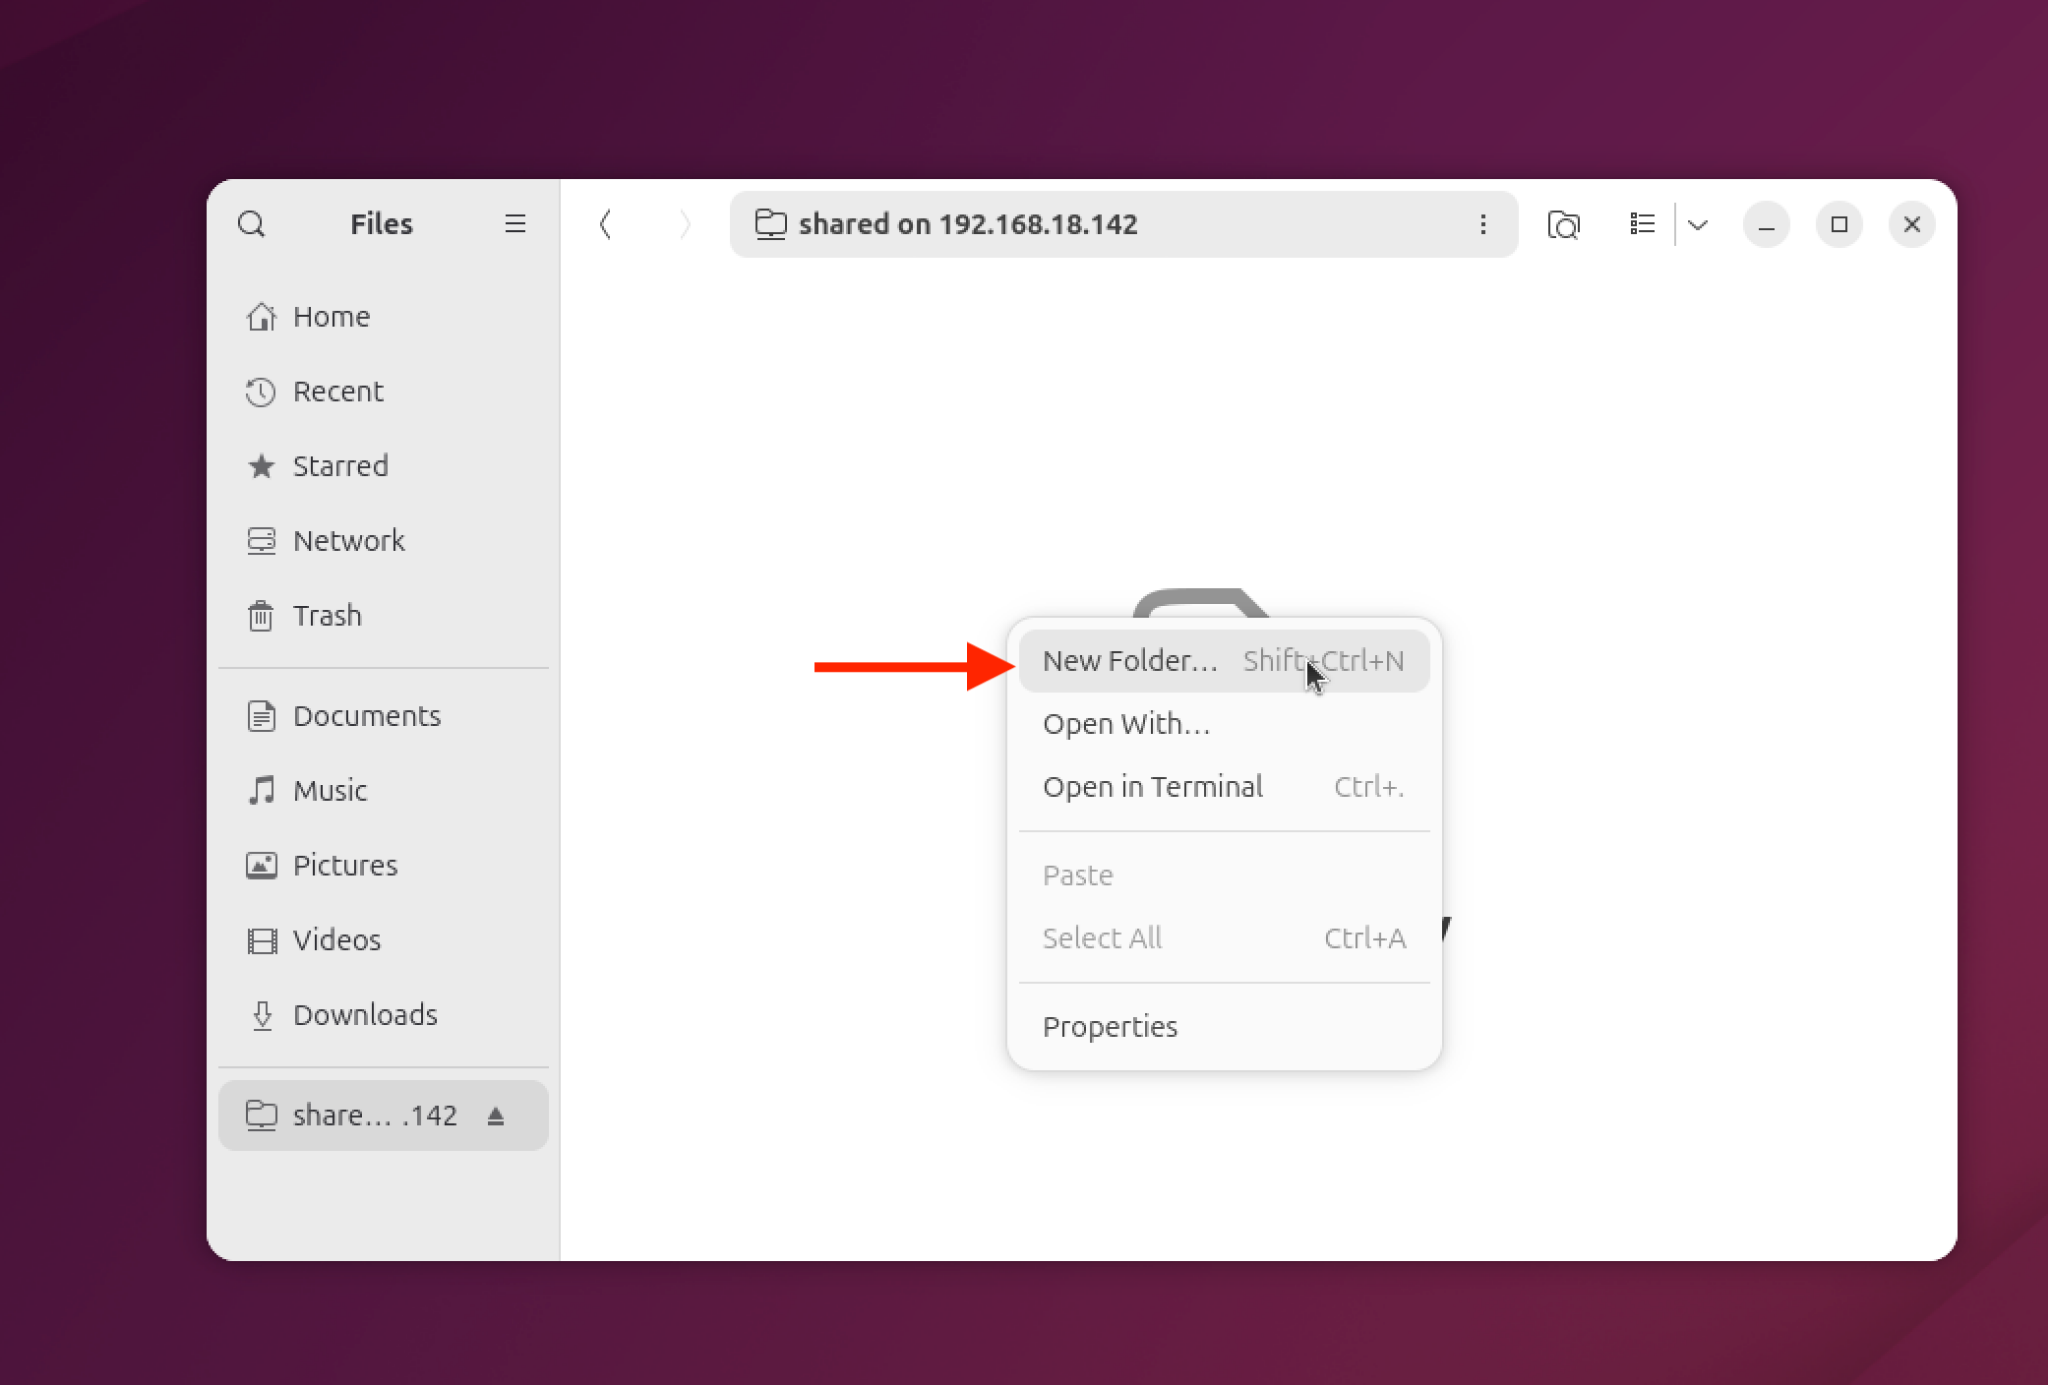
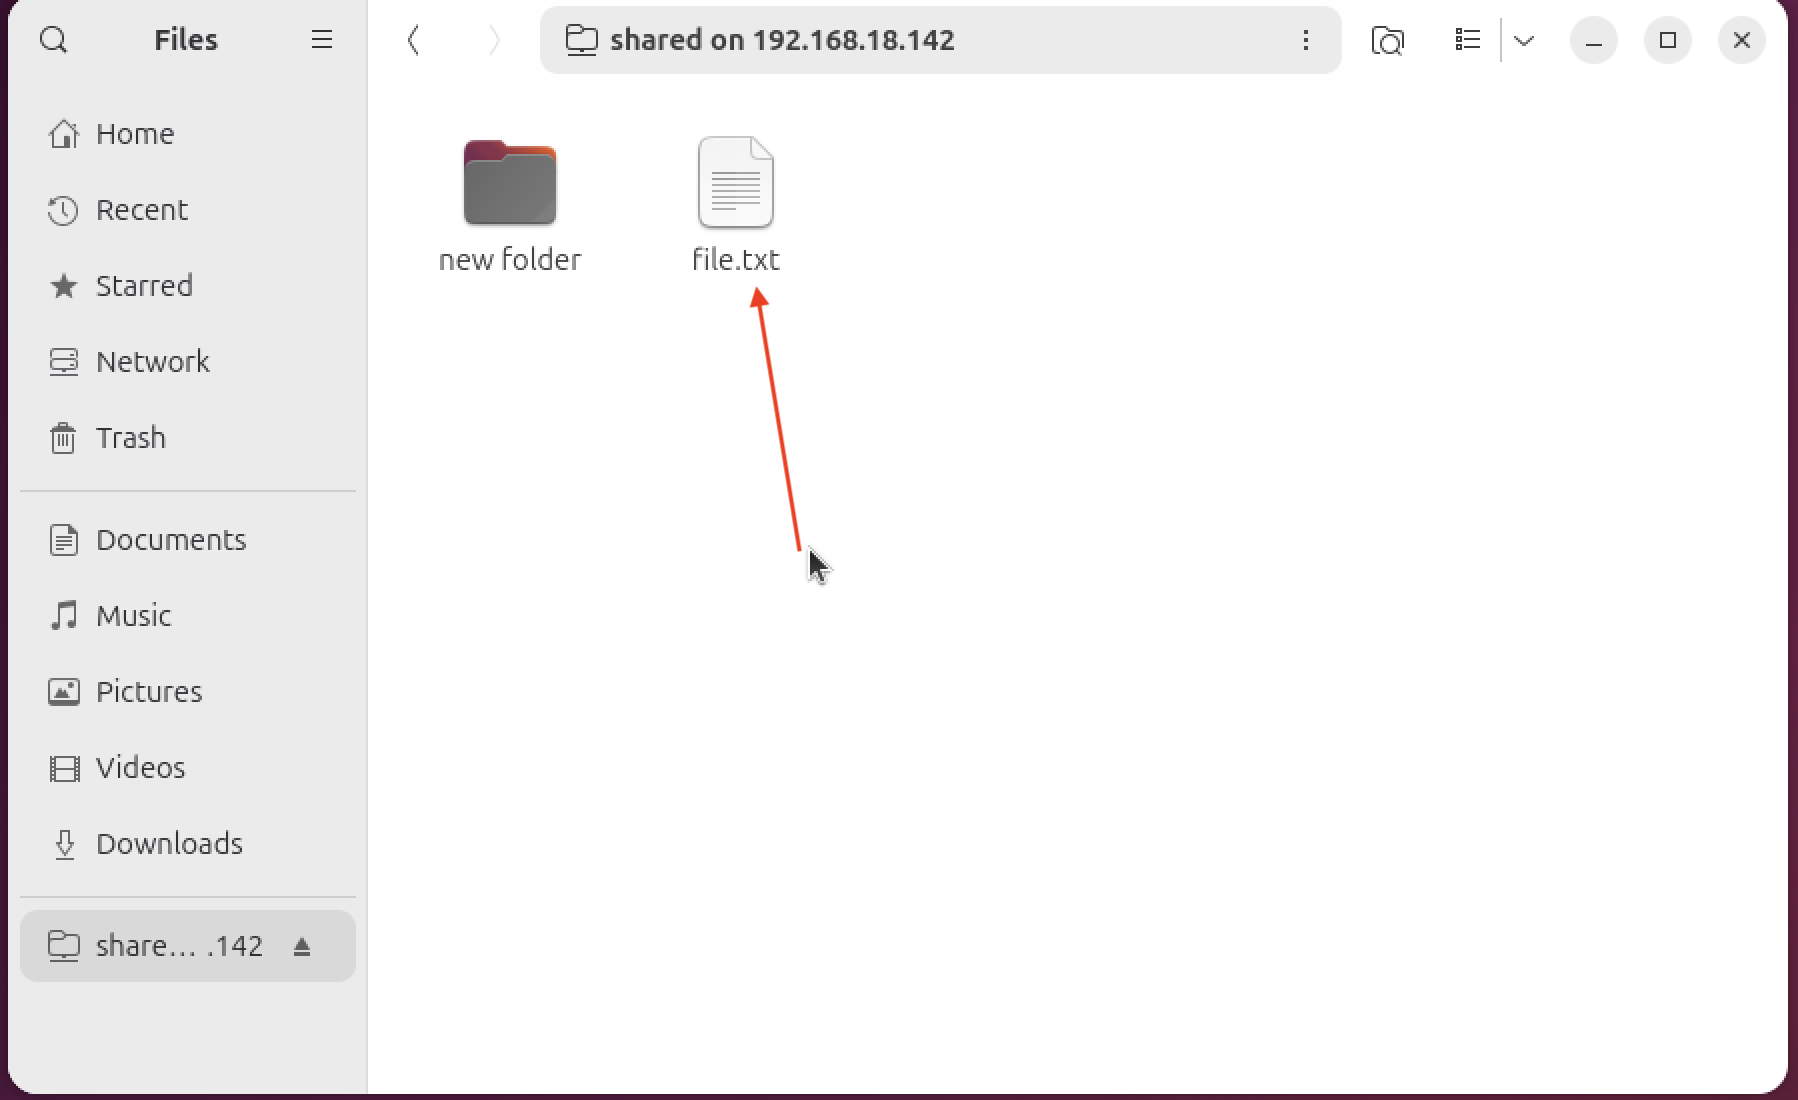
Now you are connected and you will see the shared directory. This is your central directory and whatever you put inside of that will simultaneously be available to the server and hence every machine connected with your server on your home network. Here I am creating a new folder!
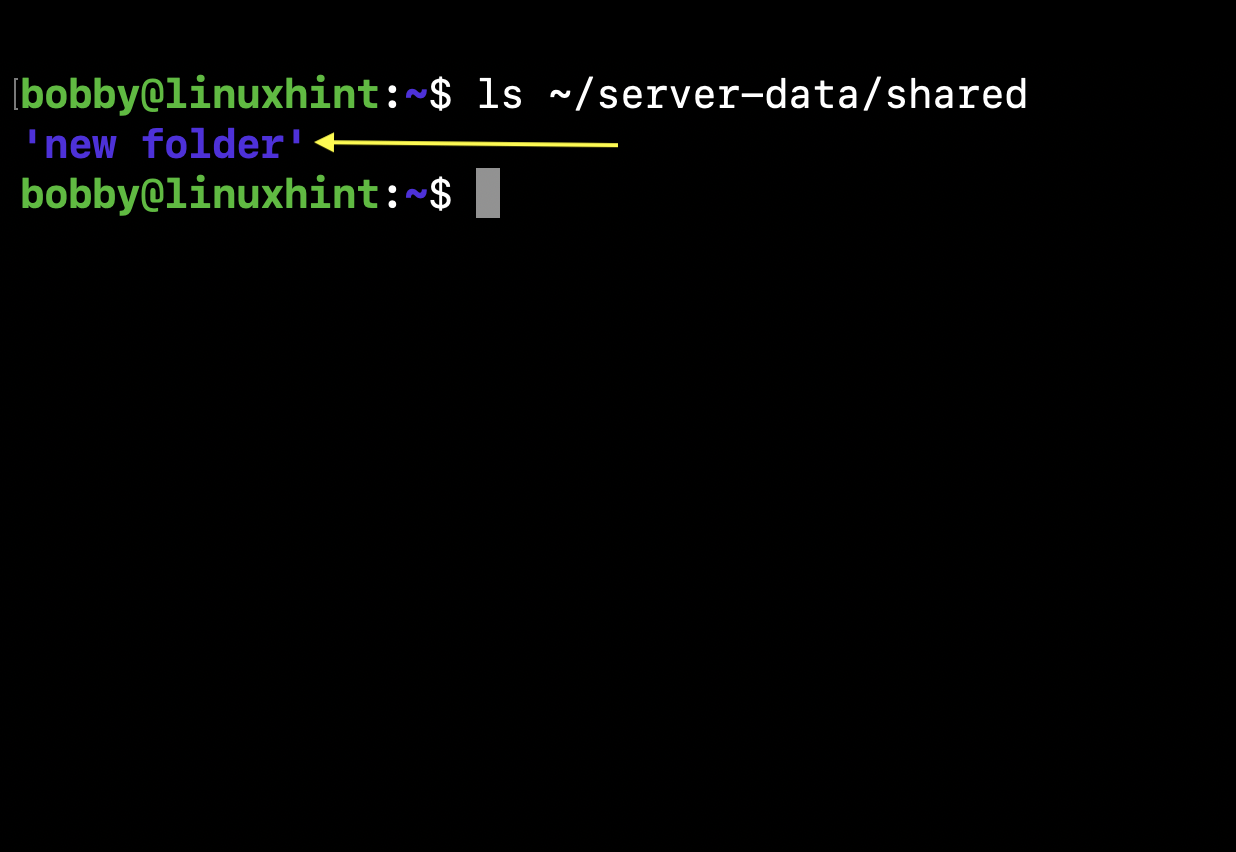
Once I create the new folder it can be seen in the terminal when I access the shared folder.
Now I create a file named file.txt in my NAS server’s shared directory.
touch ~/shared-data/shared/file.txt
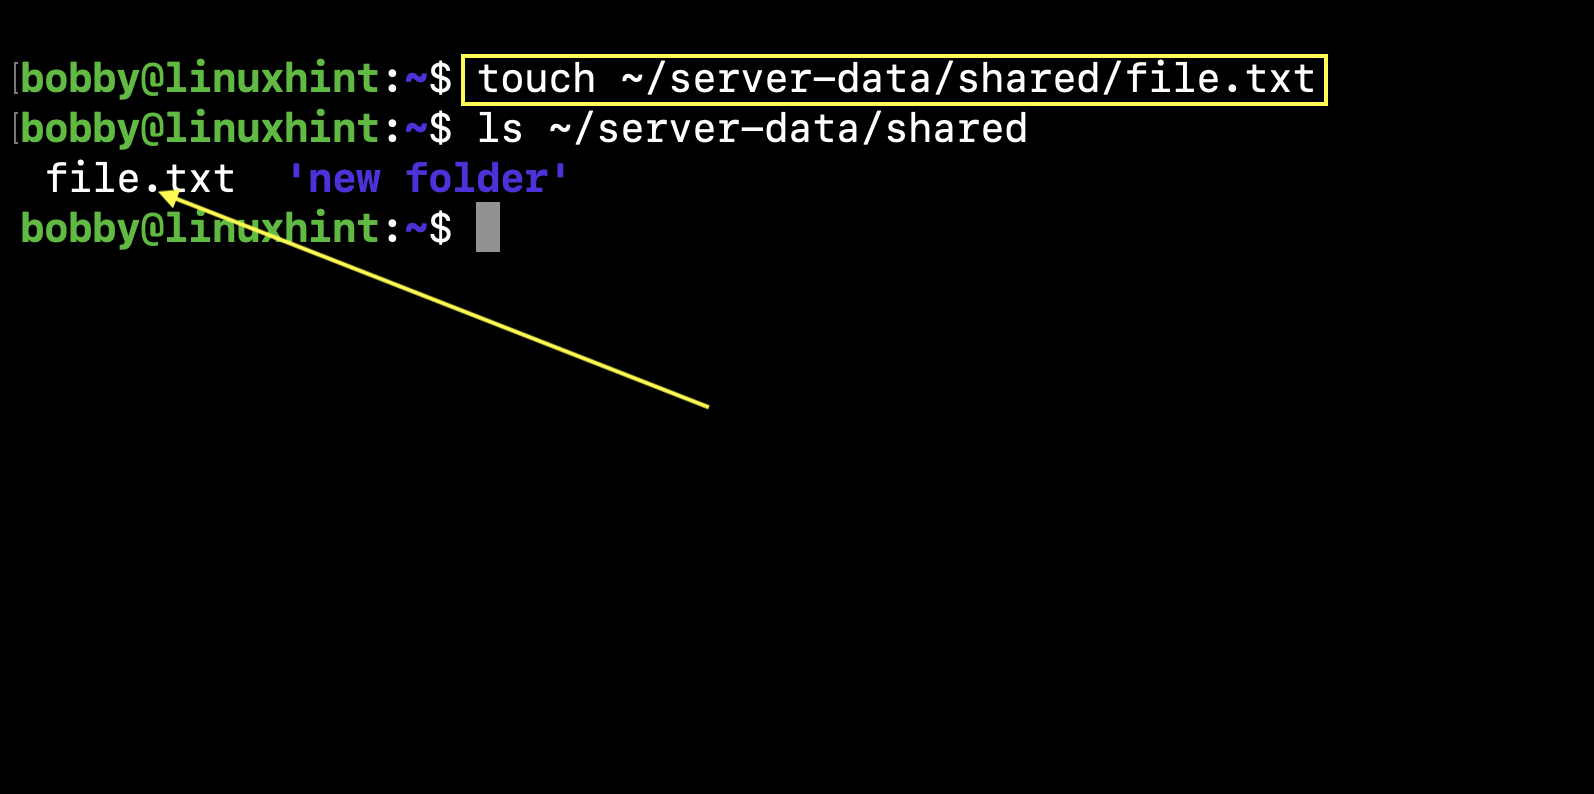
Now it’s also available and can be accessed on our Linux Desktop.
B- Connect to NAS from Mac OS
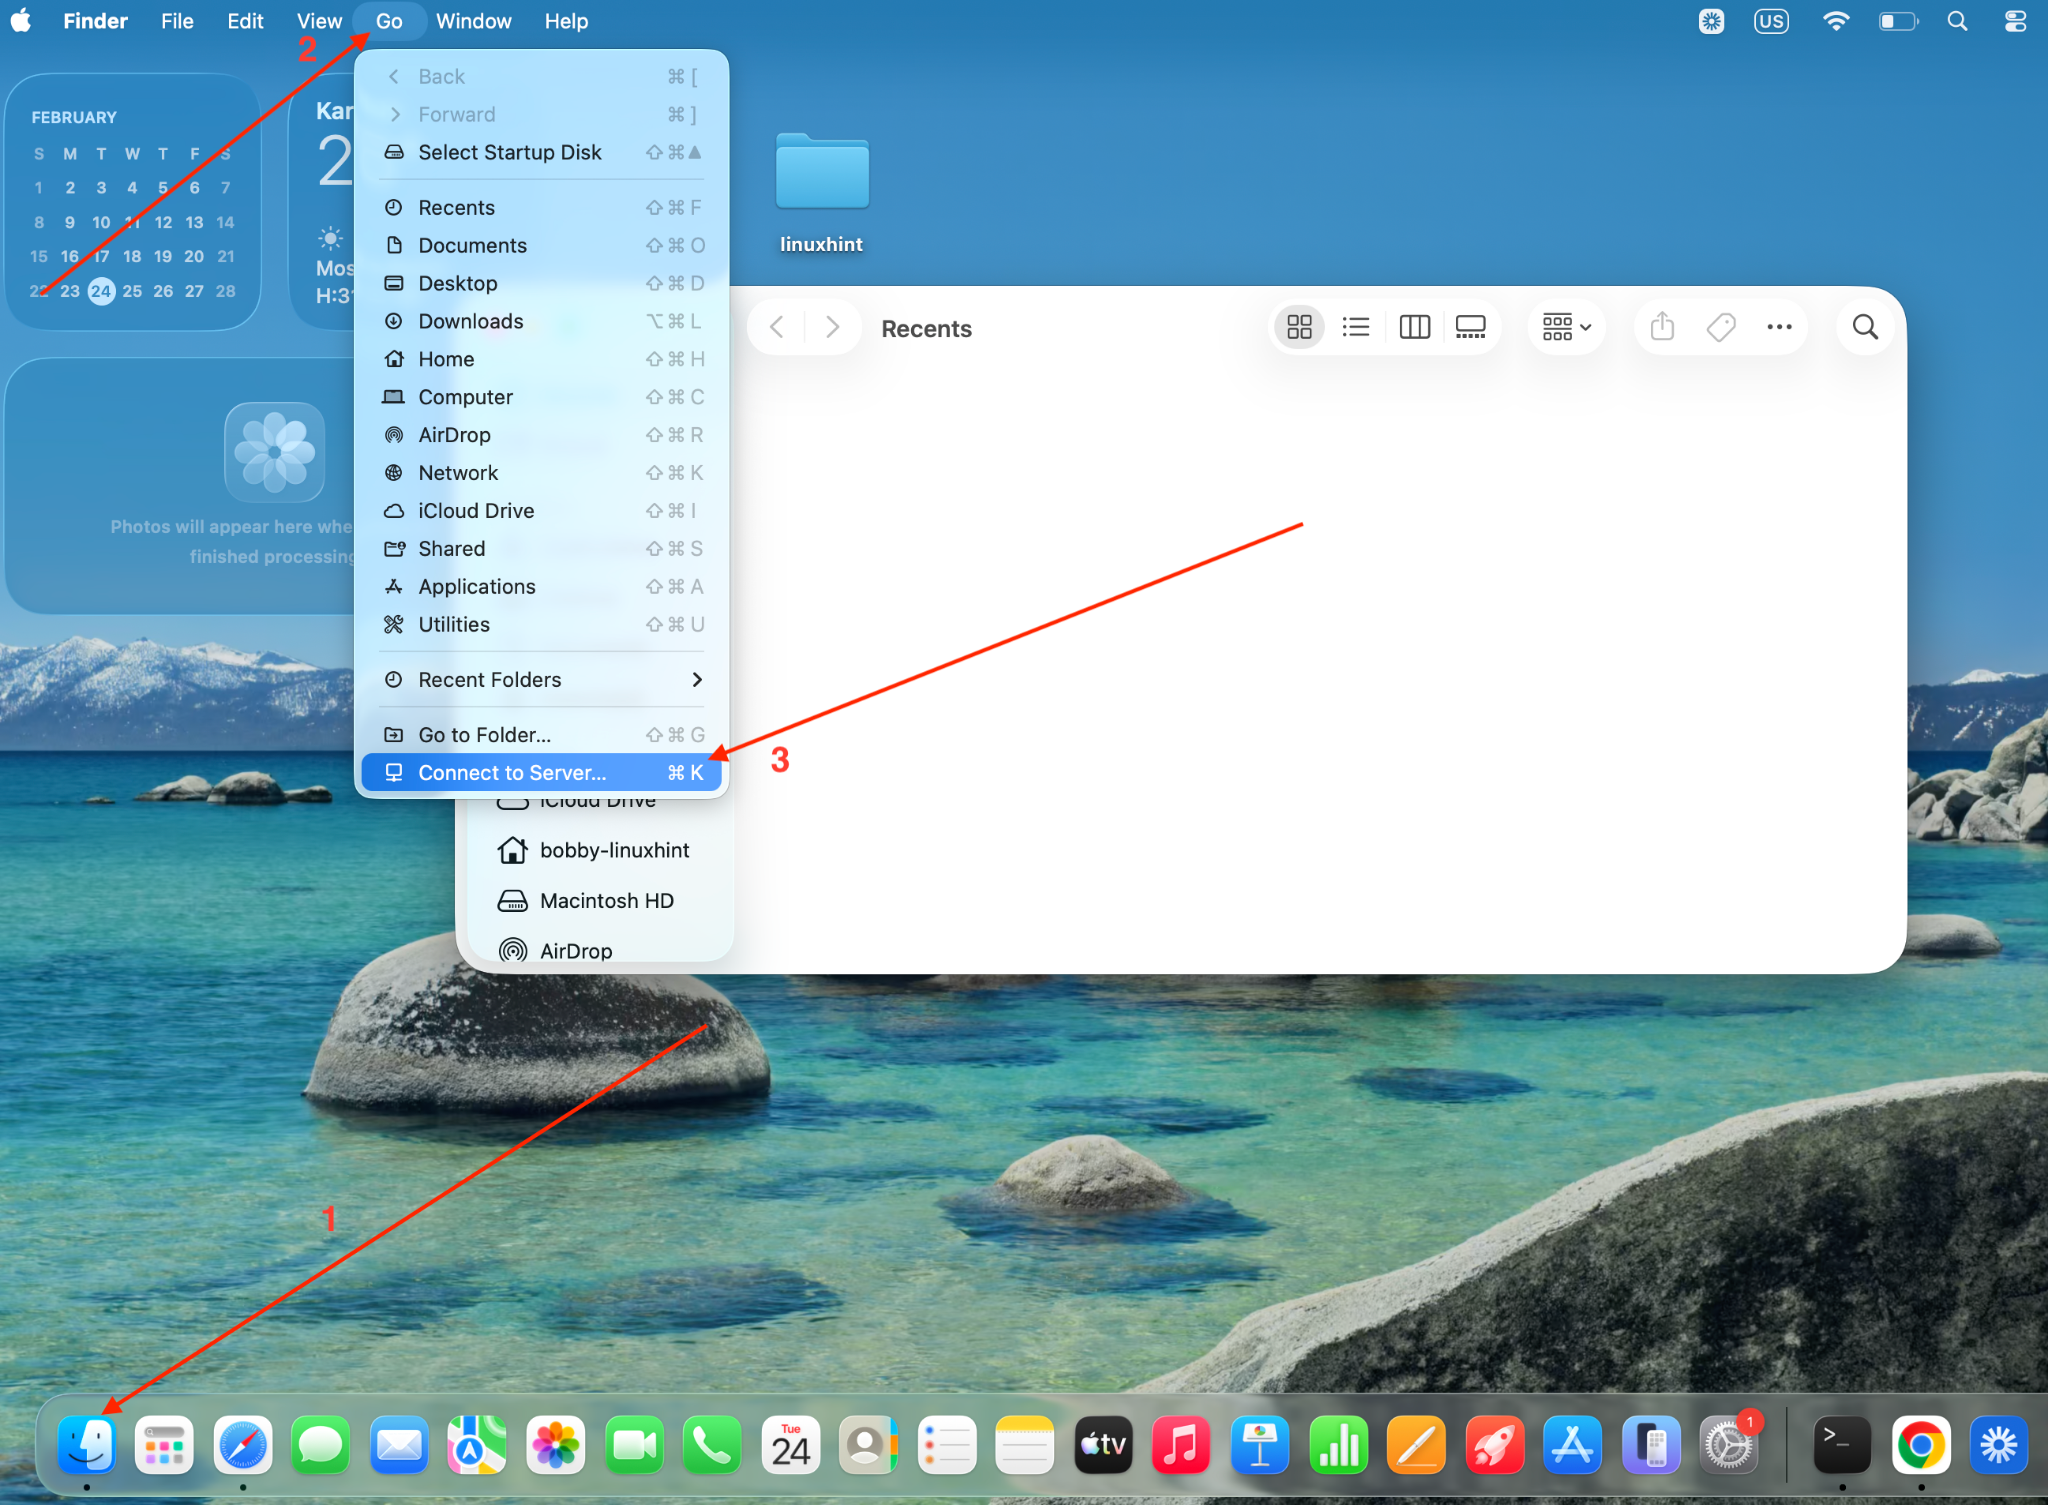
Go to Finder, Select option “Go” and from drop down select “Connect to Server”.
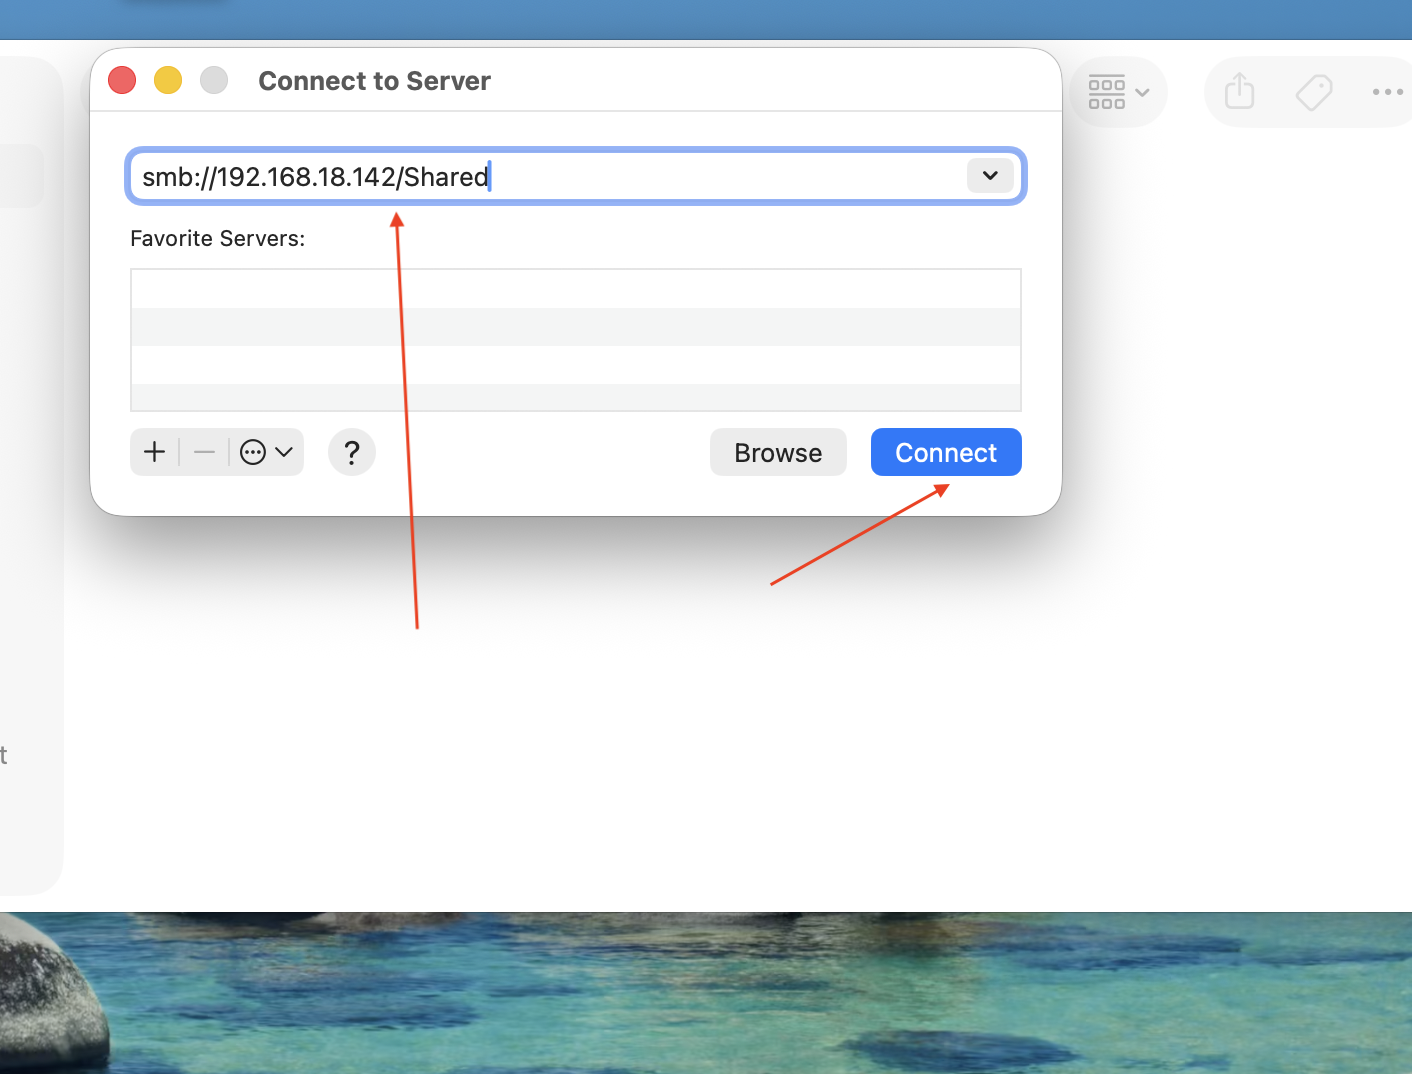
Here you want to enter the path with your server’s IP Address.
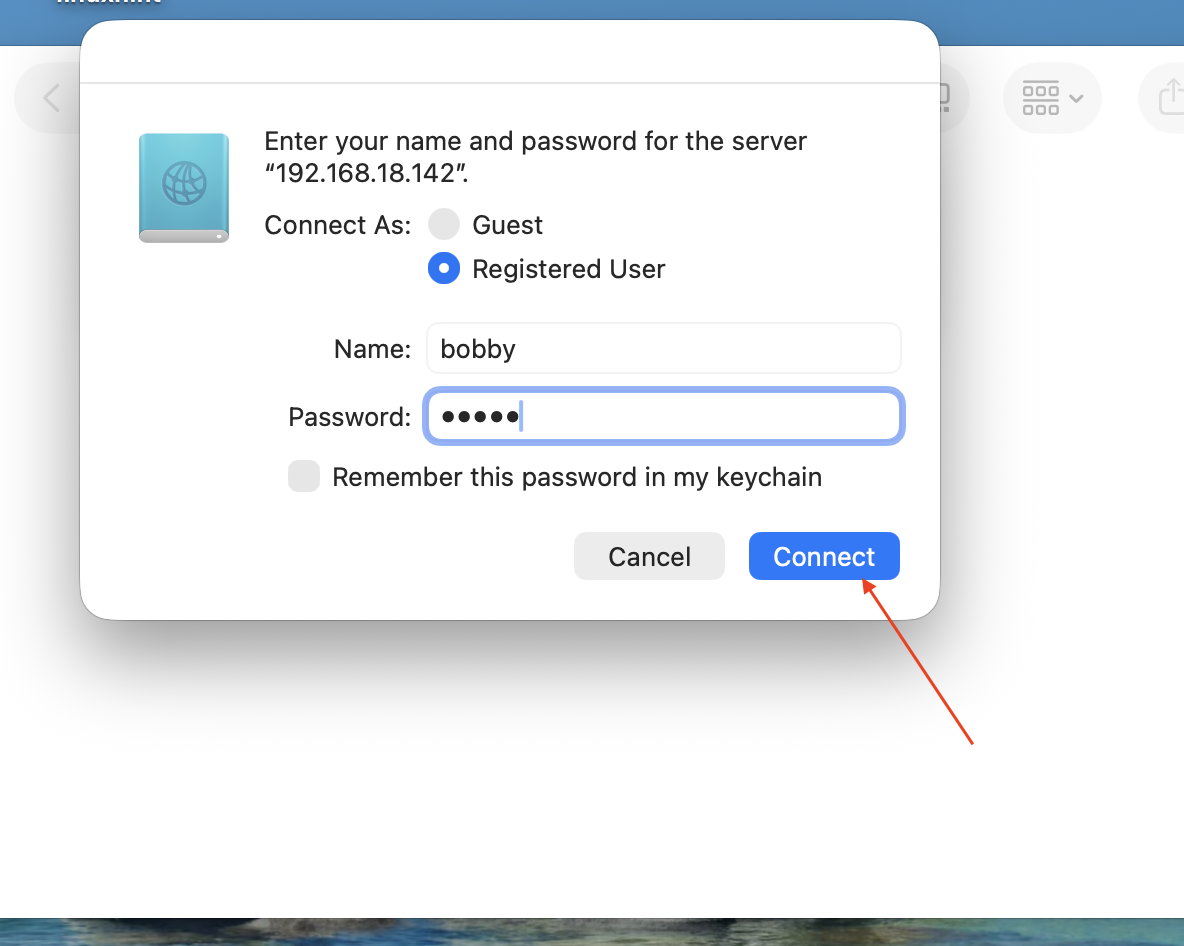
A pop up will appear where you can select Registered User and then enter your username and password and hit Connect.
Now I am connected with my NAS and in my shared folder I can see one folder and one file that I previously created while I was working with Linux. Now I am creating a new directory named LINUXHINT.
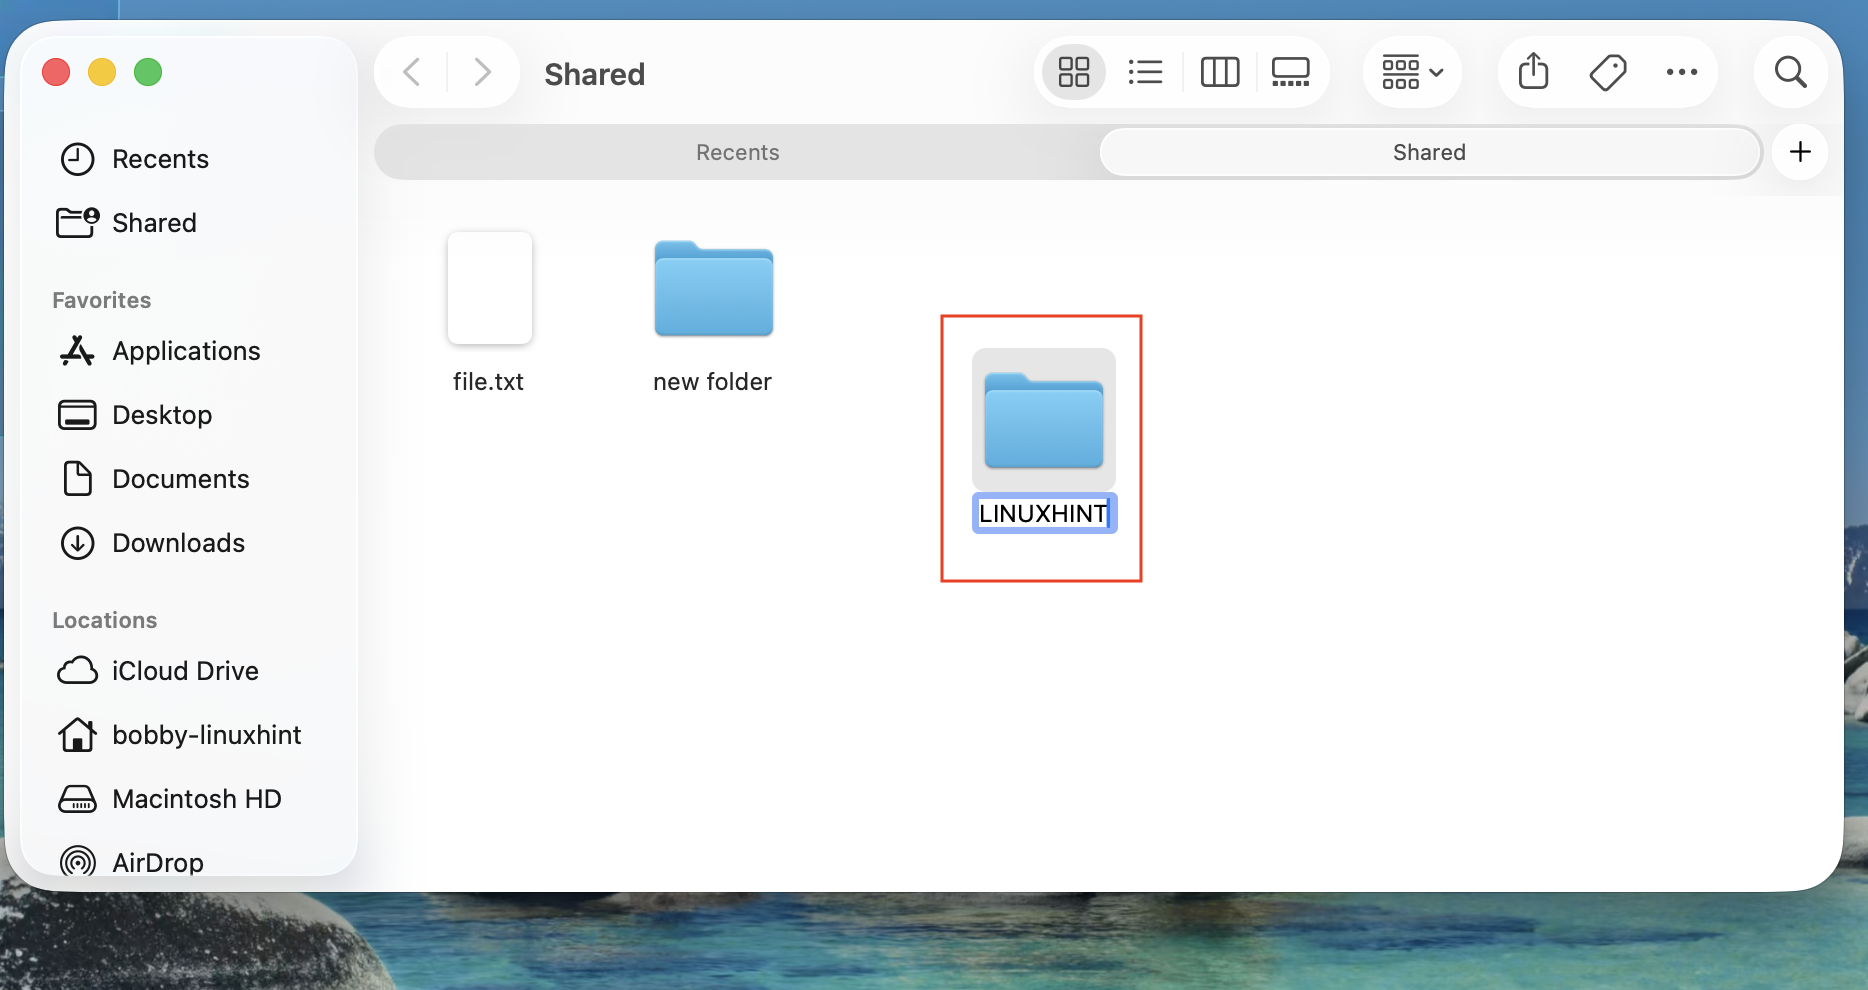
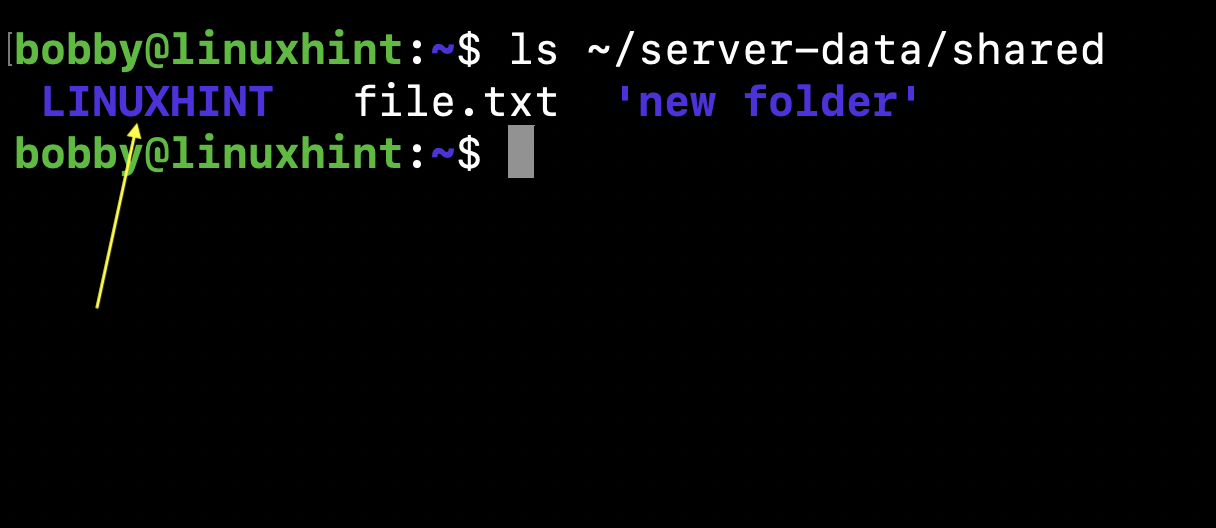
In my NAS server’s shared folder, this newly created directory now exists simultaneously.
C- Connect to NAS from Windows
This is my least favourite part and I haven’t used windows in ages and I am borrowing this laptop from a sibling to just demo this. If you are still using Windows, why don’t you try out Linux?
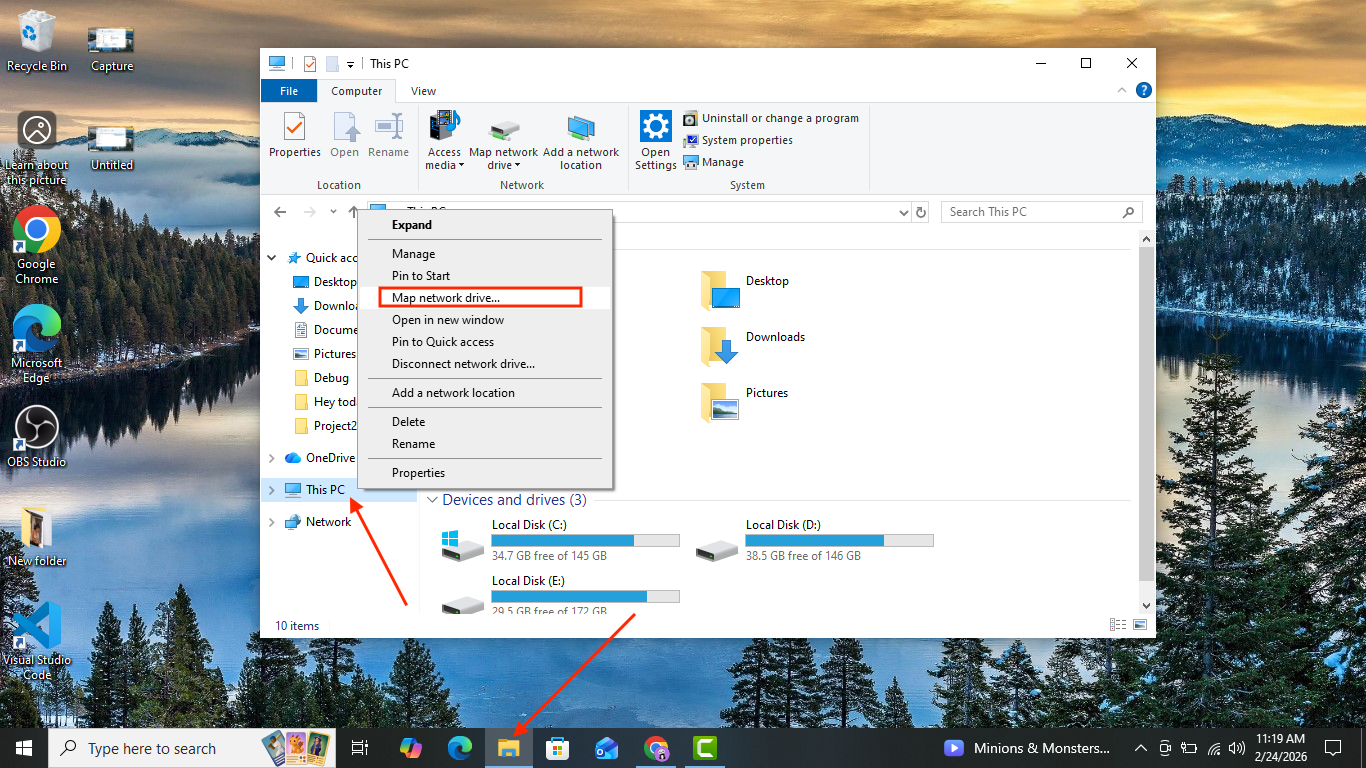
Anyway, right click on “This PC” and select “Map network drive…”.
In this window, add the IP address but make sure you don’t enter smb:// and no “/”. Instead use “\”.
Type in: \\IP-ADDR\Shared
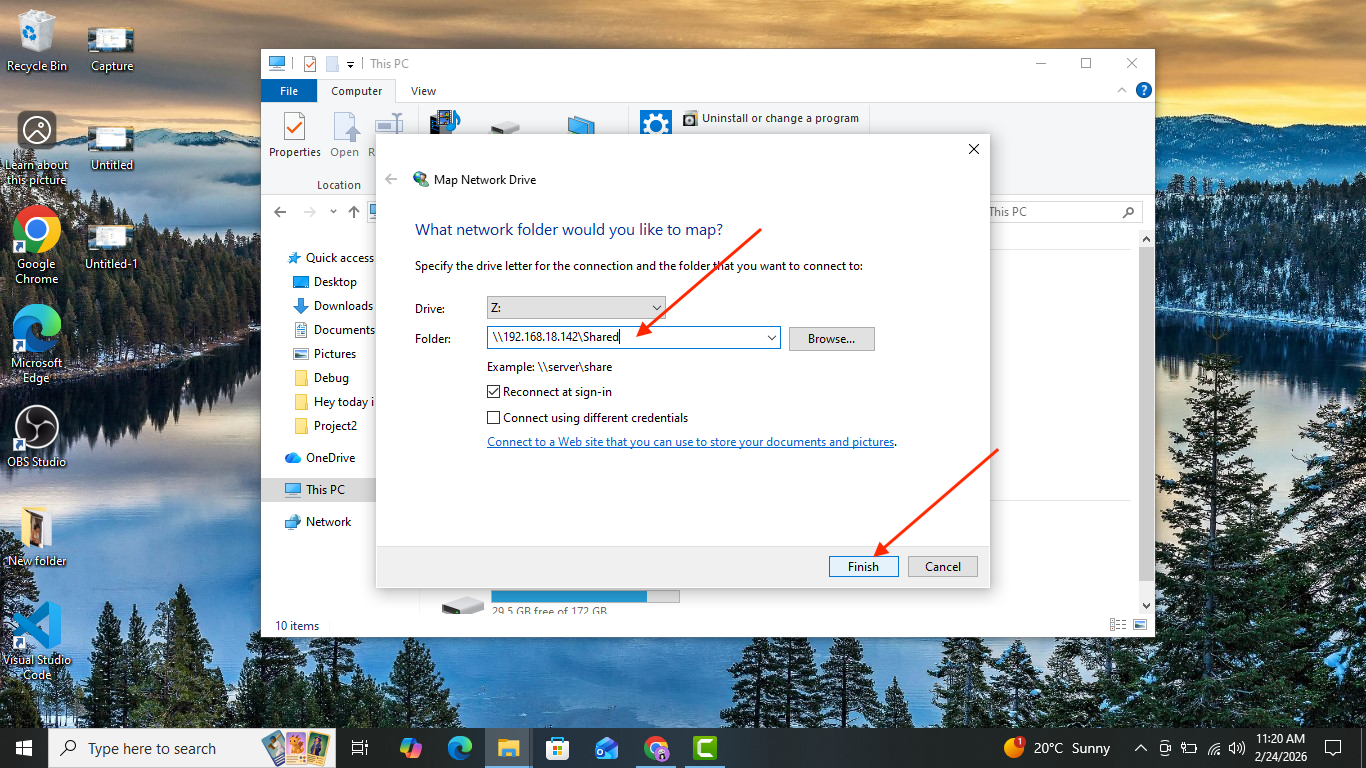
Enter your samba username and password and click ok. You can mark Remember my credentials if you want.
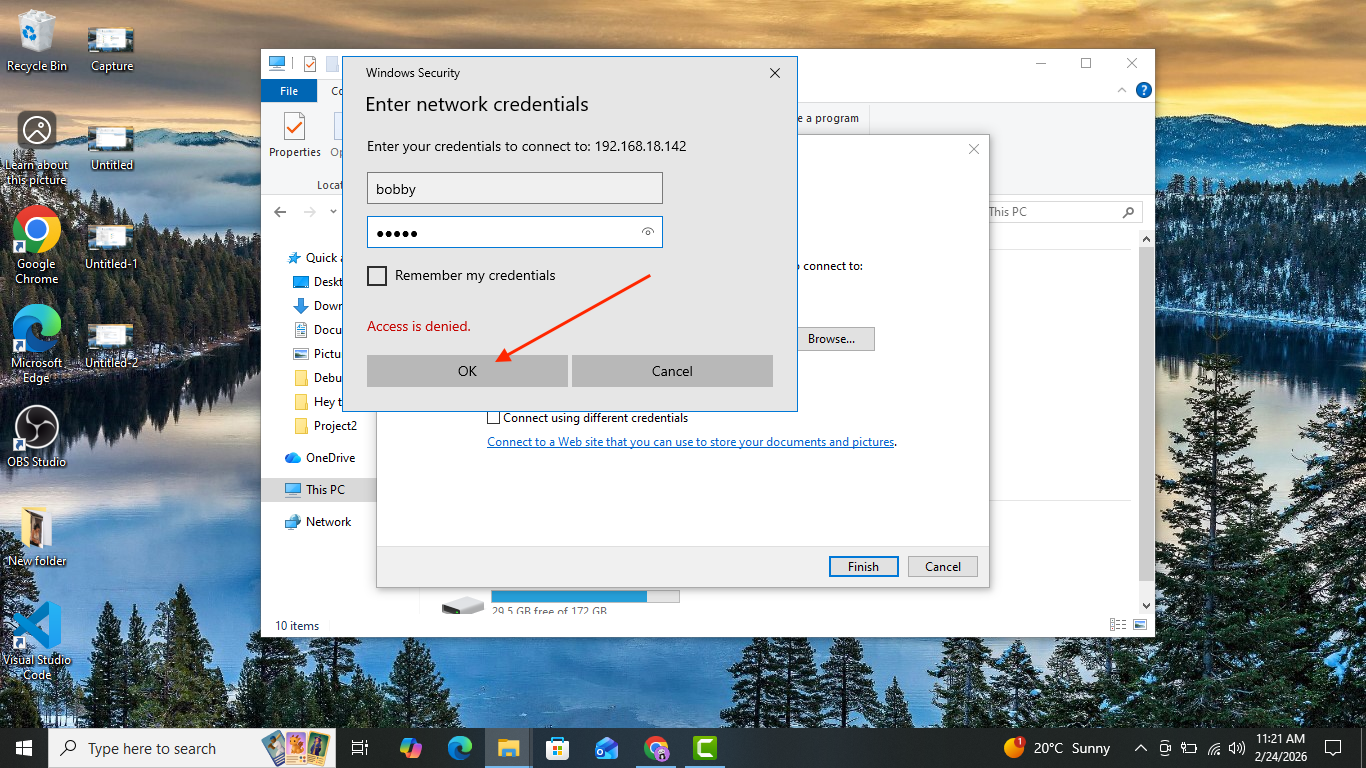
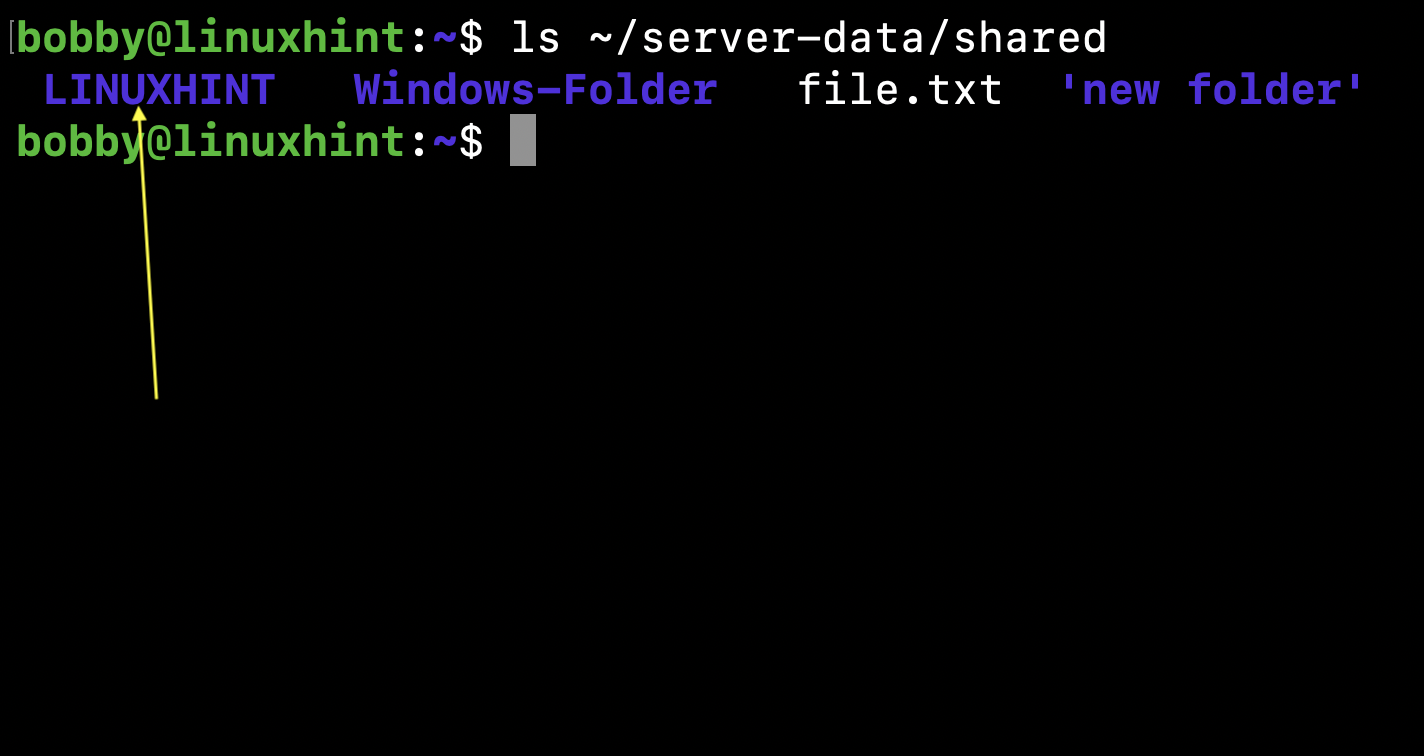
Now you’d be able to access the Shared folder and inside i am creating a new folder named Windows-Folder.
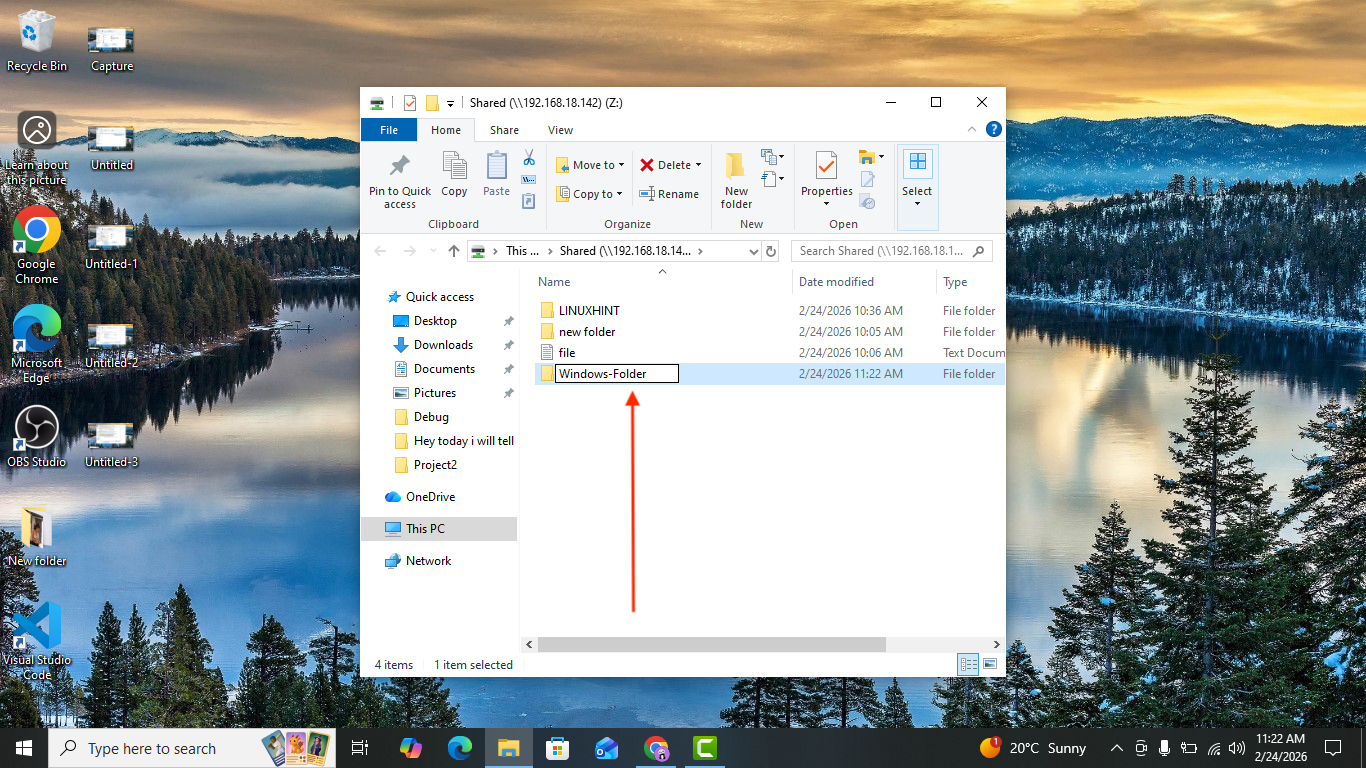
As it’s been created in the central directory, everyone on the network connected with the shared folder will be able to access it. See the shared directory within our server:
10- Conclusion
You saw that we can easily repurpose an old PC into a full time NAS. This NAS then can be used as a central storage space connected with multiple devices through your home network so your files are not scattered but can be accessed in one place from multiple devices. A few things to keep in mind would be to use secure and long passwords with special characters and capital letters and numbers. Never expose your NAS to the internet and if you need to use remote access then use a VPN and generate and use SSH keys to login instead of password, SSH password usage on your trusted home network is fine but if you wanna be extra secure then use SSH keys. Also, remember that your NAS is not a backup so if you want to create the backup of your NAS then it could be another NAS or a cloud service which you can use to create backup. In case of hardware failure or anything, you could lose data(if you don’t have a backup) so it’s always a good practice to check the storage health on the regular with SMART tools or automated alerts.

![[keyword]](https://learnxyz.in/wp-content/uploads/2026/03/1772527509_एवेंटन-सोल्टेरा-3-इलेक्ट्रिक-बाइक-समीक्षा-एक-मजेदार-हाइब्रिड-सिंगल.png)