

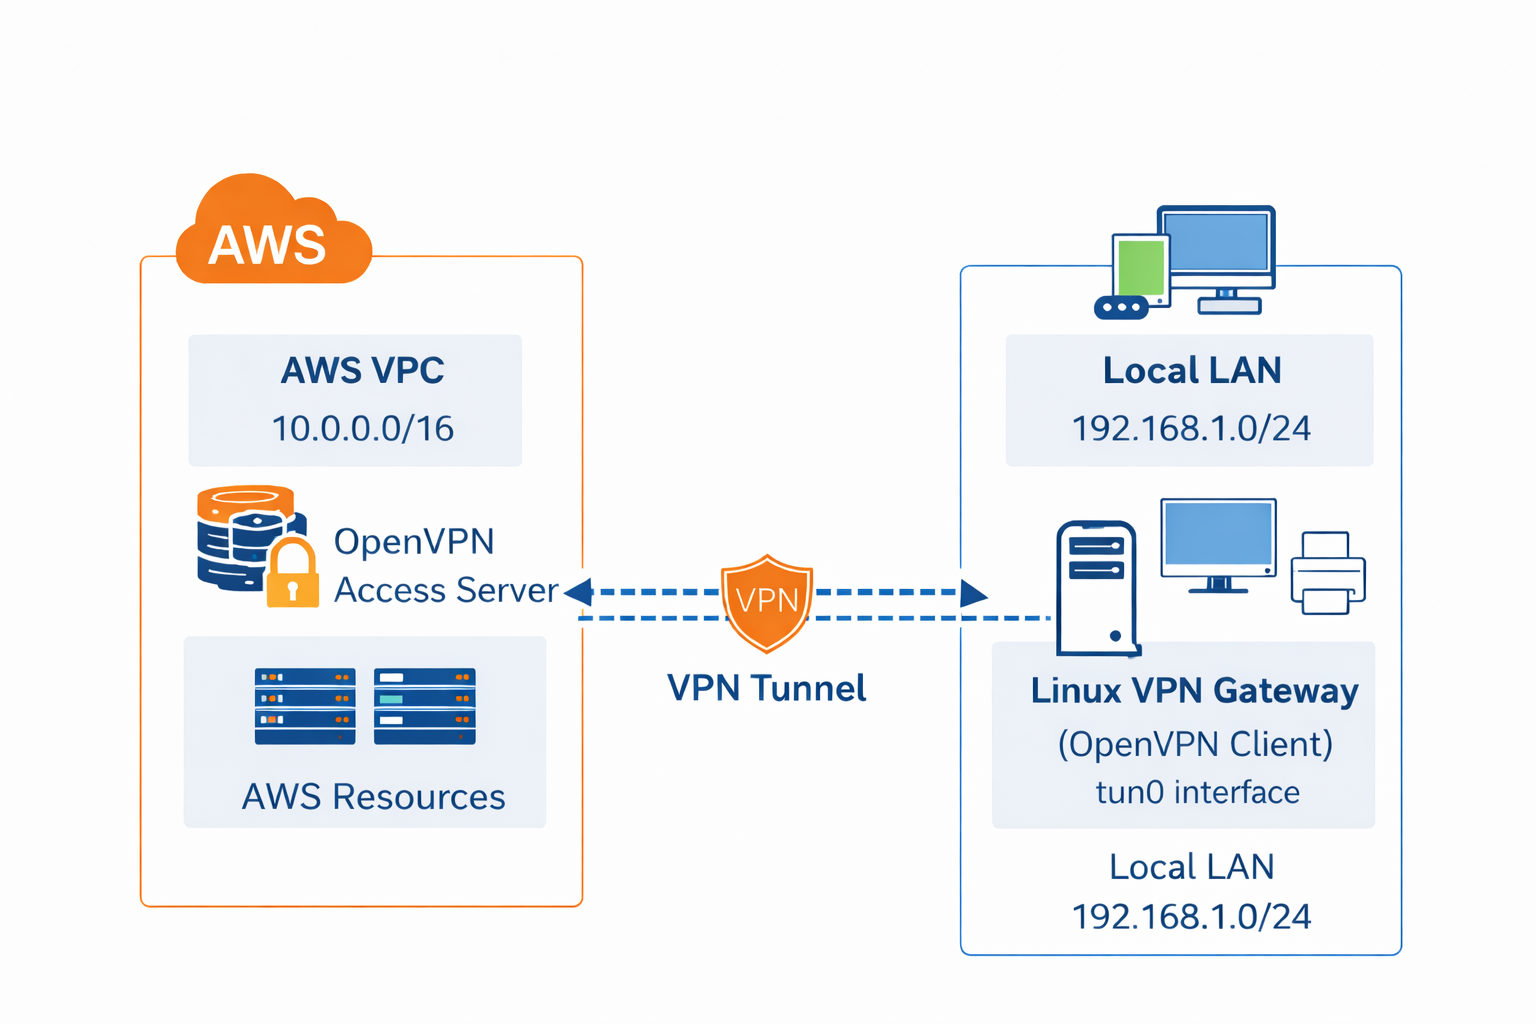
A site to site VPN connects two distinct networks together and forms a secure tunnel between them and due to which both networks and all devices on those networks behave as though they are connected to the same network. See the thing is that internet is a very public place and may be your company is working on a product and has all their resources on AWS so the best way to stay secure would be to configure a site to site VPN in AWS and configure a gateway on a linux device or configure your router to connect your office network to AWS via OpenVPN Access Server. A secure tunnel will be formed between two networks and they will behave as one private network.
In this article, we are going to configure a Linux machine as our gateway for our local network and establish a site to site vpn connection. We would do the required settings and configurations on our gateway machine and walk you through the entire process. To simplify the deployment of openvpn access server, we are going to use OpenVPN Access Server/Self Hosted VPN(PayG) Amazon Machine Image (AMI) which can be installed on an EC2 instance with one-click and you can forget about all those manual installations.
Here’s how to create a site-to-site vpn in aws using access server step by step:
Step 2: Launch OpenVPN Access Server
Step 3: Configure EC2 Instance & Networking
Step 1. Get AWS Network Ready
Before we deploy the OpenVPN Access Server, we need to get the AWS network ready with a few networking configurations. We will create a Virtual Private Cloud (VPC) and after setting up a few networking components, we will launch OpenVPN Access Servers’ EC2 instance. You can follow along and create your own VPC if you don’t have it already.
Create a New VPC
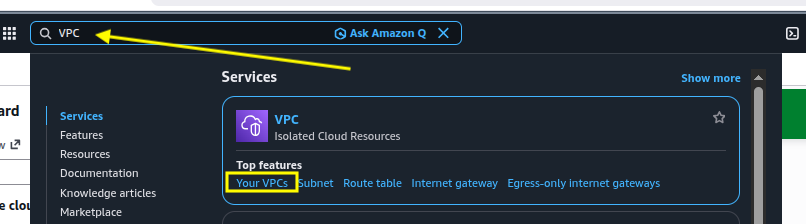
Go to your AWS management console and in there, search for VPC. Go to Your VPCs:
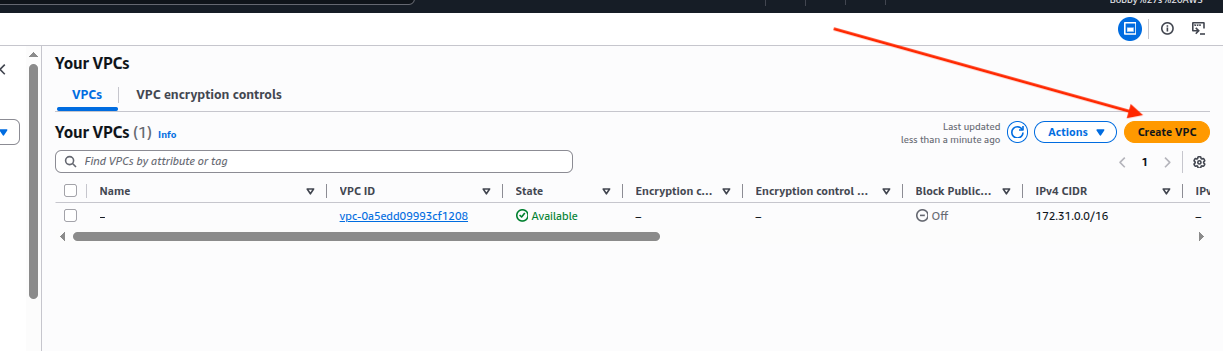
Click on Create VPC option:
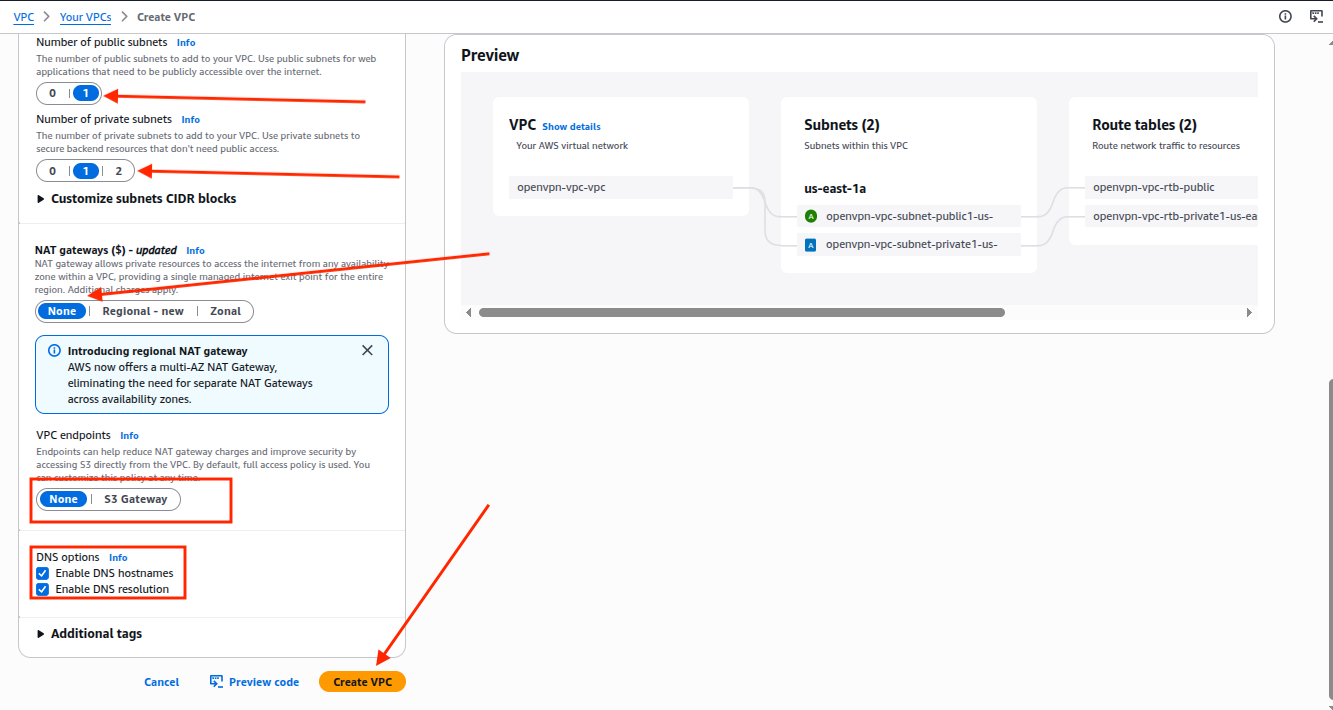
In the VPC Settings, select the option VPC and more, write down the name tag such as in my case “openvpn-vpc” and keep the IPV4 CIDR Block as 10.0.0.0/16 so we can have a large expansion capacity so you can create as many subnets as you want and it avoids the overlapping with general home networks such as 192.168.x.x. That is a must, your IPV4 CIDR Block must not overlap your home network so routing works smoothly.
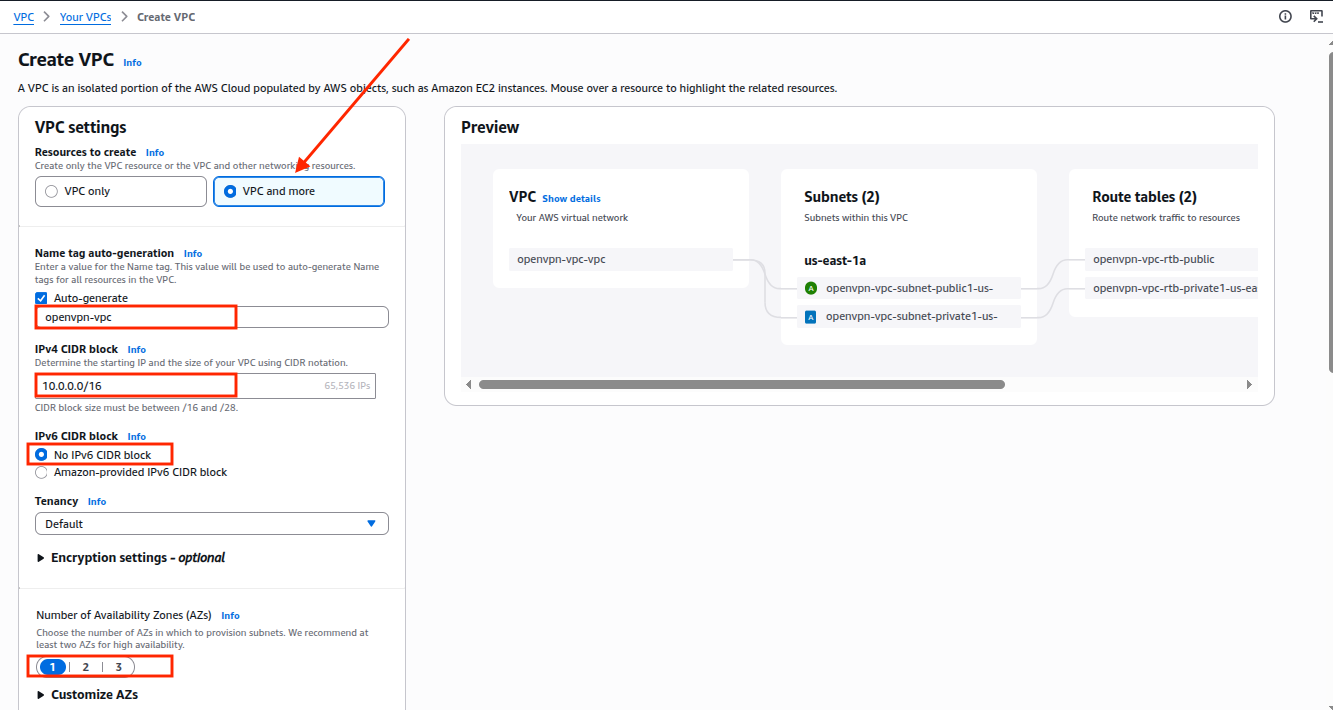
Keep all other options as it is shown in the screenshot below:
After successful creation of VPC, you will see this screen:
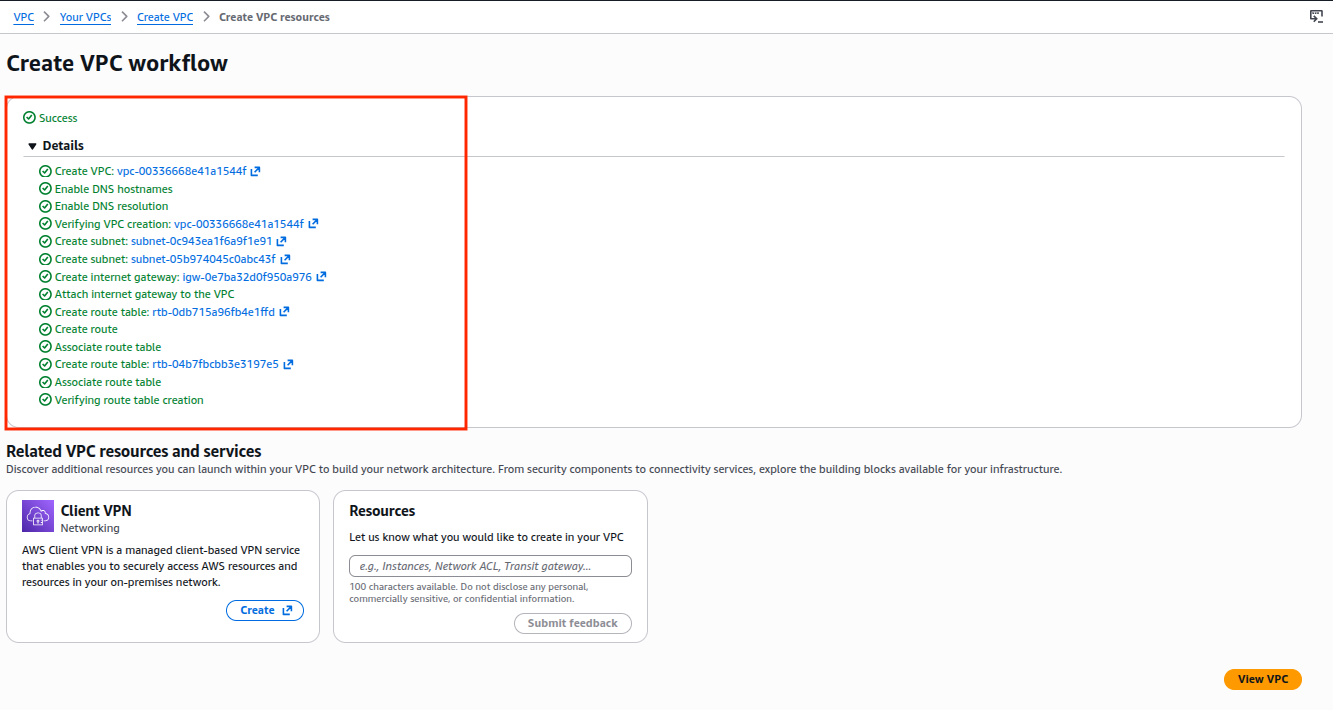
One thing to keep in mind is that when we selected the option “VPC and more” then AWS created our networking components automatically such as public and private subnets, routing tables and internet gateway which you can also see on the successful VPC creation screen and you can click on their IDs to further check them out.
Step 2. Launch OpenVPN Access Server from AWS Marketplace
2.1 Get Subscription
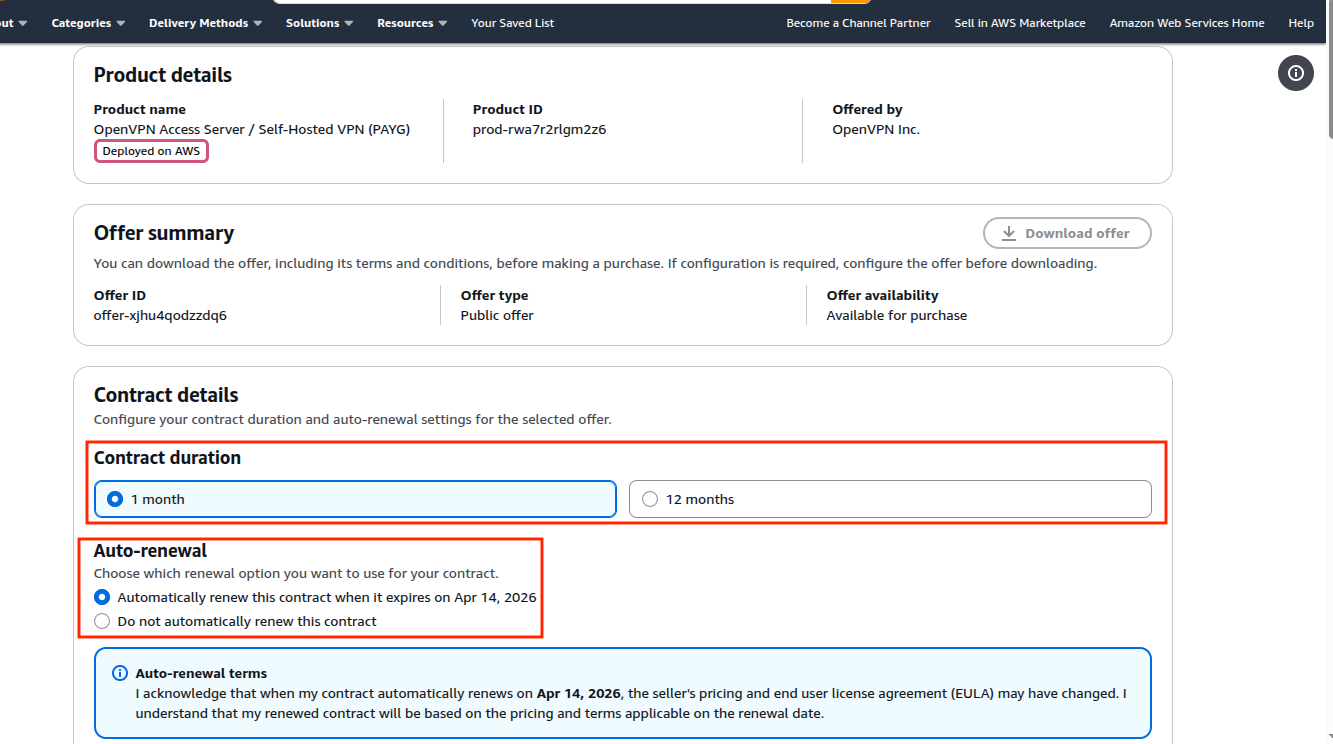
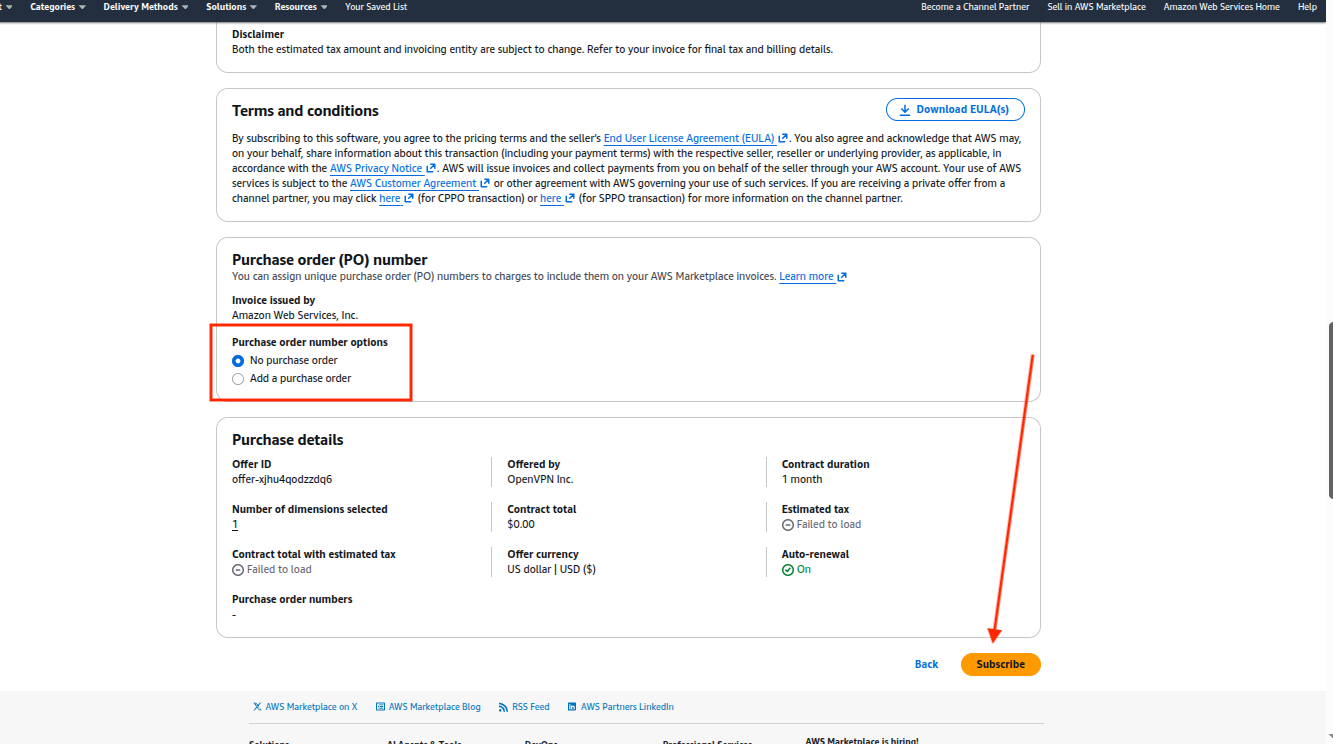
Go ahead and subscribe to OpenVPN Access Server/Self Hosted VPN(PayG) which offers a pay as you go model and it’s quite flexible when it comes to scaling connections as your need grows and it’s very easy and quick to deploy.
On this page you can select your contract duration or whether you want to renew your contract automatically or just want it for the following month.
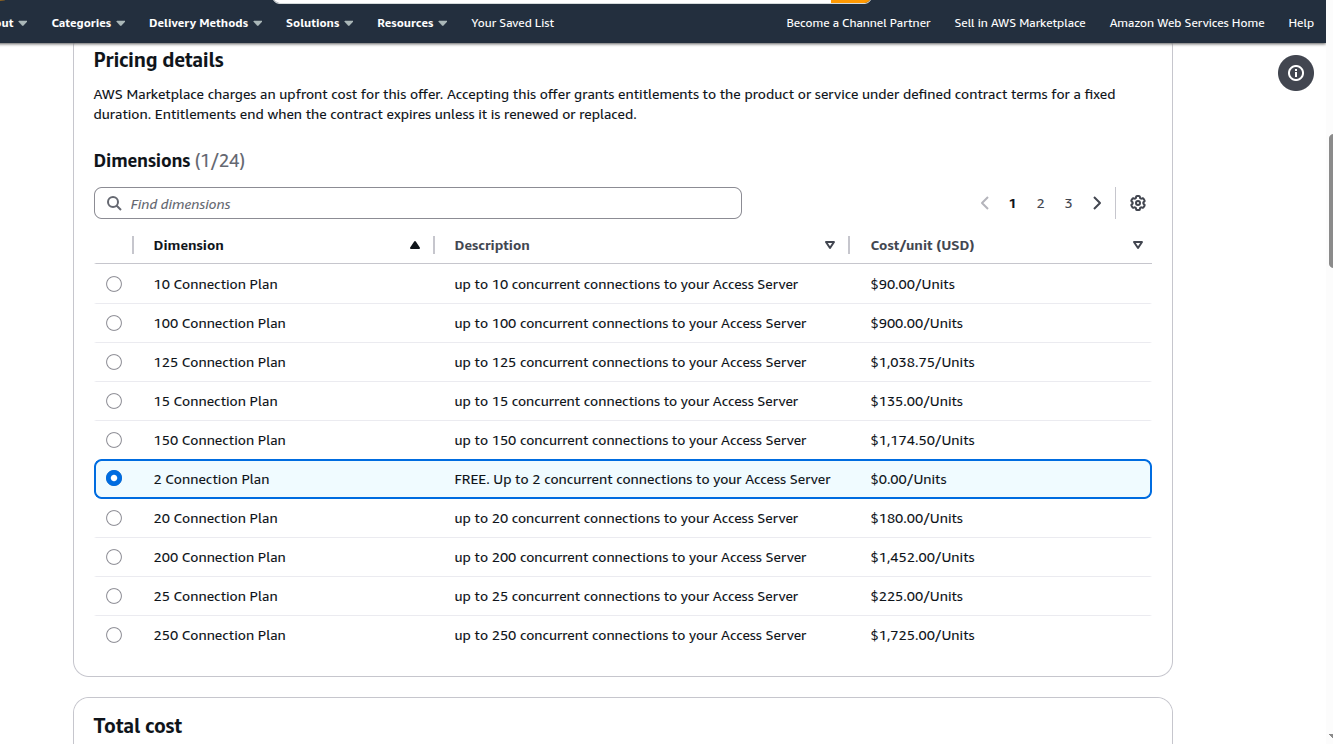
You have 24 dimensions you can choose from depending upon your need, for the sake of this tutorial I’d select 2 connections which is a free option but if you require more connections, go ahead and choose an option that best suits you.
Next you can add a Purchasing Order(PO) if you want and before you hit subscribe, double check all your selections.
2.2 Create OpenVPN Account
Once you subscribe successfully, there will be a button showing up “Set up your account”, alongside the success message, which you can click and it’ll take you to the OpenVPN’s account creation page where you can sign up if you don’t already have an account.

If you already have an account, just sign in.

2.3 Create Stack
After logging in, on the dashboard your subscription will appear and you can choose your region. For low latency, choose the region that is close to your location:
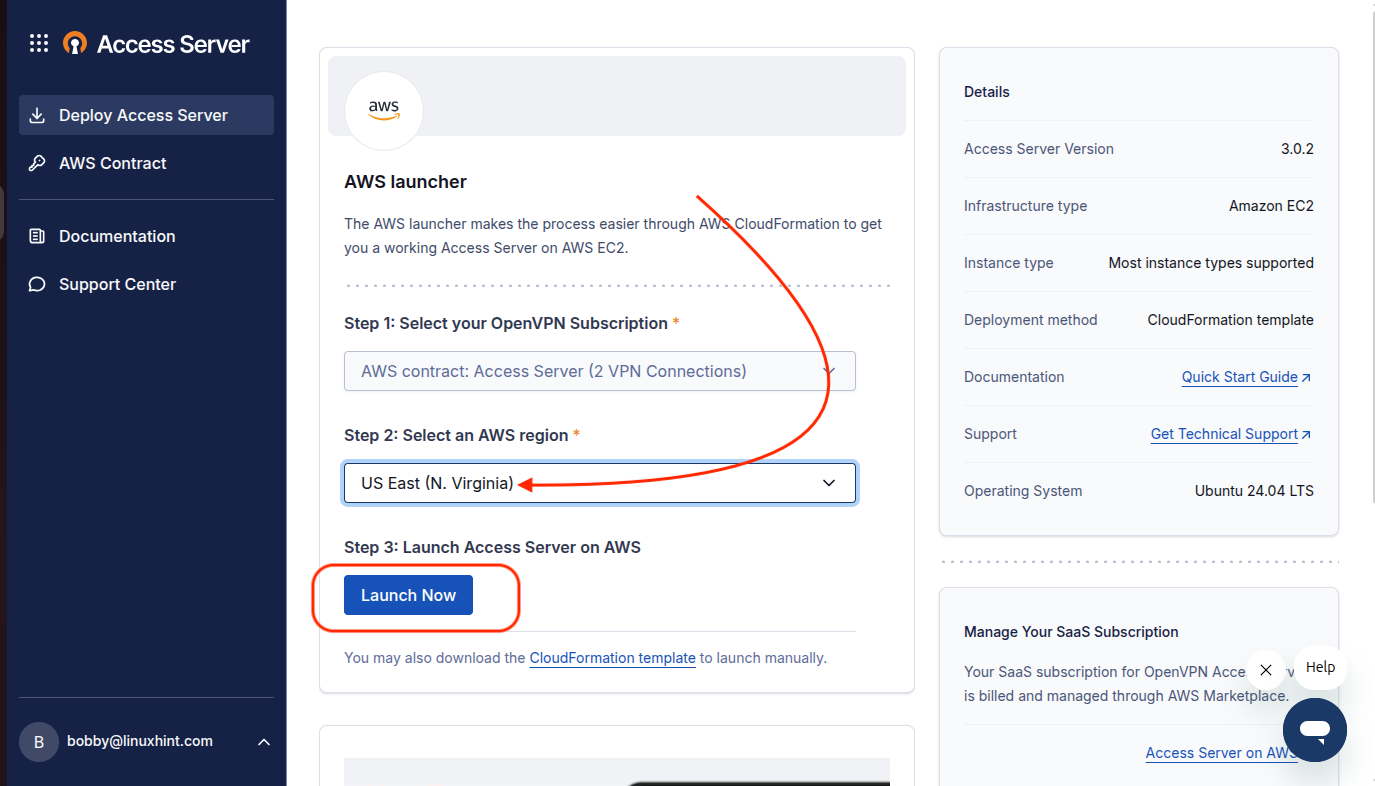
When you click on Launch Now then it will take you to a stack creation page:
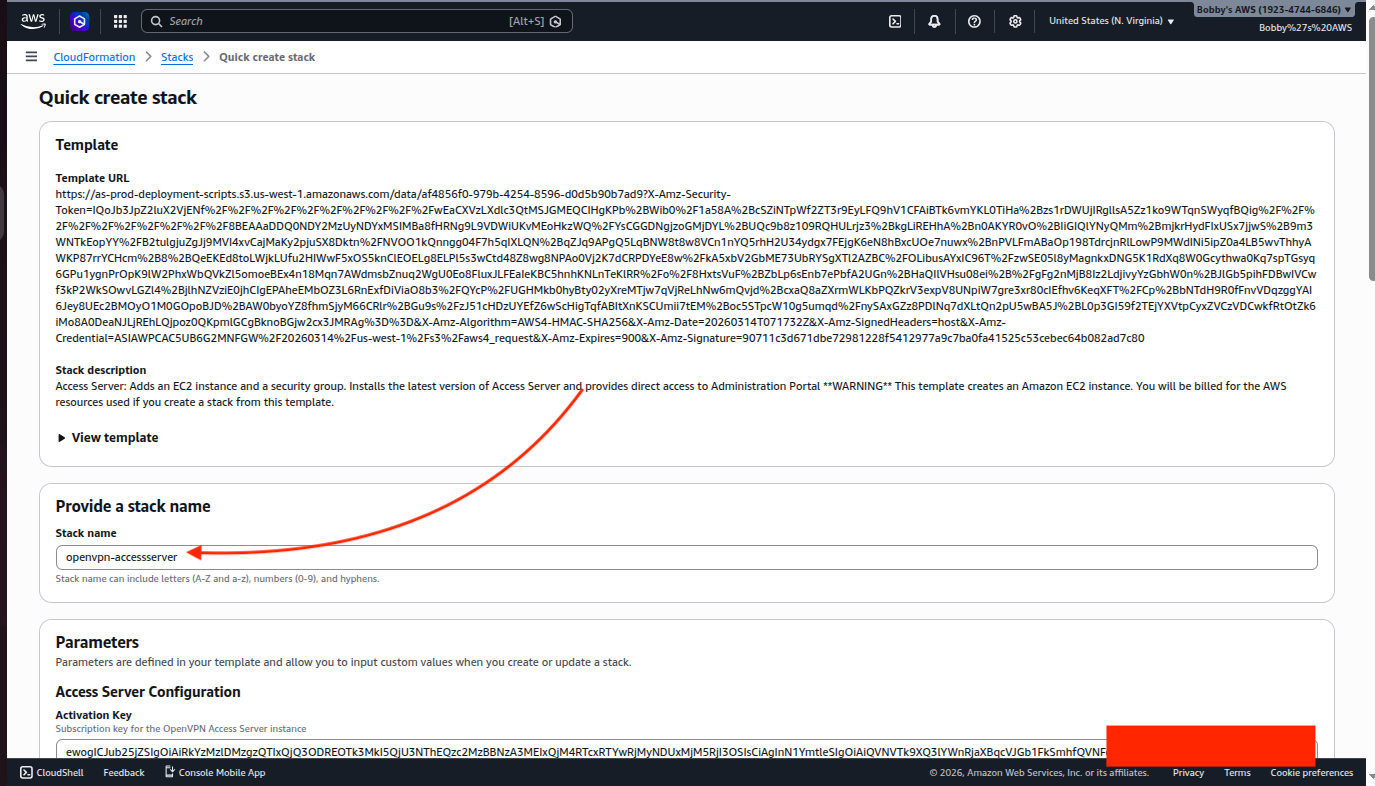
Choose the VPC we created earlier and ensure that Public Subnet ID, we are choosing, belongs to the same VPC. An EC2 instance would be created on which we will deploy our Access Server, so name the EC2 instance, choose the instance type which in our case is t4g.small and for SSH select a keypair name which I have already created.
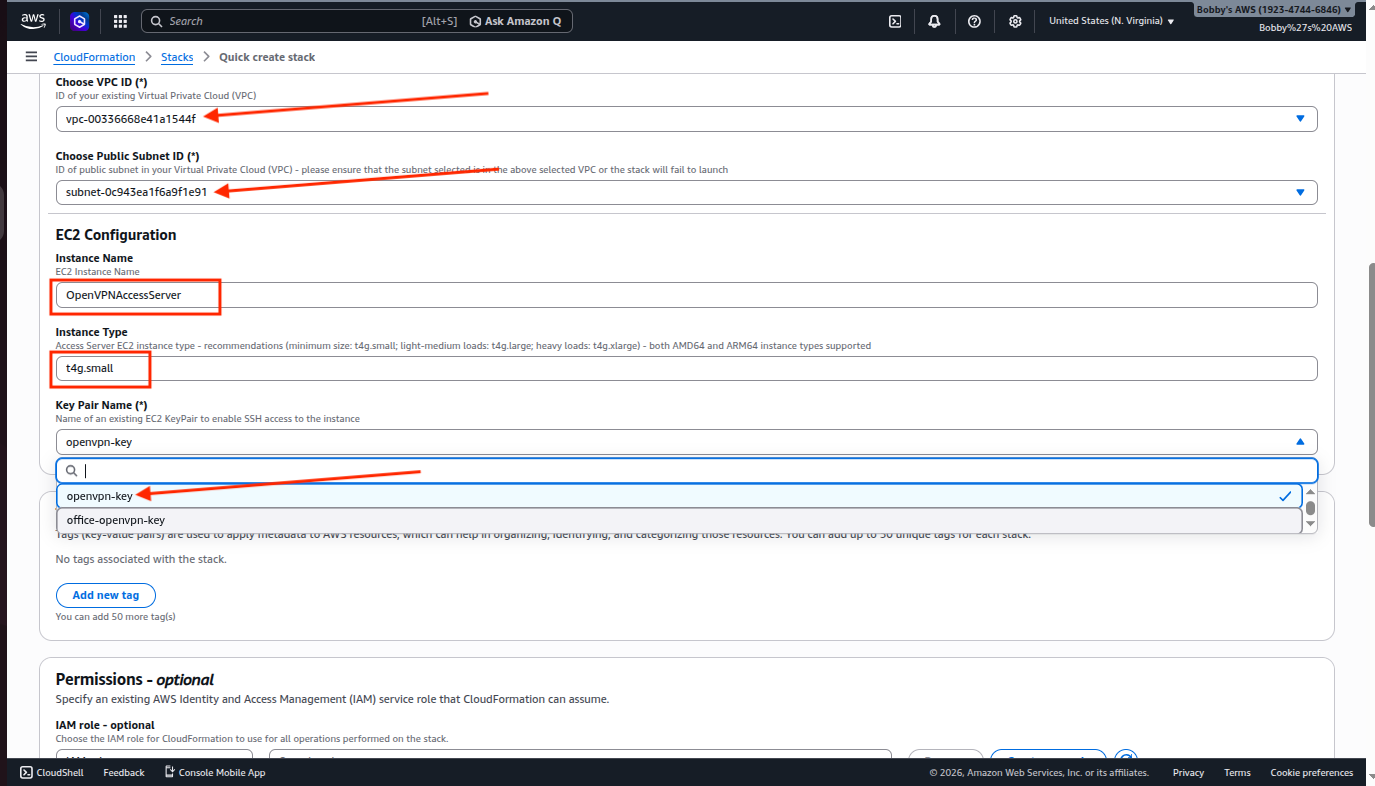
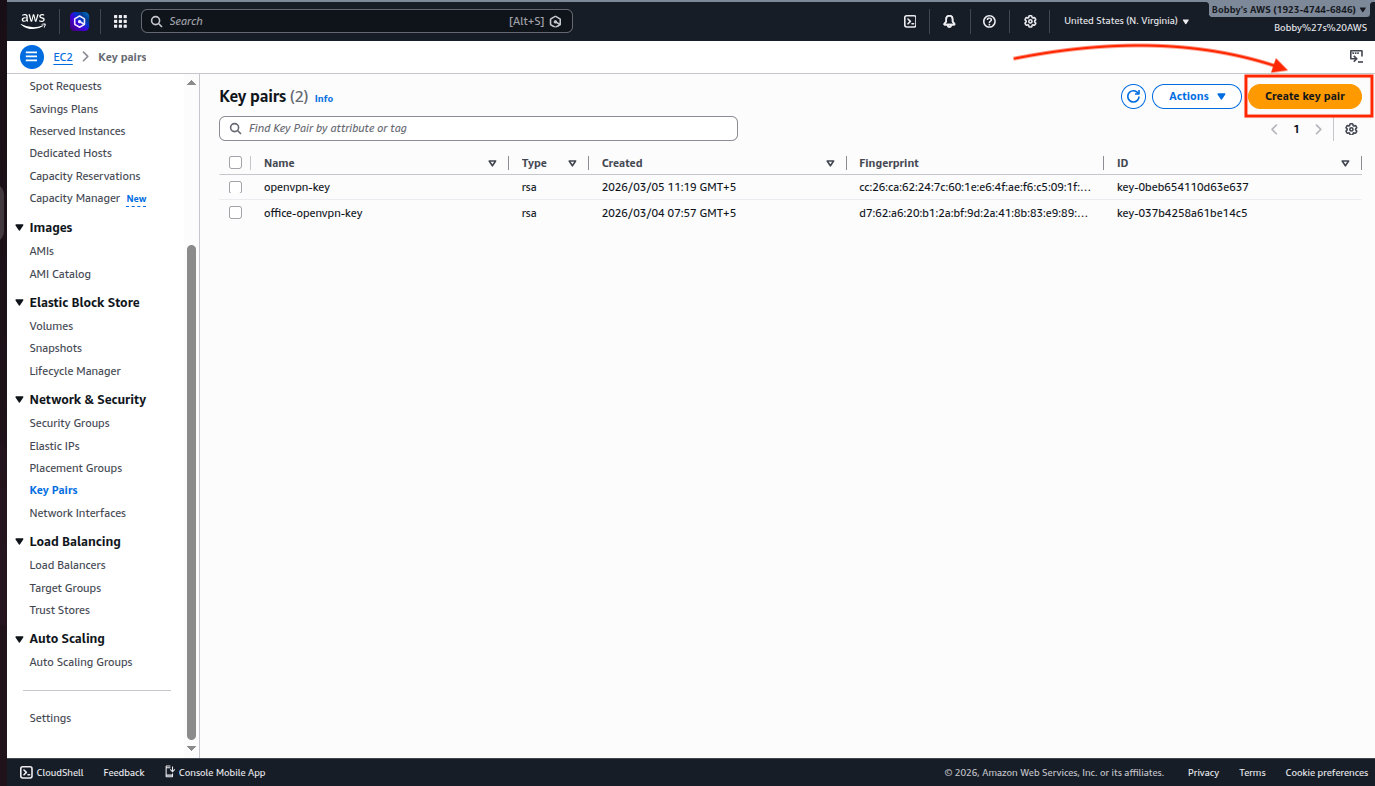
If you don’t have it already then you can create it by going to your EC2 dashboard and then clicking on “Key Pairs” under the Network & Security tab.
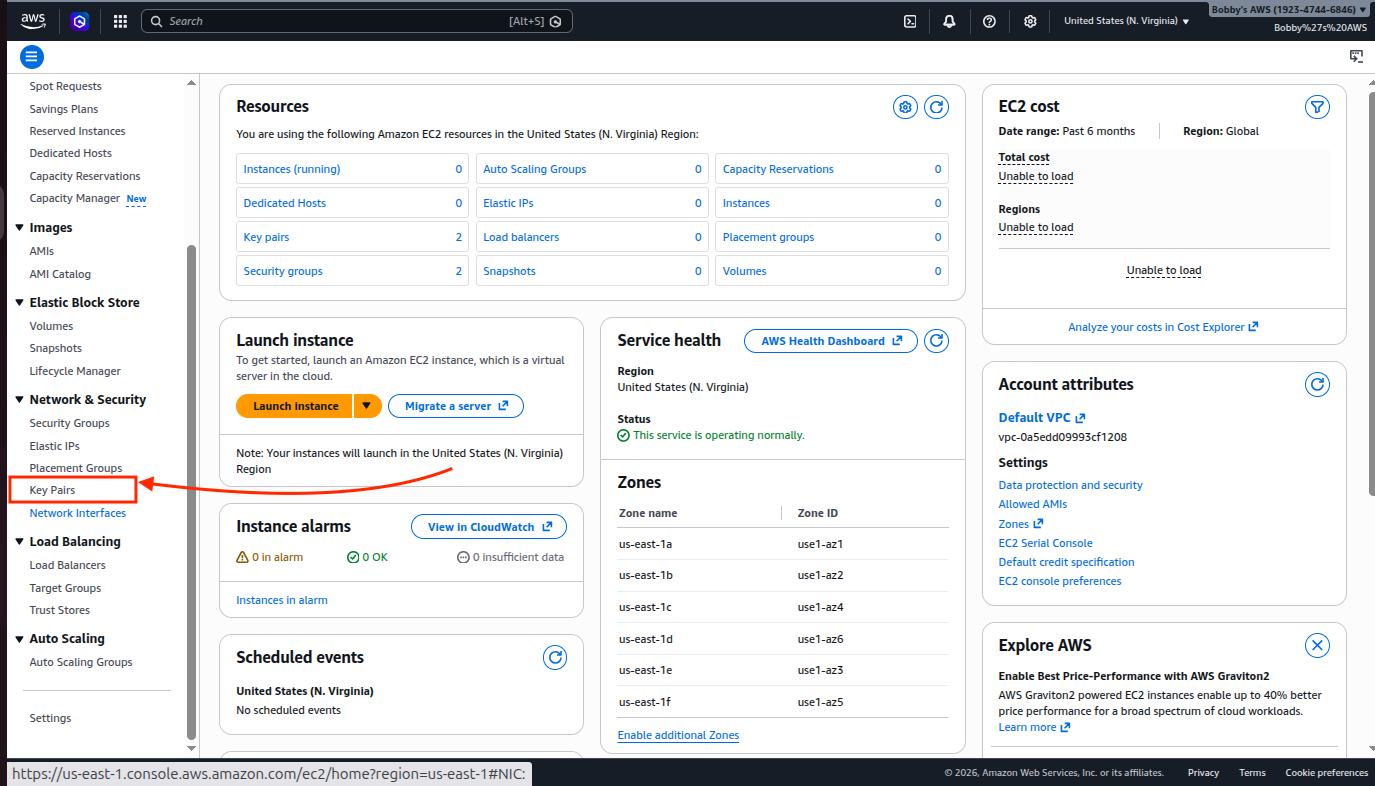
Click on “Create key pair”.
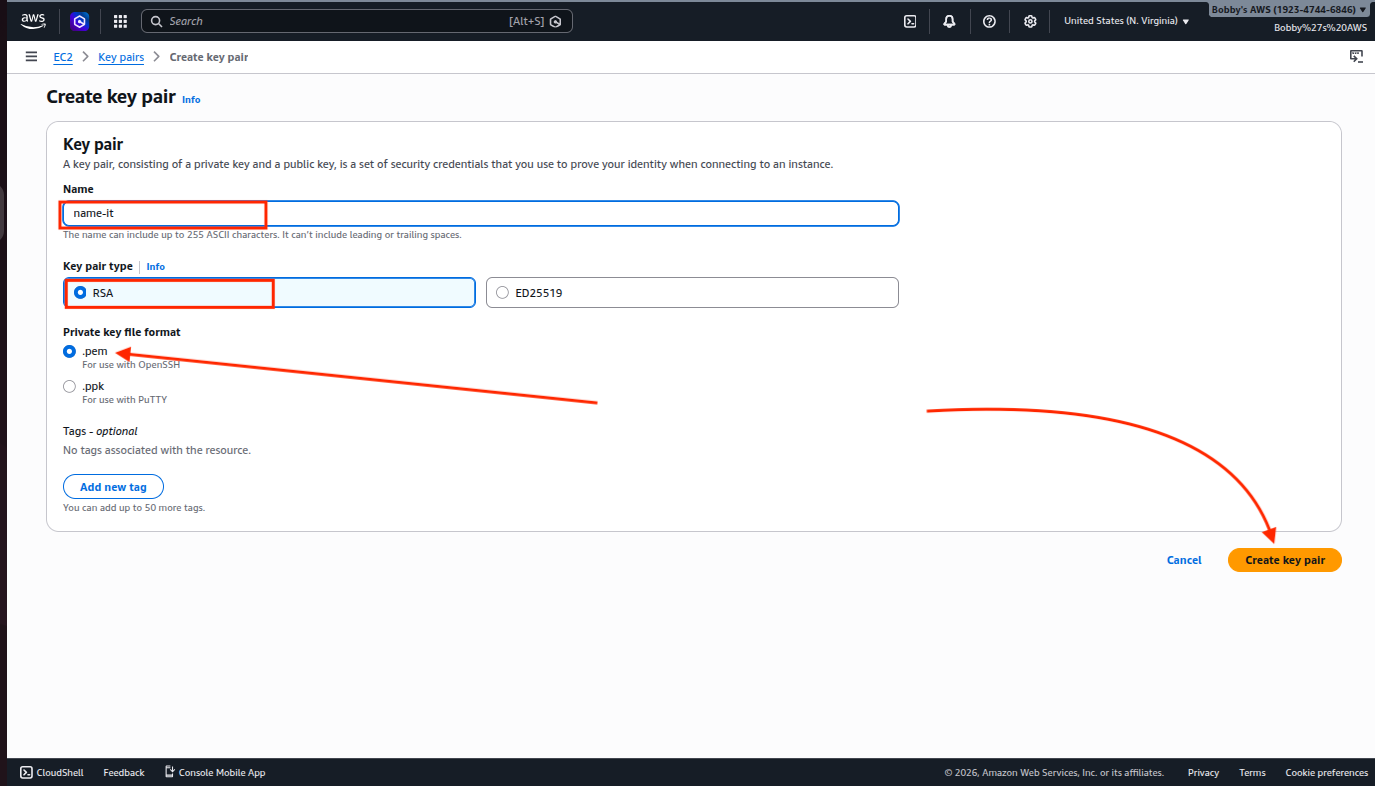
Name your key pair, select the type RSA and the format .pem and then click on the “Create key pair” button. Your file will be downloaded on your system. Make sure whatever keypair you are choosing has its .pem file available on your machine.
Anyway, coming back to the stack creation, If you want to create a name tag then do so, otherwise go all the way down and check the box where it says “I acknowledge…” and then click on the “Create stack” button.

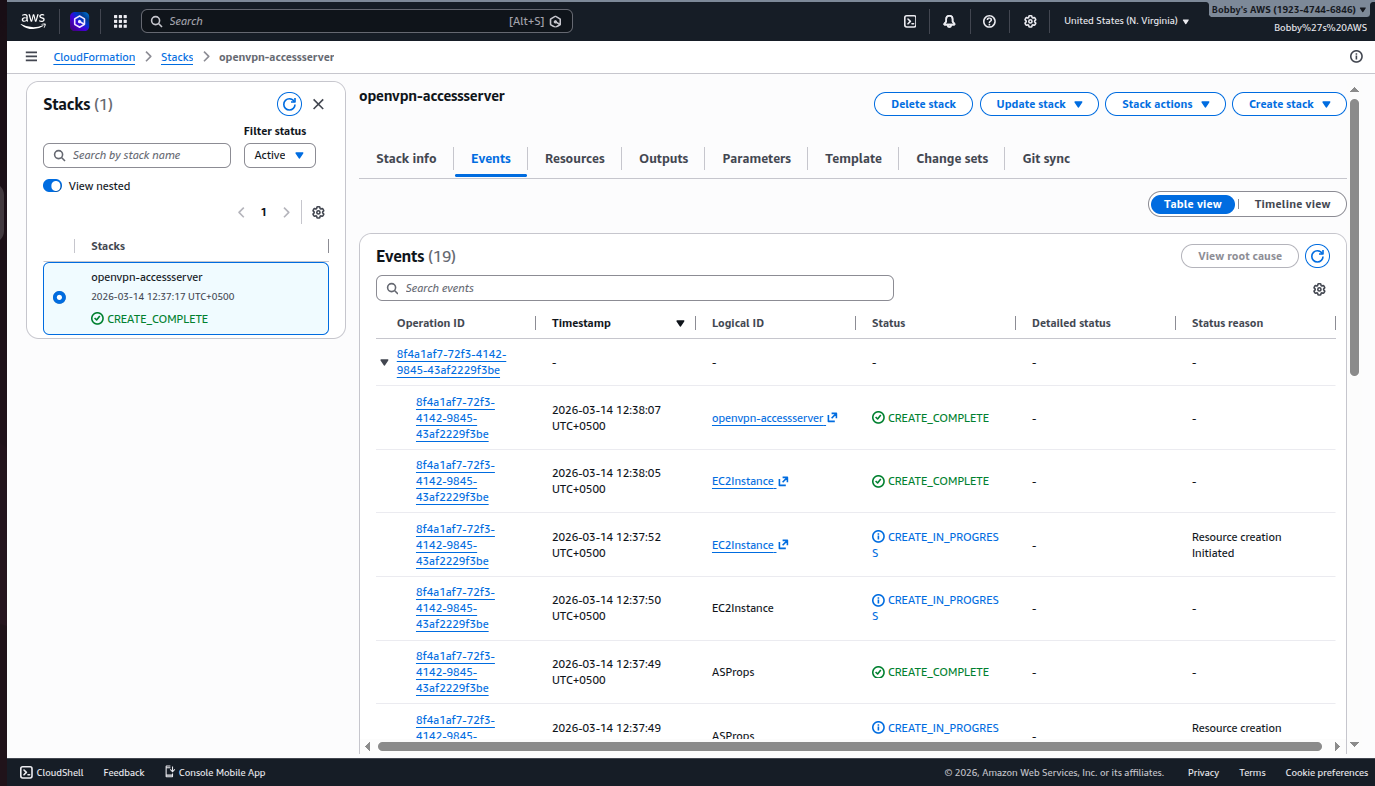
Once stack creation is successful then you will see a screen like this:
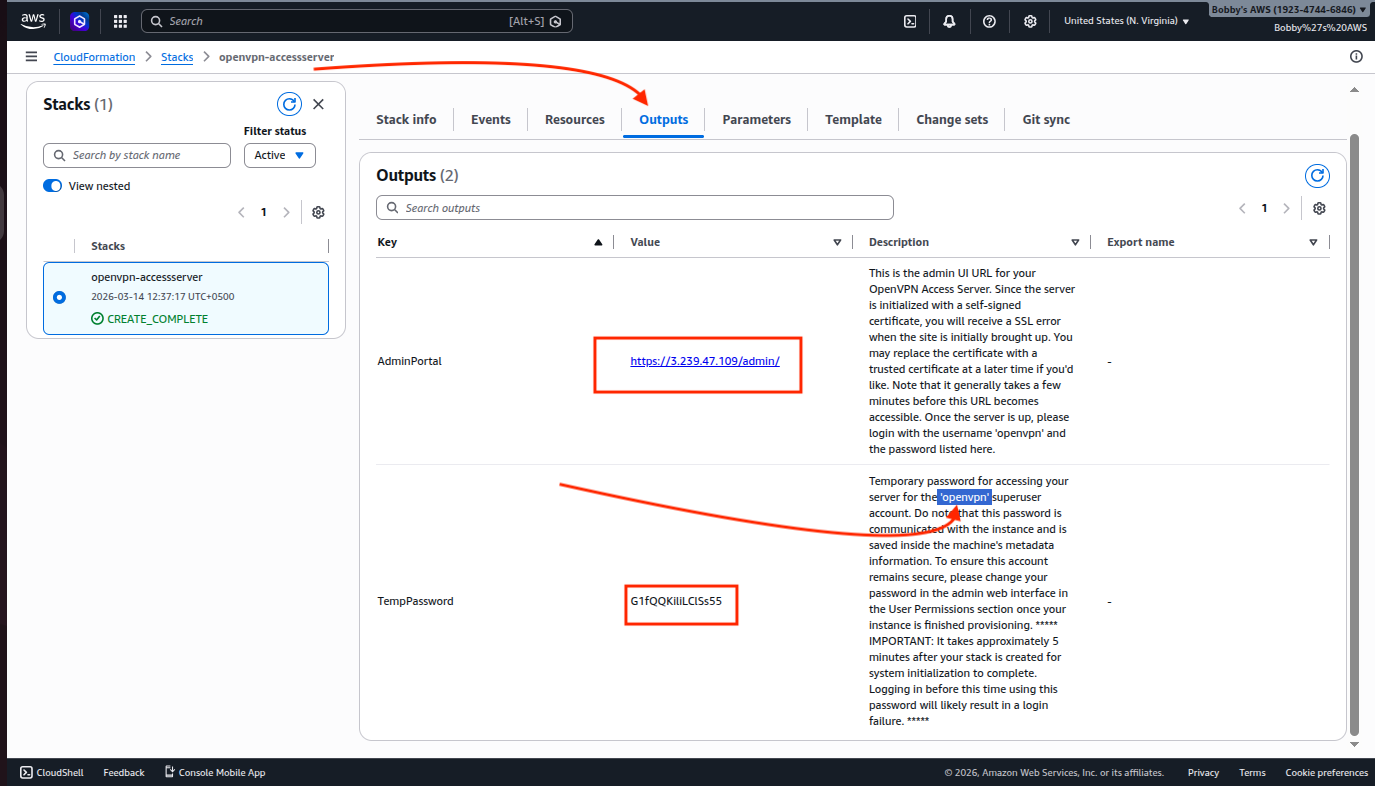
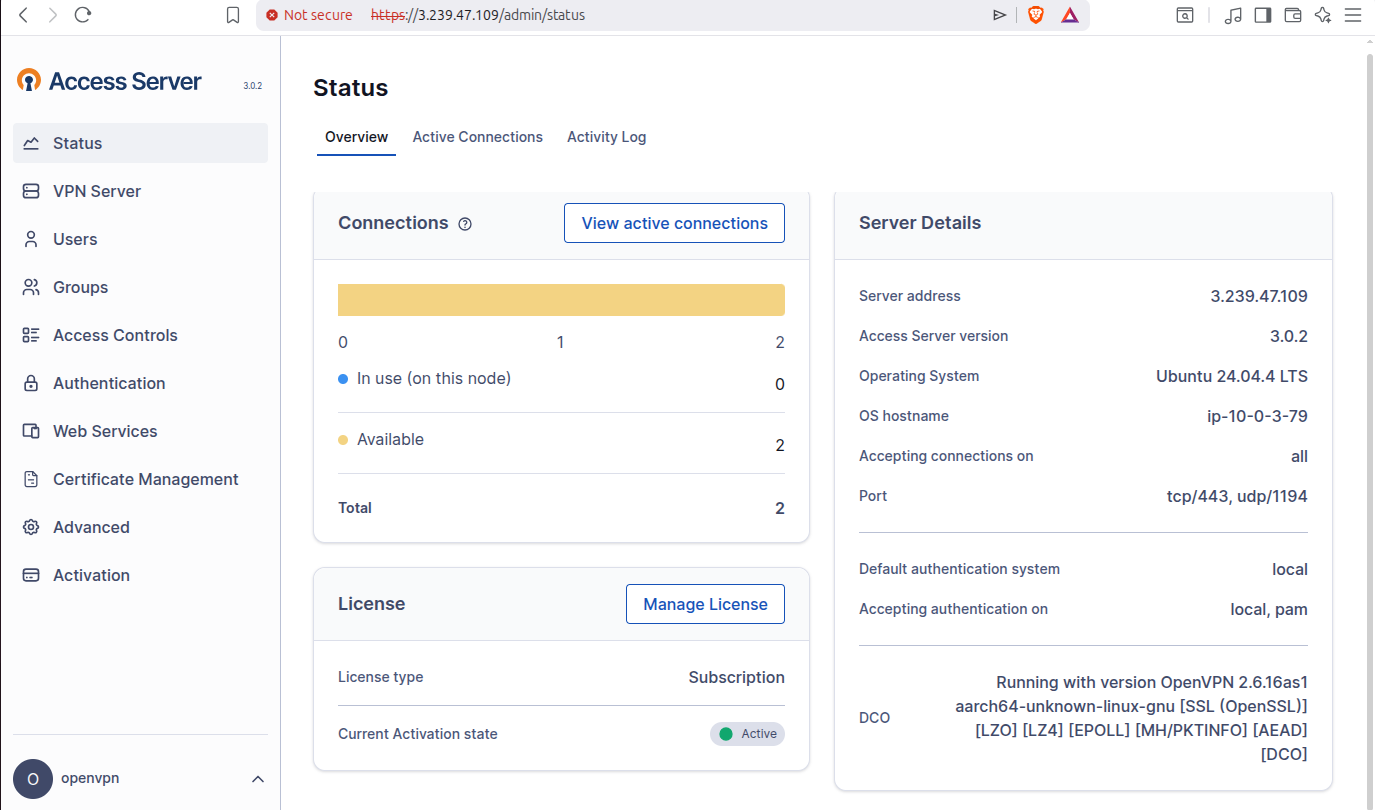
2.4 OpenVPN Access Server’s Admin Portal
Go to the Outputs tab and here you will be able to see the admin portal’s URL, username which is “openvpn” and a temporary password which you can change after logging in.
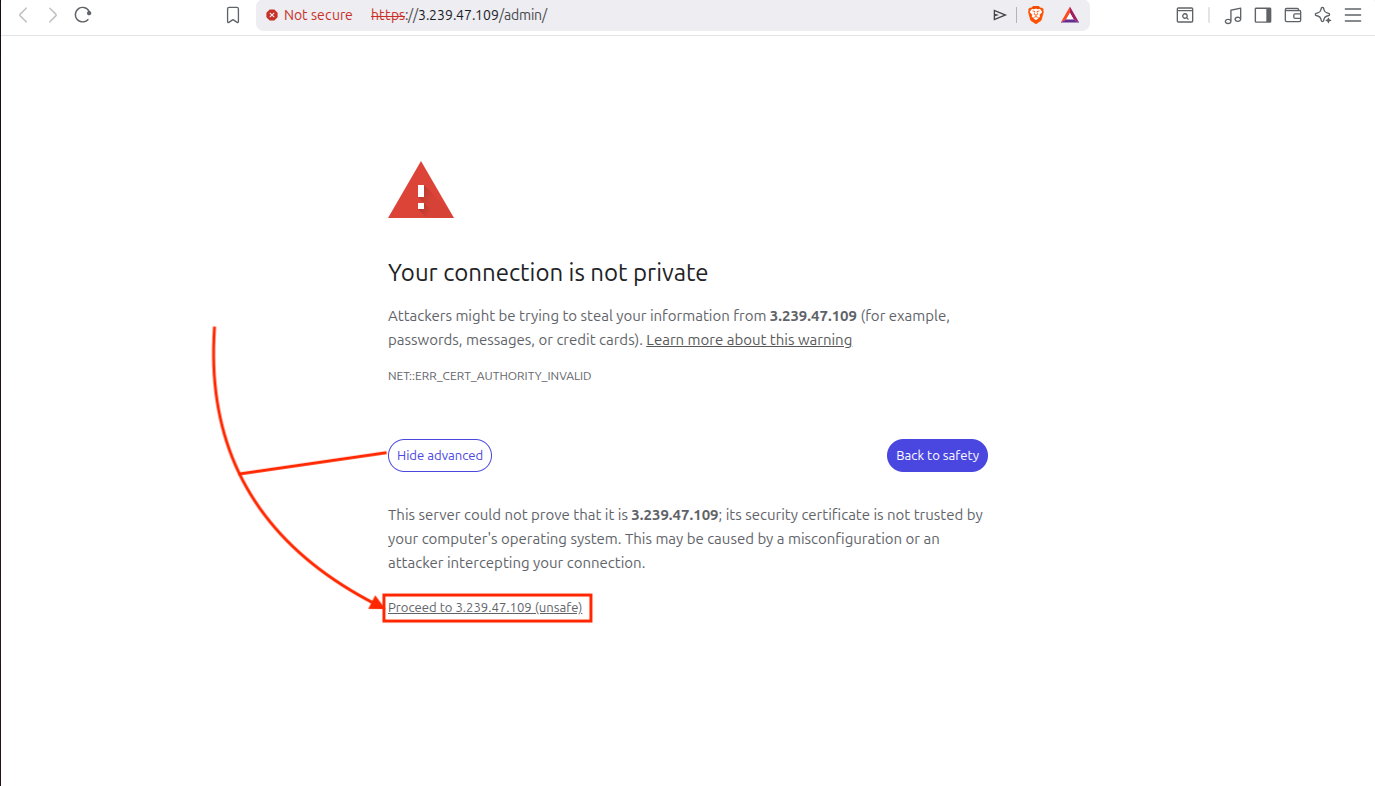
When you go to the URL, it will give you a warning which is due to the fact that it uses a self signed certificate so we will just ignore it and click on Advanced and then Proceed.
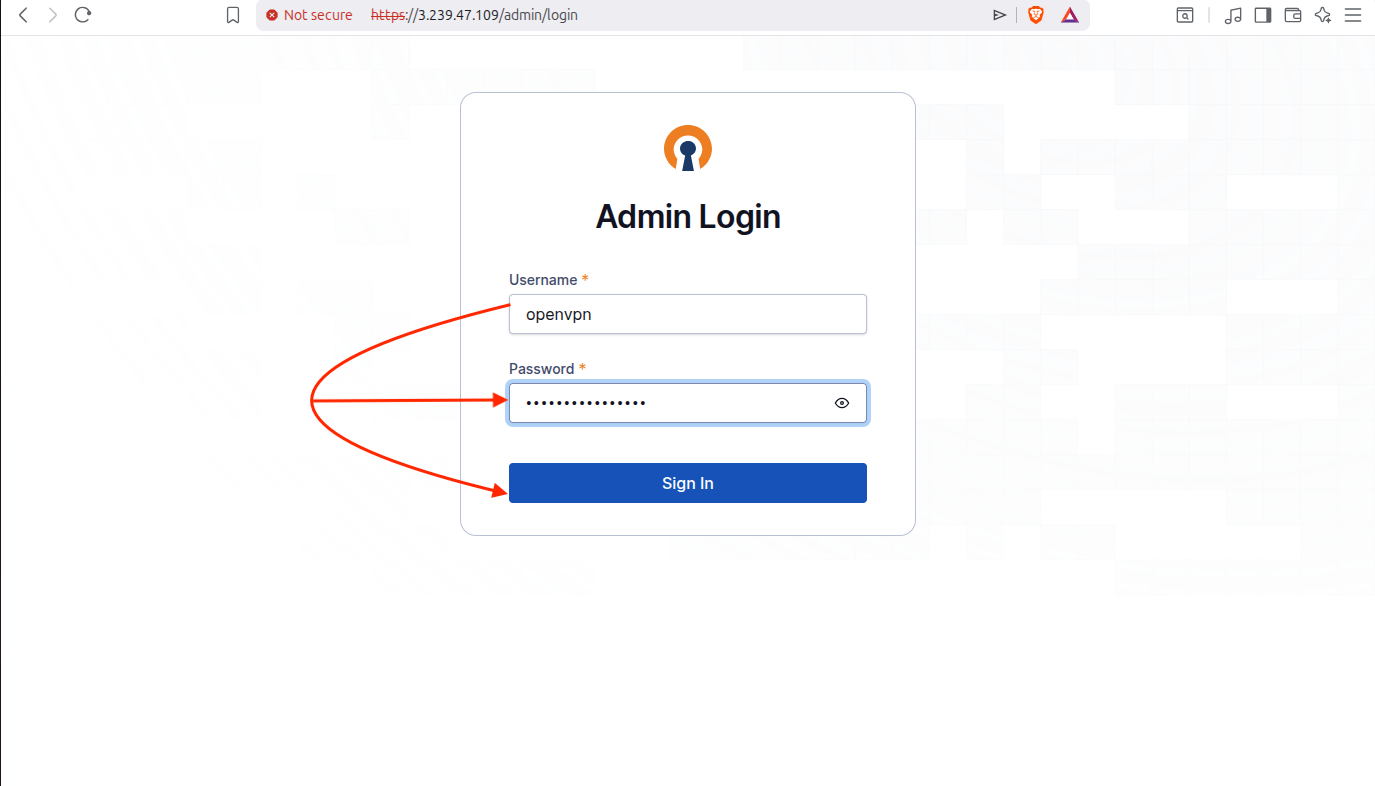
Enter the username “openvpn” and temporary password to login:
Click on Agree to accept the license agreement:
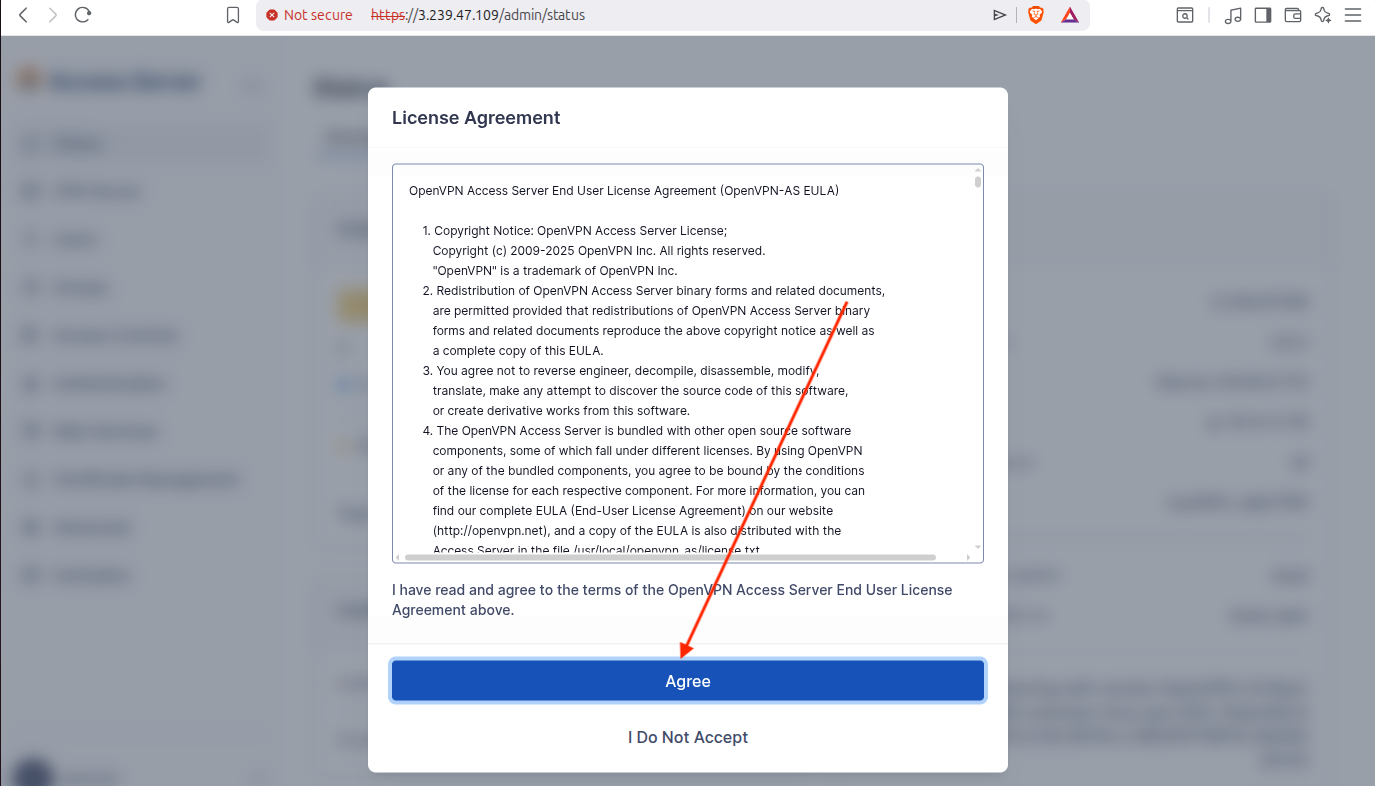
Now you have access to Access Server’s portal.
2.5 Configure Security Group Rules
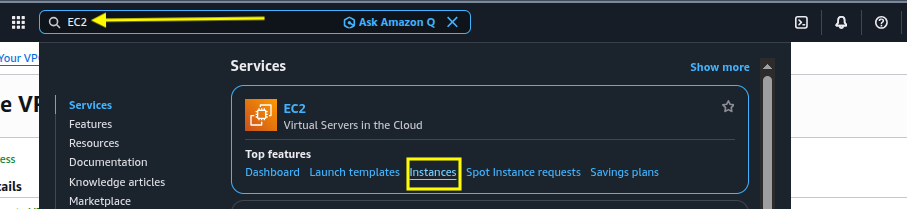
Go to your AWS Console and search for EC2 and click on Instances:
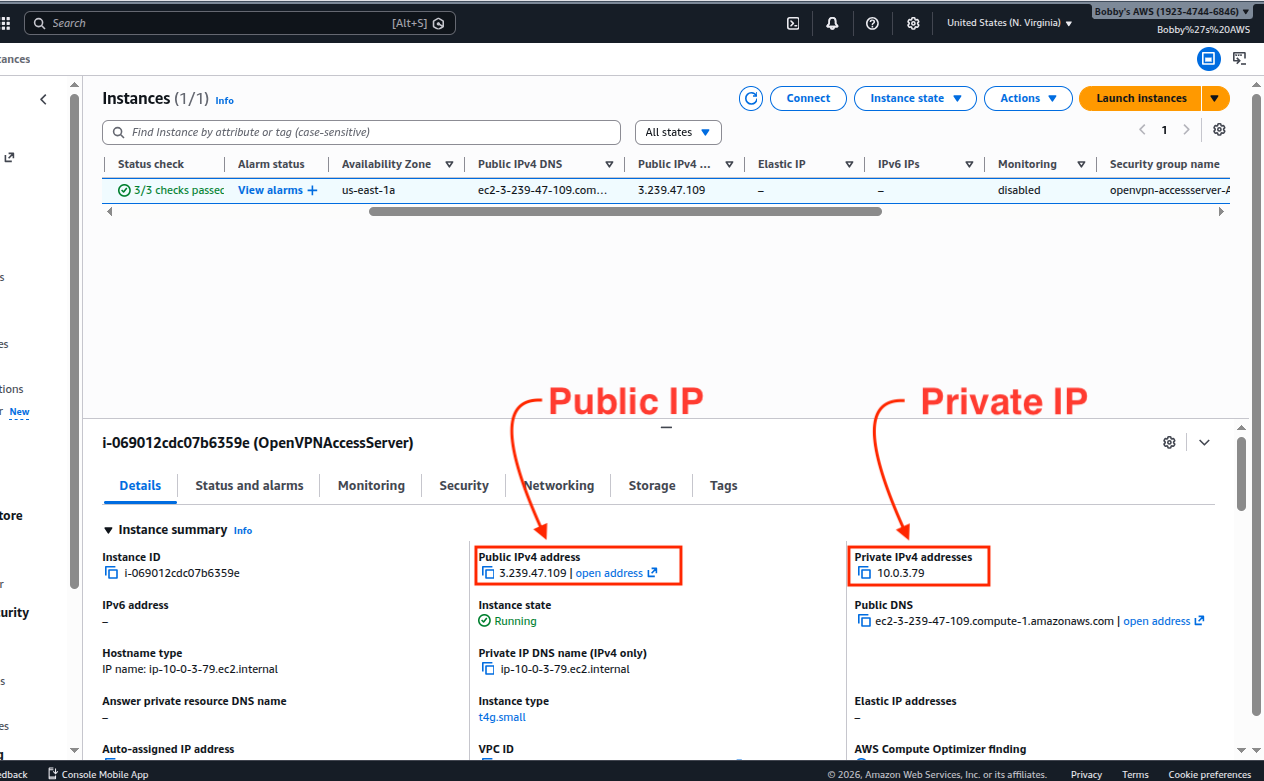
Select the relevant Instance and you will be able to see the public and private IPs, make note of both:
Go to EC2 > Security > Group ID > Edit inbound rules and configure the security group to allow inbound traffic on ports 22, 443, 943 and 1194.
| Type | Protocol | Port | Source | Purpose |
|---|---|---|---|---|
| SSH | TCP | 22 | 0.0.0.0/0 | Remote login to the EC2 instance |
| HTTPS | TCP | 443 | 0.0.0.0/0 | VPN Client Connections |
| Custom TCP | TCP | 943 | 0.0.0.0/0 | Admin UI + Client UI |
| Custom UDP | UDF | 1194 | 0.0.0.0/0 | OpenVPN Tunnel traffic |
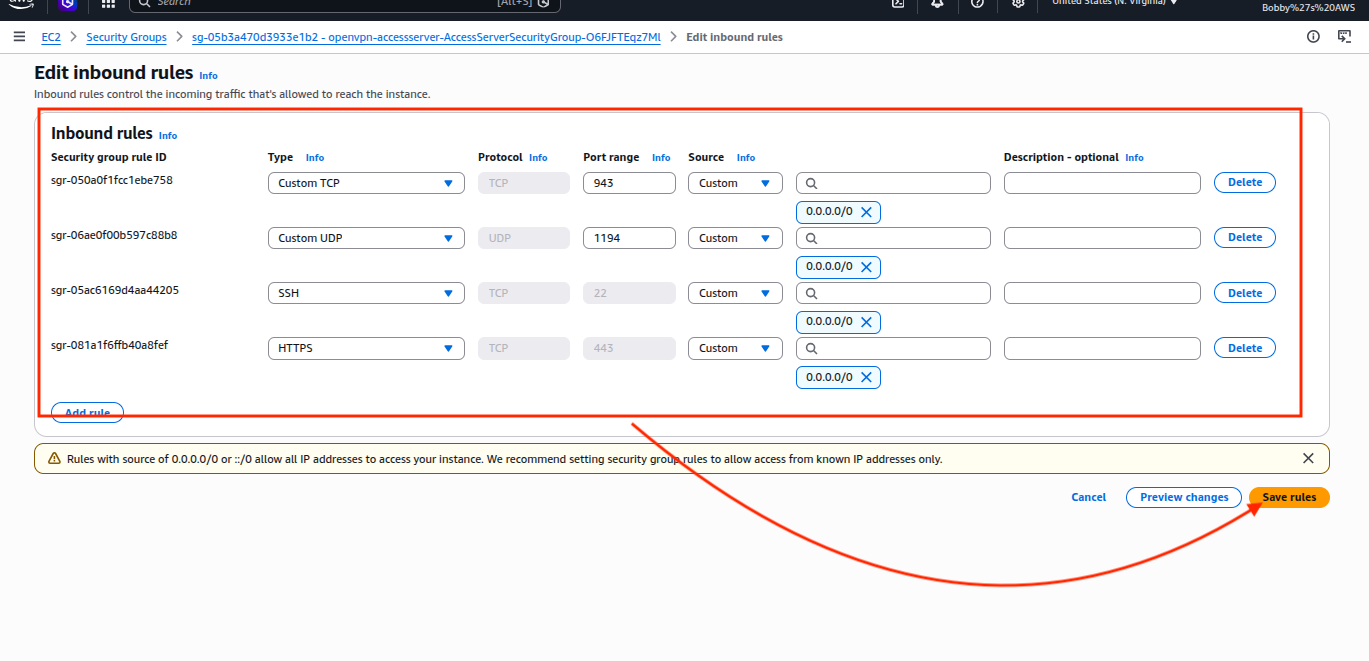
If you see any additional ports in use such as 945 or any else, delete that for now because you are not gonna need it and it might create issues.
2.6 Connect to EC2 Instance via SSH
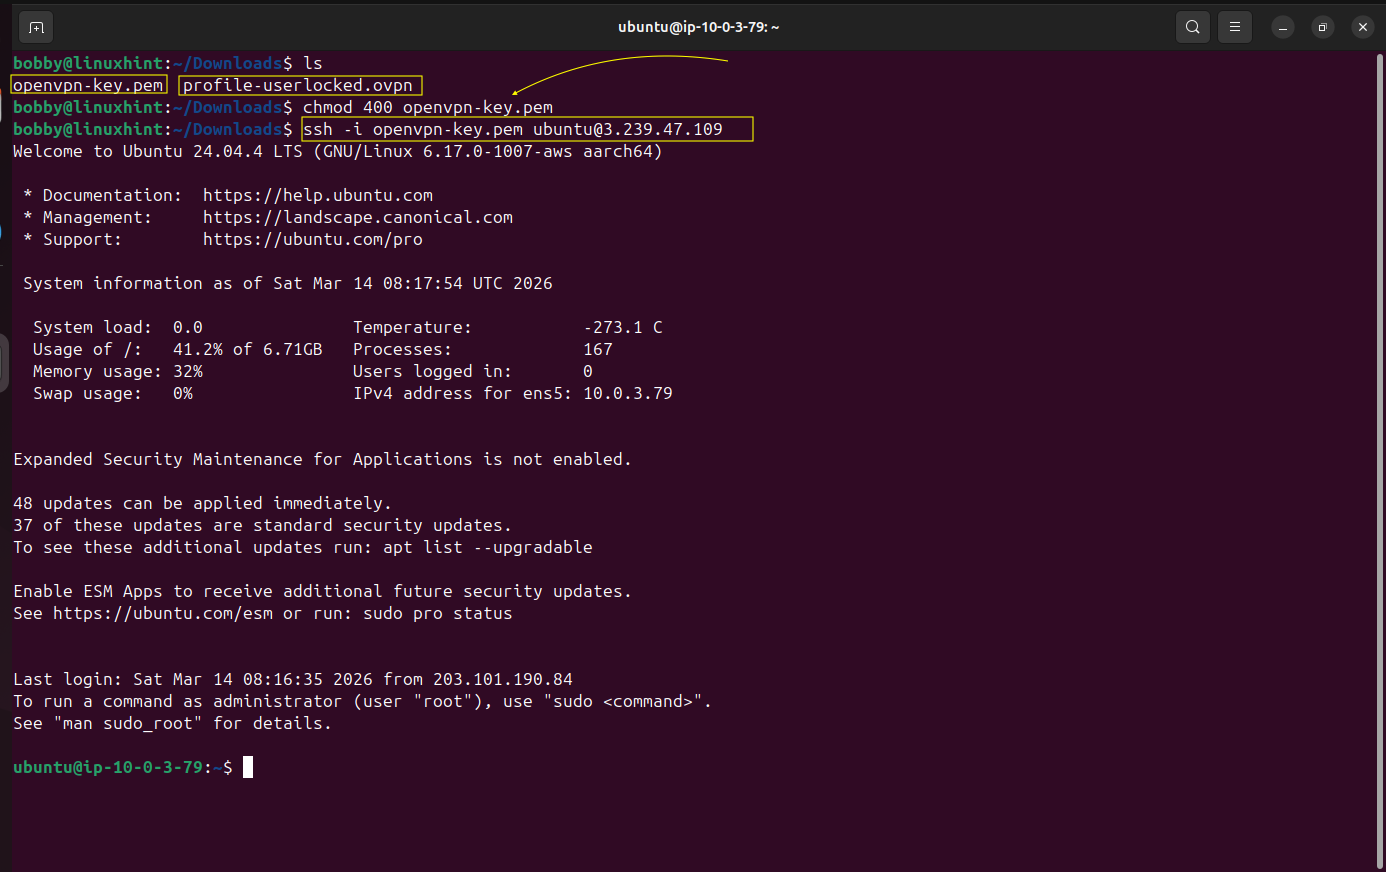
Remember, we talked about key pairs? You have downloaded the .pem file right? So now go to your Downloads directory in your terminal.
Make sure you see the .pem file here in the Downloads directory.
Ensure permissions are accurate.
chmod 400 openvpn-key.pem
Remember we made note of public and private IPs of our EC2 instance, here we will use the username@PUBLIC-IP of our AWS EC2 instance.
ssh -i openvpn-key.pem ubuntu@3.239.47.109
Now you can see that the hostname and username of your linux machine, inside the terminal, have been changed to AWS hostname and username which shows that now you are remotely connected and now you are inside your AWS EC2 instance.
We need to make sure that IP forwarding is enabled on our AWS EC2 instance, for that matter we run the following command if the result is 1 then it means IP forwarding is already enabled.
sudo sysctl -w net.ipv4.ip_forward=1
cat /proc/sys/net/ipv4/ip_forward
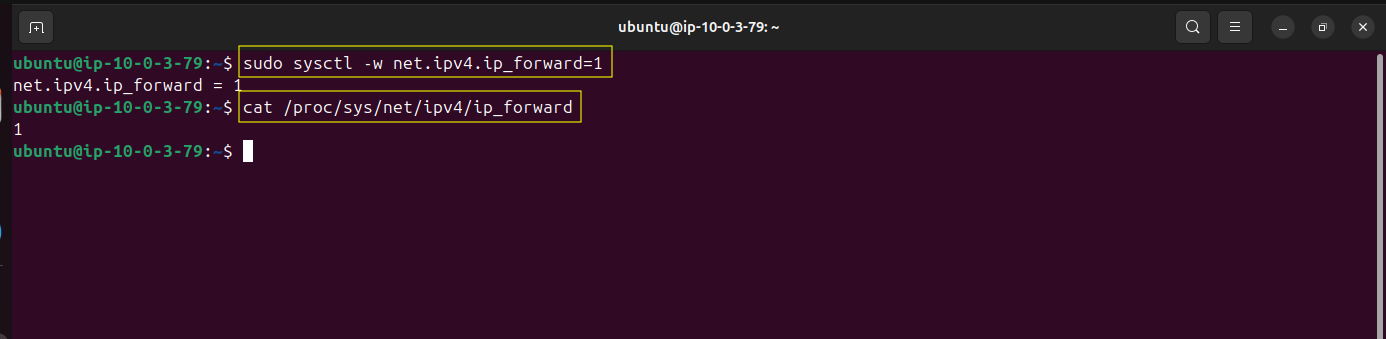
Both shows 1 which means that IP forwarding is enabled.
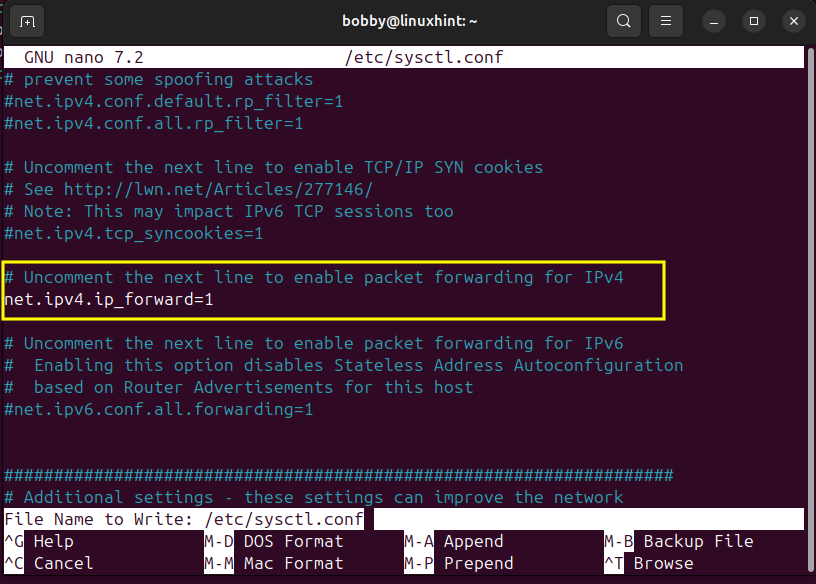
We need to make that permanent and for that we go to our sysctl.conf file:
sudo nano /etc/sysctl.conf
Inside of this file look for the line “#net.ipv4.ip_forward=1” and remove “#” which will uncomment this line.
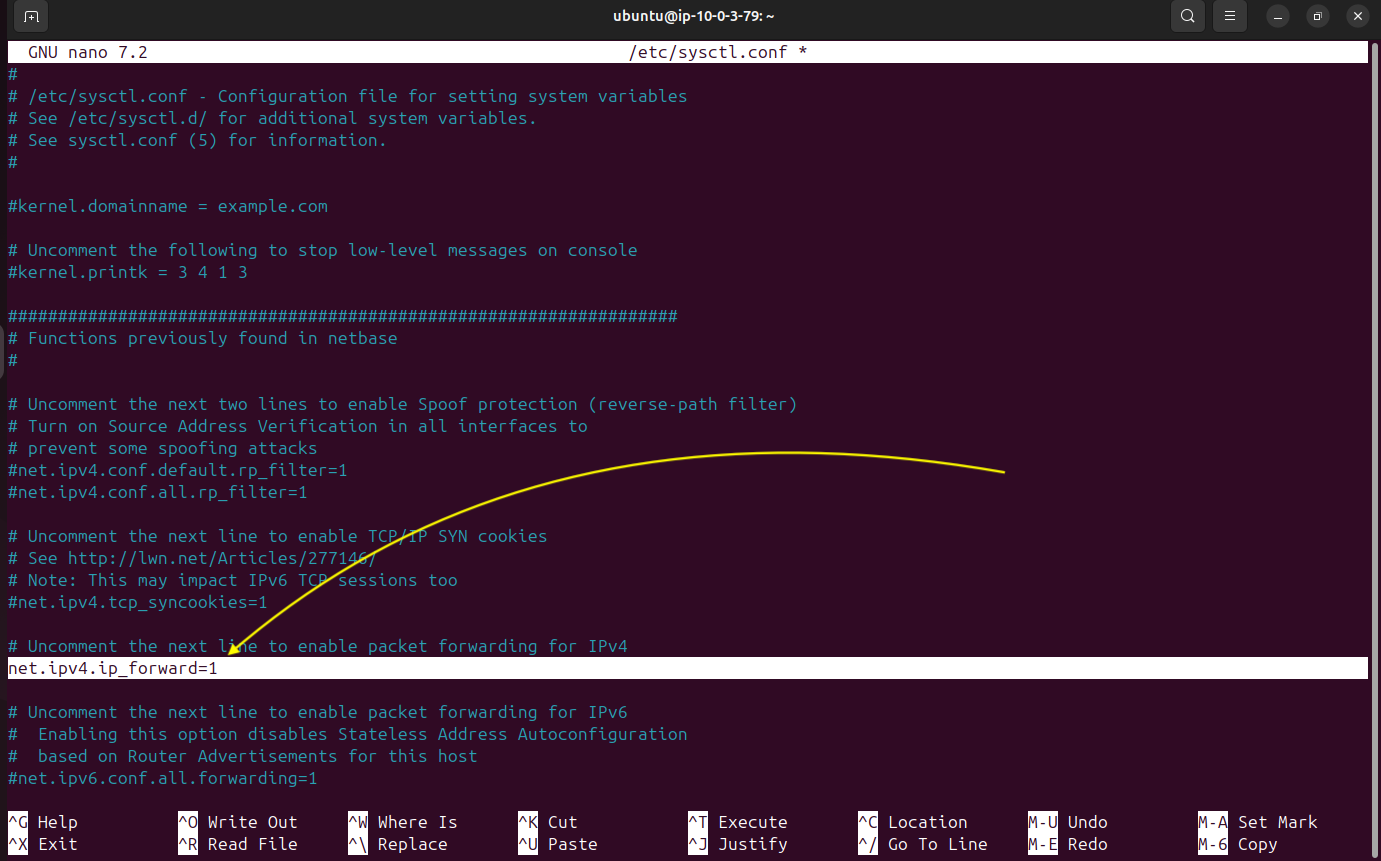
Then press CTRL + O then hit enter to save it and then CTRL + X to exit.
Apply the changes made by using this command:

Now we will run the following command:
sudo iptables -t nat -A POSTROUTING -o ens5 -j MASQUERADE

This command configures NAT on the EC2 instance so that traffic leaving the server through the ens5 network interface is translated to the instance’s IP address, allowing VPN clients to communicate with external networks.
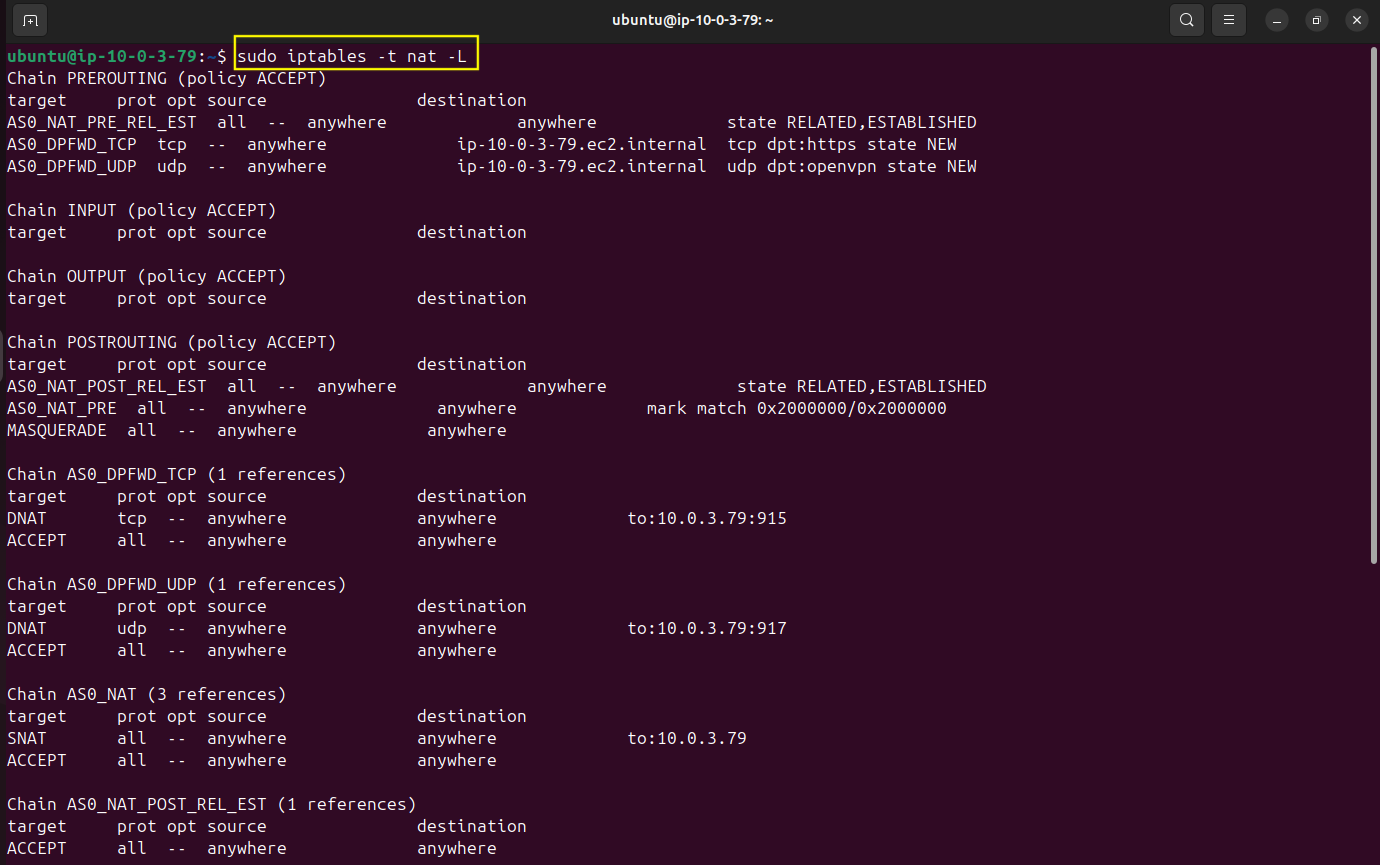
Now verify if the changes made have been applied successfully.
We are going to install an ip persistent package which will help us store iptables rules and NAT rules and reload them on our server when it restarts.
sudo apt install iptables-persistent -y
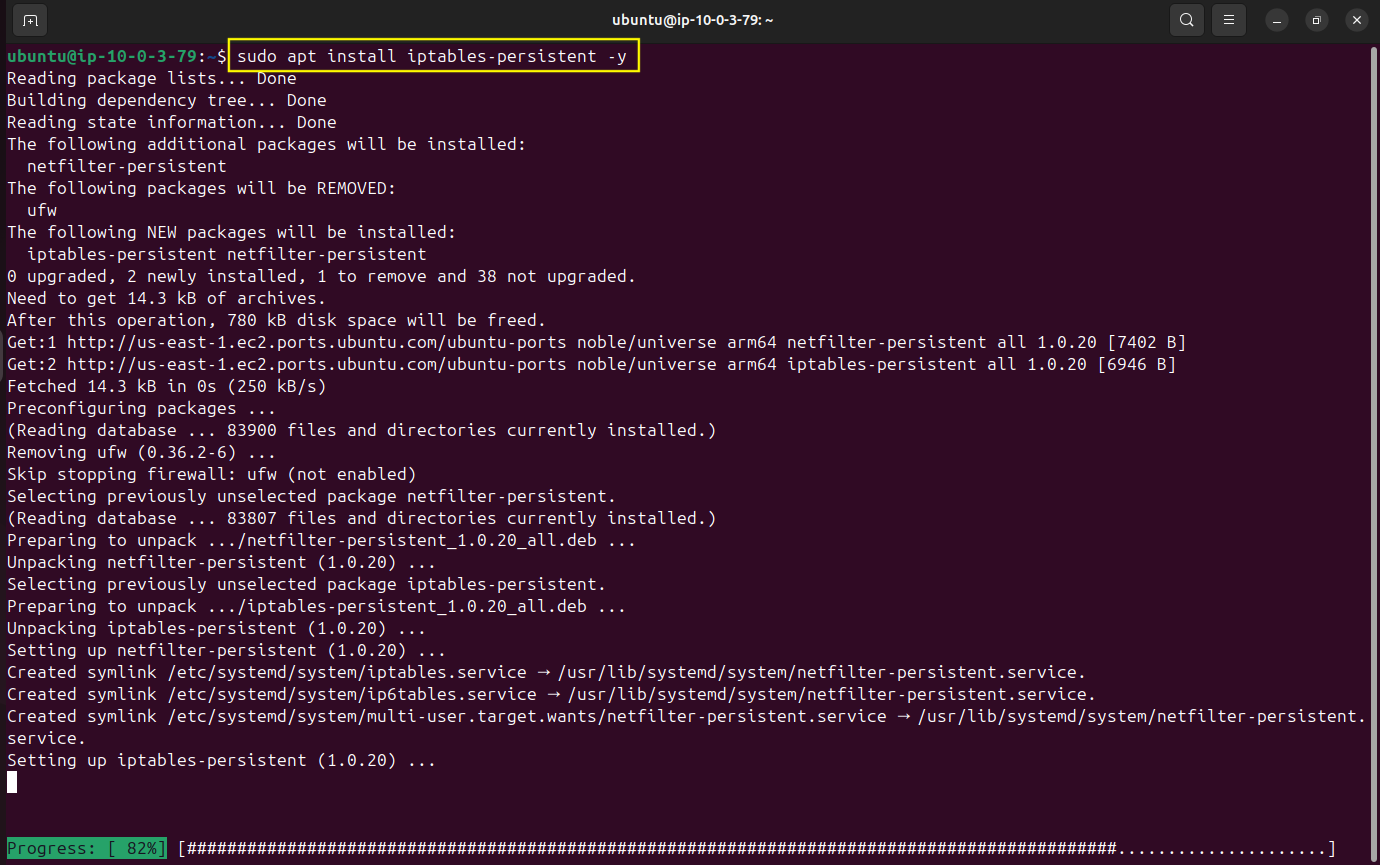
Select
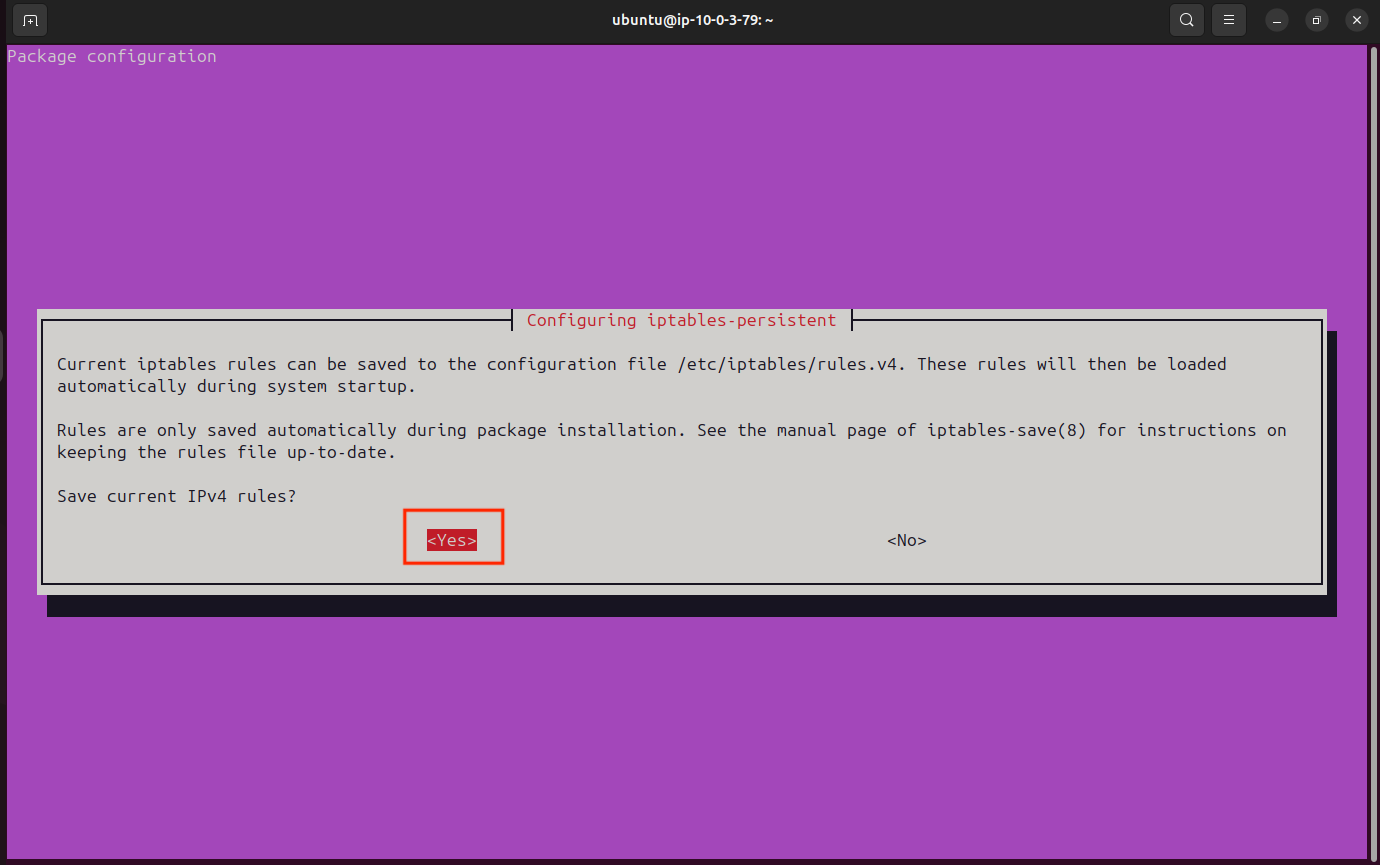
We installed the persistent package but we need to use it now. By default iptables and NAT rules are temporary so if server restarts, those rules are gone but with this command you essentially write them to disk and save them permanently which means even if server restarts then you can be sure that iptables and NAT rules are going to be reloaded.
sudo netfilter-persistent save

Step 3. Configure OpenVPN Access Server
Go to your Admin UI at the same URL we copied in the stack creation section which will be different in your case.
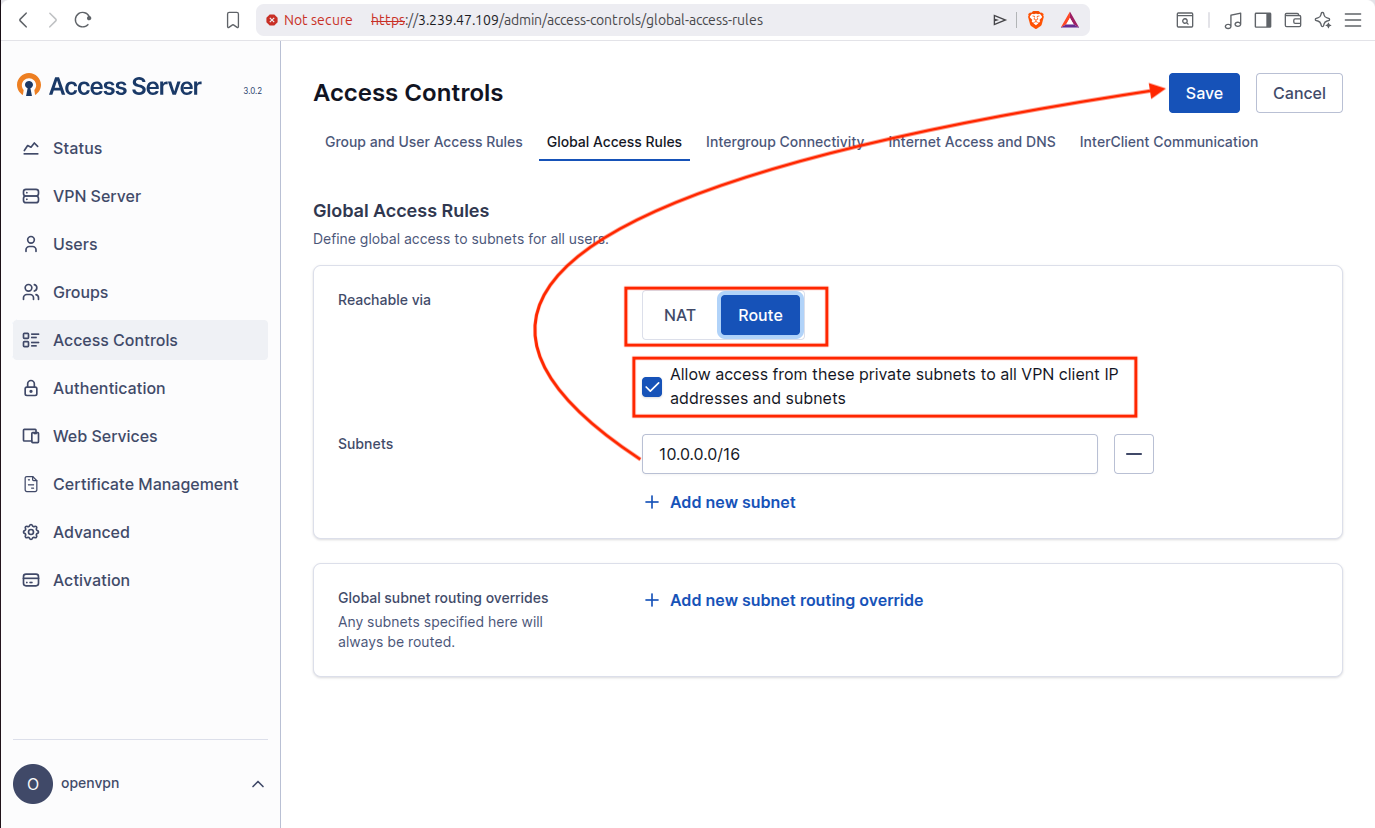
3.1 Configure Global Access Rules
In the dashboard, go to Access Controls on the left side of the screen and go to Global Access Rules tab where select “Route” and check the box where it says “Allow access from the private subnets to all VPN client IP addresses and subnets”. Make sure the subnet is 10.0.0.0/16 and save changes.
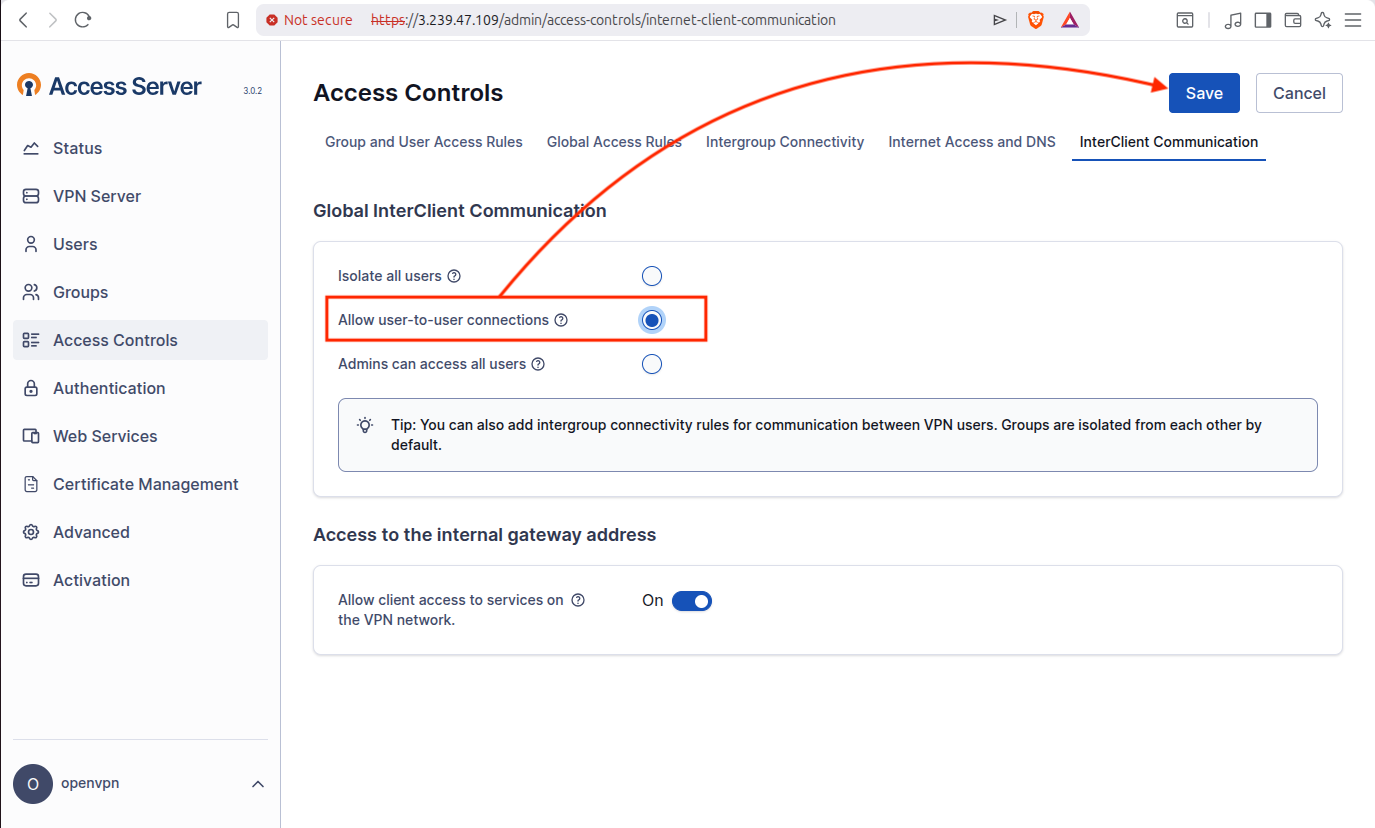
Now in the same Access Controls, go to the tab called “InterClient Communication” and here choose the option that says “Allow user-to-user connections” and then save changes.
Now i will run this command “ip route” to check the routing table of my local linux gateway machine:
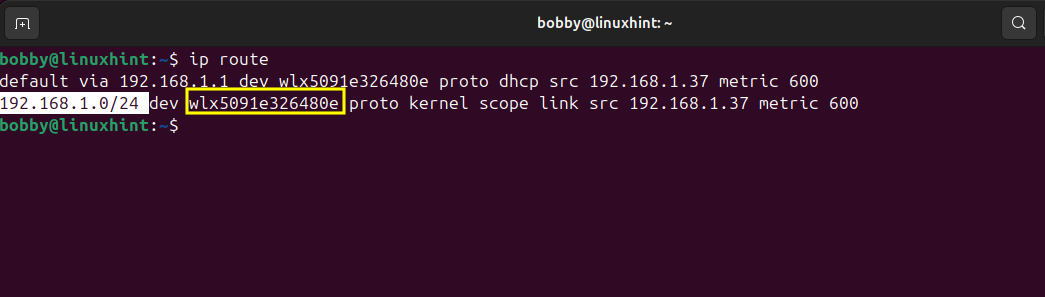
192.168.1.1 is my default gateway while wlx5091e326480e is my Wi-Fi interface and 192.168.1.0/24 is my local LAN network and devices on my network are reachable through the Wi-Fi interface.
Now I’ll go to my OpenVPN Access Server Dashboard > Access Controls > Global Access Rules and here I will add my local LAN network.
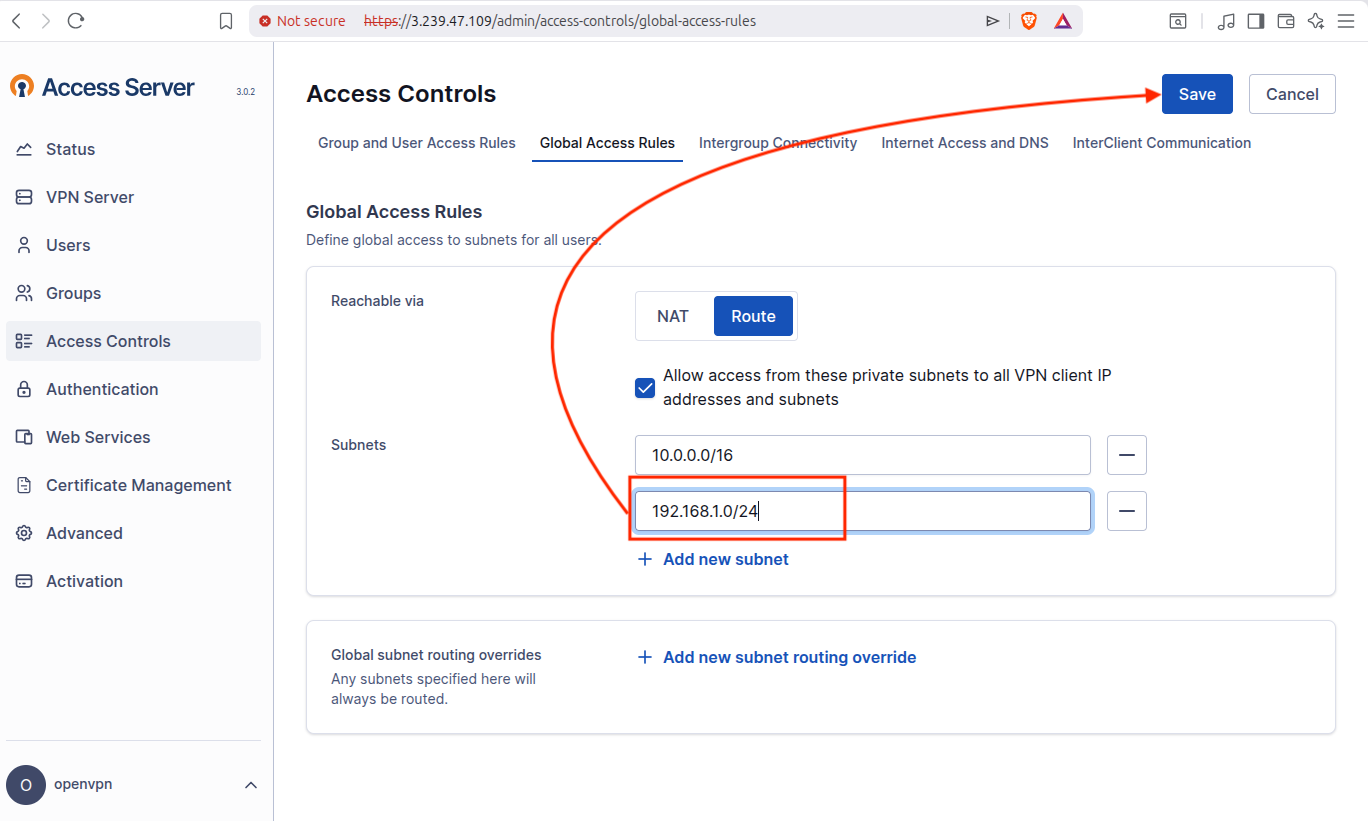
You noticed that we have already added 10.0.0.0/16 which is a subnet of AWS VPC network and OpenVPN knows that VPN clients are allowed to access AWS resources while now we are adding our local LAN subnet 192.168.1.0/24 which means that AWS side traffic can now reach devices on our local network. This ensures that both AWS and local LAN networks communicate with each other through the VPN tunnel, effectively creating a site-to-site VPN connection.
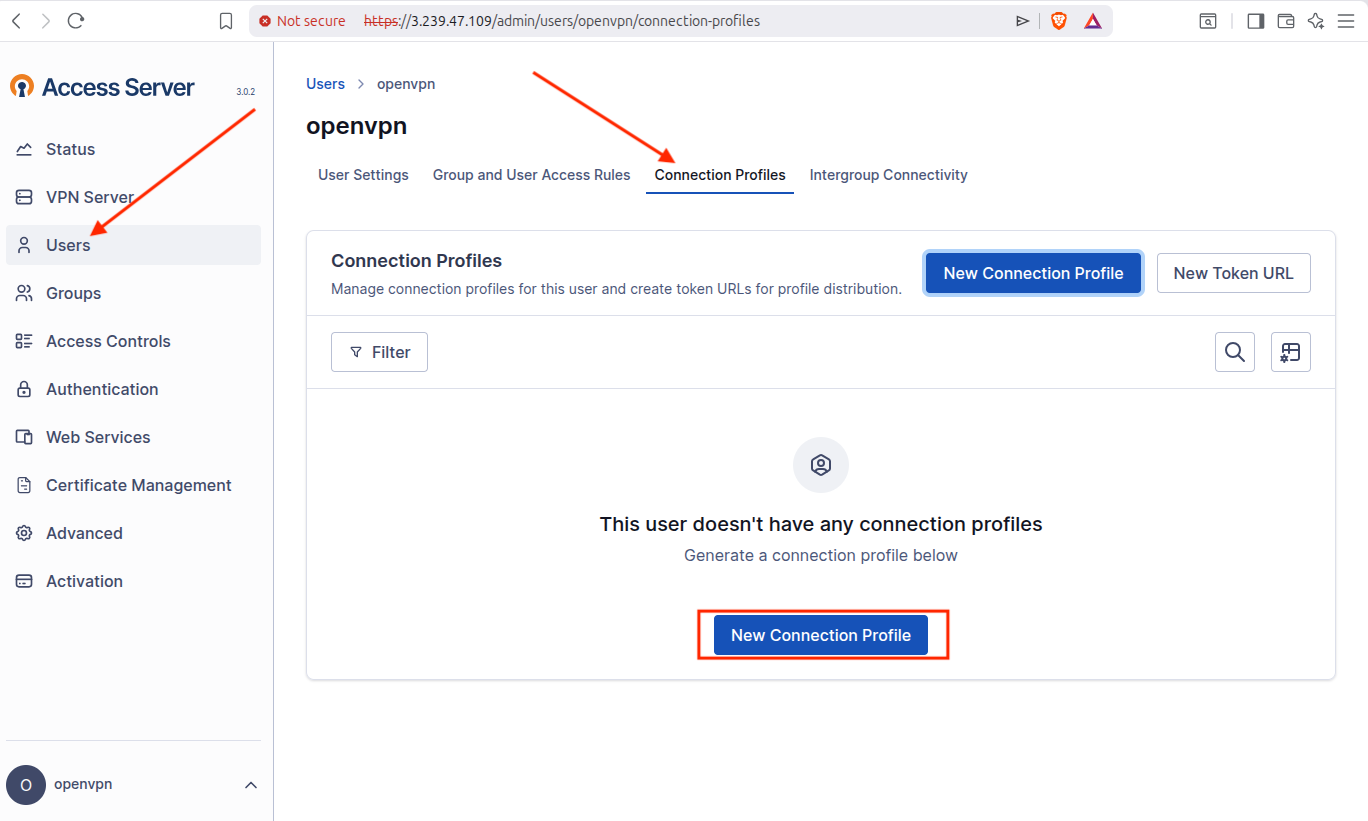
3.2 Generate VPN Client Connection Profile
Go to OpenVPN Access Server Dashboard > Users > Connection Profiles > New Connection Profile.
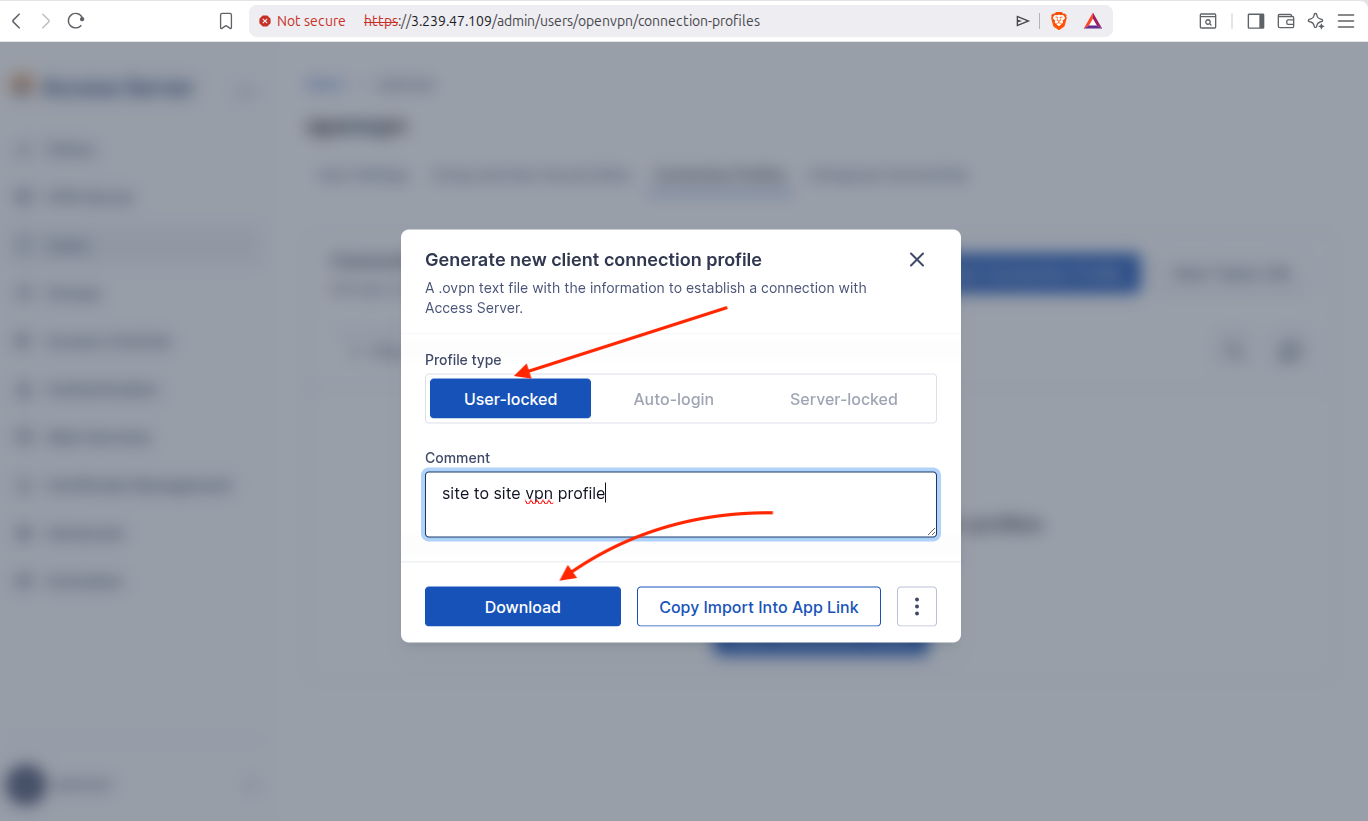
Now select User-locked and download the connection profile.
3.3 Install OpenVPN Client
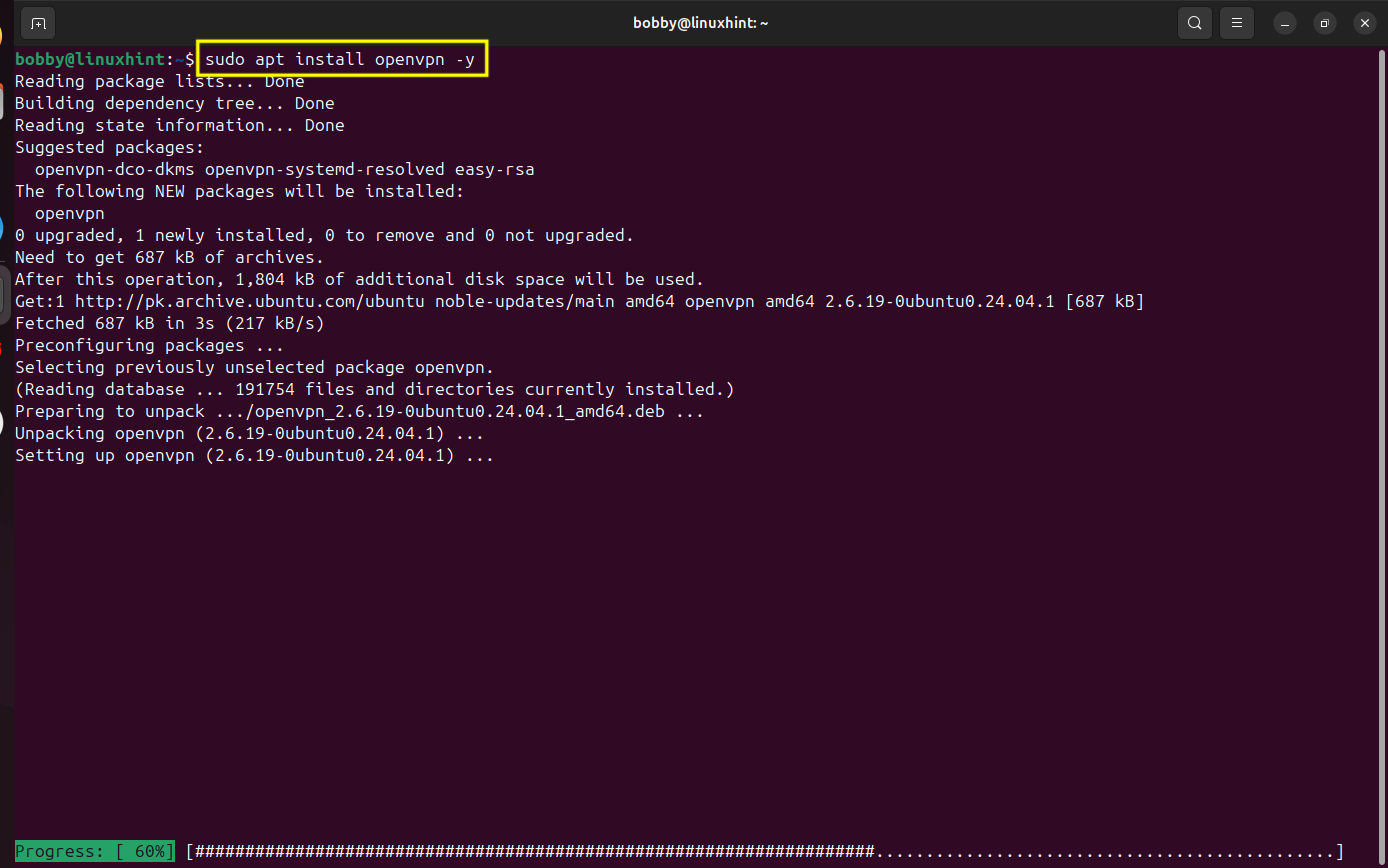
Go to your terminal on your local linux machine and install openvpn client using this command:
sudo apt install openvpn -y
3.4 Connect to the VPN Server
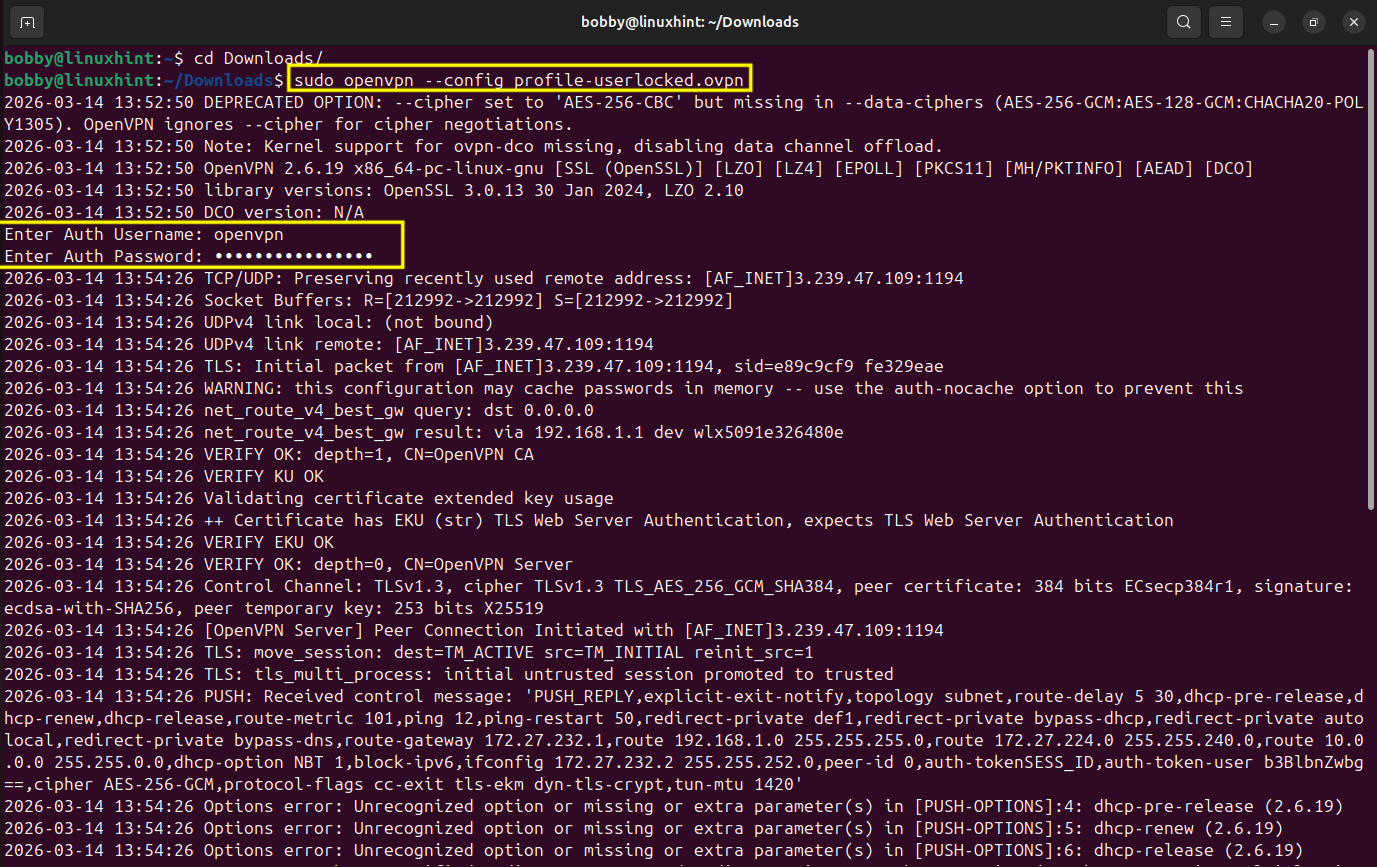
Go to your terminal and change directory to downloads, that’s where you downloaded your openvpn connection profile.
You can check this directory for the name of your openvpn connection profile:
After that you wanna connect your local machine to OpenVPN Access Server running on your AWS EC2 instance using configurations in the user connection profile.
sudo openvpn <em>–config profile-userlocked.ovpnem>
Enter your username and password and it would shortly connect and establish the secure tunnel between your local LAN and AWS network.
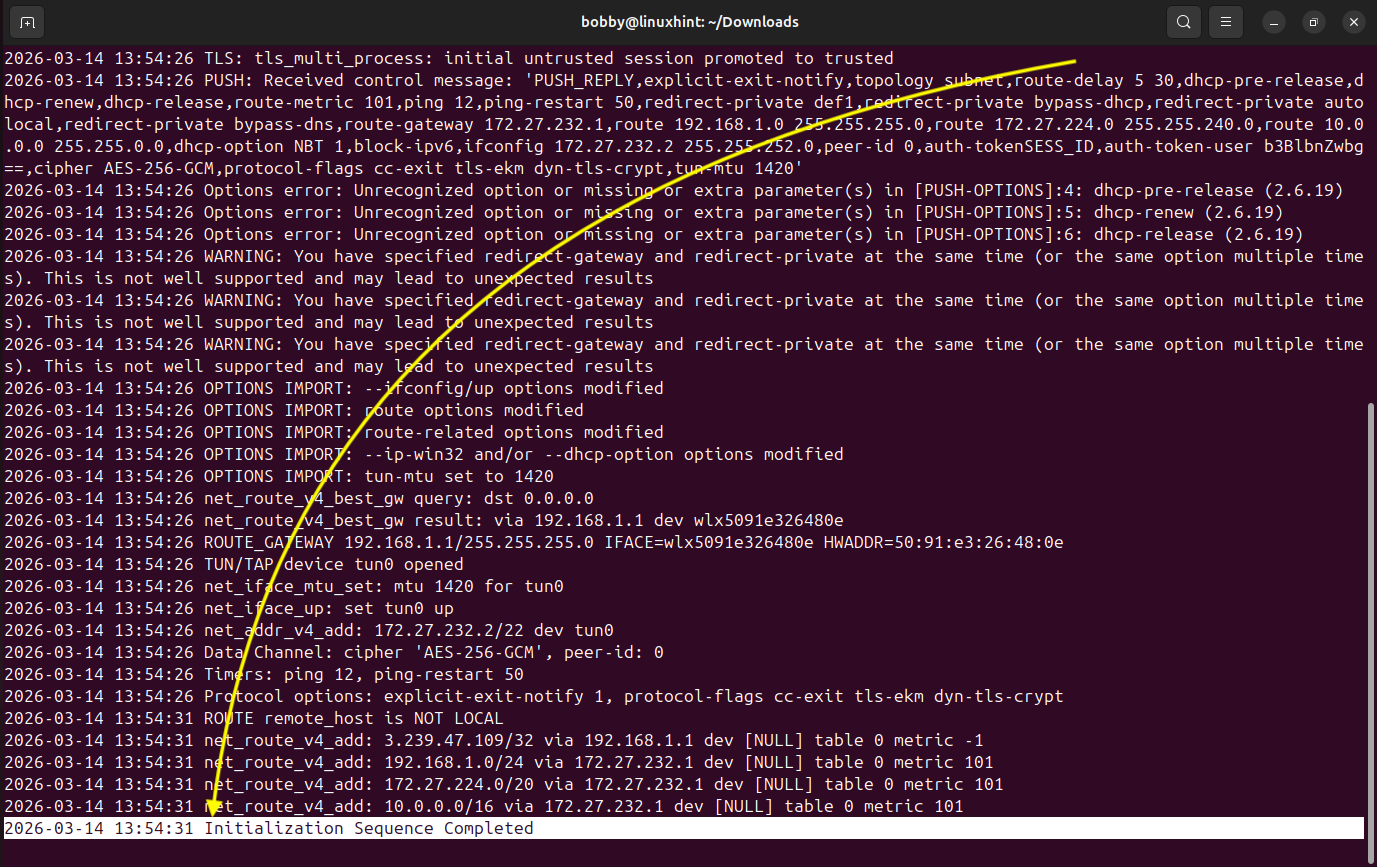
At the end you will see something like “Initialization sequence completed”. This tells you that the VPN connection has been made and a tunnel has been established between these two networks. Let it run now.
3.5 Verify VPN Tunnel Interface
Now open a new terminal, and run this command to verify if the tunnel has been established:
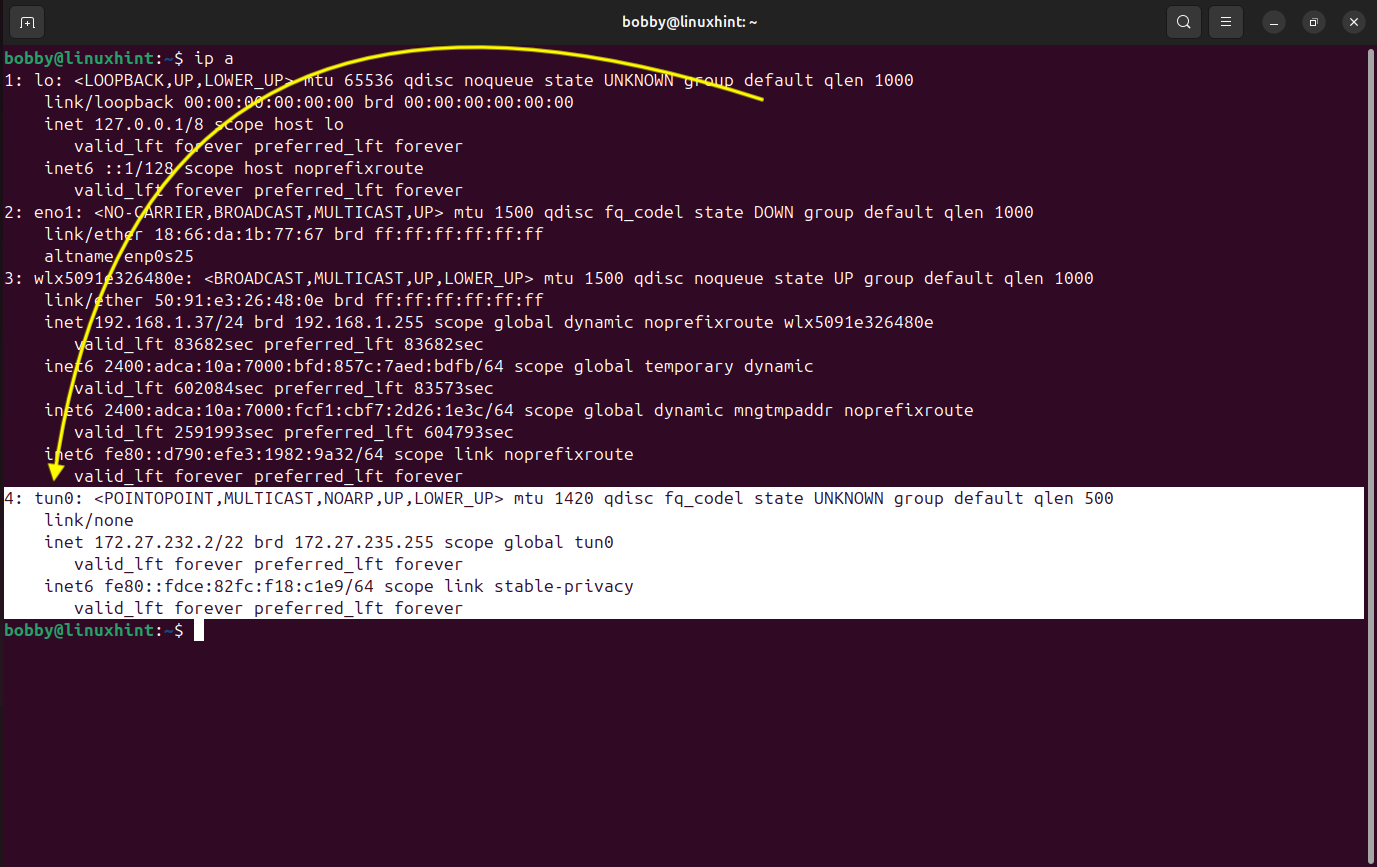
This command essentially displays all the interfaces configured on the machine and now we are able to see our new virtual interface tun0 which represents the VPN tunnel that has been established between AWS network and our local LAN network. All local devices will communicate with the AWS network through our local linux machine and treat it as a gateway.
3.6 Verify Routing Configuration
Now lets verify our routing and check if the correct routes have been added to our system, for that matter run this command:
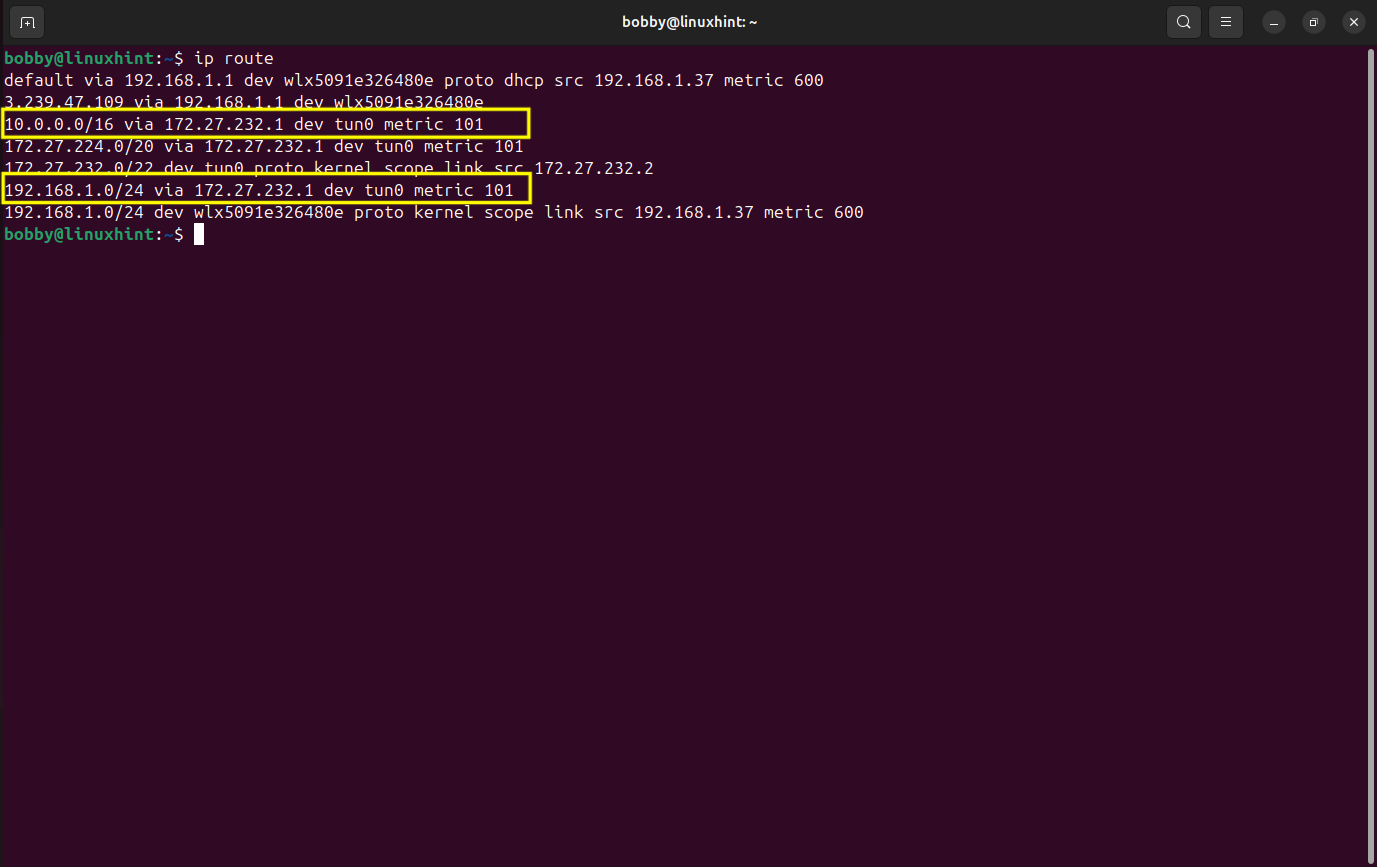
In the screenshot, we notice two important routes:
1- 10.0.0.0/16 via 172.27.232.1 dev tun0
2- 192.168.1.0/24 via 172.27.232.1 dev tun0
These routes show that traffic meant for AWS VPC and local LAN network are both being routed through the VPN tunnel interface tun0. While 172.27.232.1 is the VPN server’s address inside the tunnel network. This confirms that the traffic between the AWS environment and our local LAN network is forwarded through the VPN connection and our setup is site-to-site.
3.7 Enable IP Forwarding
As you know we are using one of our linux machines as the gateway so our linux machine should be allowed to forward packets between interfaces. For that matter open /etc/sysctl.conf file and uncomment this line “net.ipv4.ip_forward=1” by removing “#”.
sudo nano /etc/sysctl.conf
Apply changes afterwards by using this command:
3.8 Configure NAT for LAN Traffic
This allows local LAN traffic to be translated when going through the VPN tunnel.
sudo iptables -t nat -A POSTROUTING -s 192.168.1.0/24 -o tun0 -j MASQUERADE

3.9 Allow Forwarding Between LAN and VPN Interfaces
Now we configure packet forwarding between local LAN interface and VPN tunnel interface:
sudo iptables -A FORWARD -i wlx5091e326480e -o tun0 -j ACCEPT
sudo iptables -A FORWARD -i tun0 -o wlx5091e326480e -j ACCEPT

This will allow the traffic to flow effortlessly between local LAN interface and VPN tunnel interface both ways.
3.10 Save Firewall Rules
Finally we need to ensure that all the rules that we have set remain there even after the reboot.
For that matter we will run this command:
sudo netfilter-persistent save

Conclusion
We successfully deployed OpenVPN Access Server on AWS and configured it to establish a site-to-site VPN connection between our AWS VPC and our local LAN network. We began by preparing the AWS network environment and launching the OpenVPN Access Server from the AWS Marketplace. We made our SSH connection to our server and set routing rules and from Admin UI we were able to generate and download a connection profile.
On our local linux machine, we installed the openvpn client and established a secure VPN tunnel between our local LAN network and AWS VPC using the connection profile we downloaded earlier. We verified our tunnel interface and enabled IP forwarding and saved some firewall rules to ensure that traffic flows smoothly between VPN interface and local LAN interface. If you are going to try this setup, I highly recommend a dedicated linux server machine likely with a Ubuntu Server OS. You can learn how to install Ubuntu Server here. The entire procedure to create this site-to-site VPN would remain the same as mentioned in this guide.
So, with this entire setup, both networks (AWS & local LAN) can communicate with each other through VPN tunnel, creating a functional site-to-site VPN infrastructure using OpenVPN Access Server on AWS.


![[keyword]](https://learnxyz.in/wp-content/uploads/2026/03/1773757412_आरईआई-मेंबर्स-डेज़-सेल-2026-से-सर्वश्रेष्ठ-आउटडोर-डील.jpg)
![[keyword]](https://learnxyz.in/wp-content/uploads/2026/02/Why-you-should-withdraw-your-Microsoft-Azure-Consumption-Commitment-MACC-scaled.png)