
Report Elements
Interacting with reports is a tricky part. This is because the reports comprise of different elements for example iframes and the like for which we need to manage different components via code. Here is the recommended way to access the reports elements. ReportBasePage.cs in the framework is the page that the user must instantiate in their code to access report elements easily.
Switch To Frame
Switching to an iframe can be performed using the inbuilt method
SwitchToFrame()
For example if you are doing a preview of the report and trying to switch to the new frame, you can instantiate the ReportBasePage and pass the method as below. Simple!
oReportBasePage.SwitchToFrame();
Refresh
Once you are done with your testing for reports and want to switch back to original frame you can call the refresh method of the ReportBasePage and then click on the back button.
oReportBasePage.Refresh();
Back Button
Similary, to click on the back button you can utilize the method from ReportBasePage as:
oReportBasePage.ClickBackButton()
.WaitUntil(4);
PDF Button
To click on the PDF button you can utilize the method from ReportBasePage as:
oReportBasePage. ClickPDFButton()
.WaitUntil(4);
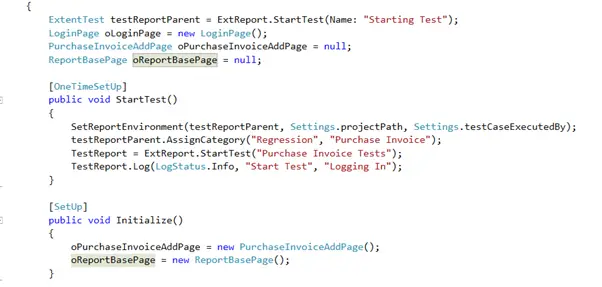
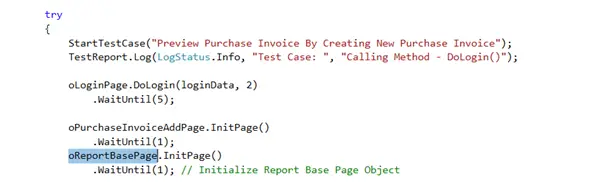
Note: For using all these methods you have to first instantiate the ReportBasePage in your code (Test). To understand how this is done have a look at sample code listing 1 and 2 below.
Code Listing: 1
Code Listing: 2
Verifying a Downloaded File
To verify a downloaded file you can use the VerifyDownloadedFile method the syntax for it is given below. The function verifies the downloaded files name with extension specified and current date needs to be considered (if true/false)
Syntax:

Usage:
oReportBasePage.VerifyDownloadedFile(“SaleOrderRegisterDateWise”, “.xlsx”, false) .WaitUntil(3);
Verify Row Data
To verify the row data we can make use of the method VerifyRowData in ReportBasePage. This method will verify the data row that user specifies from the excel file and compare it to the HTML table row that the user specifies for the application UI. This method is currently specific to “grdDetails” and can be easily used for other areas.
Syntax:
The current syntax takes 7 arguments. The first 6 are for specifying data from the excel file. This is almost equivalent to using data file which we have mentioned above in this guide. Please check signature section in excel data. The two new arguments int RangeFromCell and int RangeToCell is where the user can specify the cell range to and from where to get the row details for comparison. int UIRowNumber is the number of the Row in the application table from the UI. There should be exact match in both rows for the test case to PASS.

Usage:
oReportBasePage.VerifyRowData(Settings.dataFilePath,
oSalesReportPage.DataFile, oSalesReportPage.WorkSheet, 1, 4, 6, 2)
.WaitUntil(4);
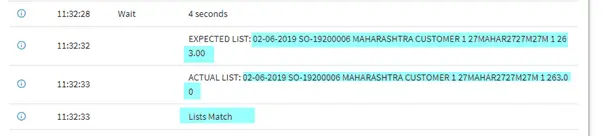
Below is the same from extent reports for the Expected vs Actual list. Remember that the rows are at position [0] in the list as we are appending the text of the entire row at [0]th position in the list.
Note this method can be easily customized to suite other grids and used elsewhere in the application.