In this article we take a look at how we can make routes work. Routes are a convenient way to display and make the app display the url we want to display. Let’s continue from where we left out last time (Deployment Recipes Part 2 – Python, Web2py, Apache and Debian – LearnXYZ )
Routes
2] Make routes work
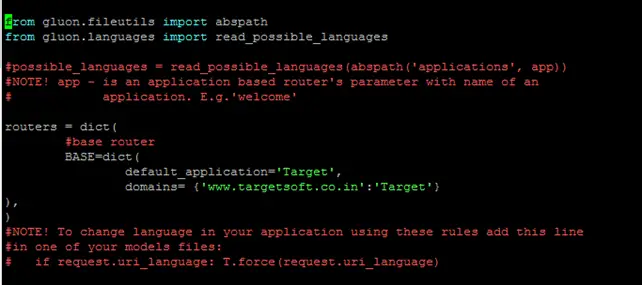
Create a routes.py file which must reside in the /web2py/ directory. Rename routes.example.py and edit it
(fix imports if errors come like import gluon.fileutils or import gluon.languages)
routers = dict(
#base router
BASE=dict(
default_application=’Target’,
domains= {‘www.targetsoft.co.in‘:’Target’}
),
)
Example: Target is the project name here and domain name is mapped to it.
3] Make sure wsgihandler.py file is in /web2py/ directory – No changes need to be done
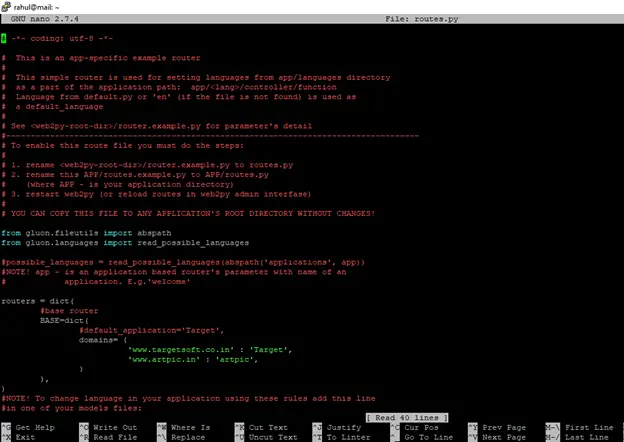
Make multiple domains work from your single web2py application on VPS
To make multiple domains work for you – Simply change routes.py and add a new domain in a new line as specified in the image below. Disable default domain in this case. This requires you to restart your webserver (Apache in our case)
Notice that if you edit routes.py, you must reload it. This can be done in two ways: by restarting the web server or by clicking on the routes reload button in admin. If there is a bug in routes, they will not reload.
Restart Apache webserver as root user with : sudo /etc/init.d/apache2 restart
EXAMPLE:
routers = dict(
#base router
BASE=dict(
#default_application=’Target’,
domains= {
‘www.targetsoft.co.in‘ : ‘Target’,
‘www.artpic.in’ : ‘artpic’,
}
),
)
Apache
4] Next we configure Apache server. I had installed the latest version available that time. Apache is a flexible webserver that is fast and is used in multiple sites. It has fantastic gluing abilities and it really stands out for hosting web pages/sites. So we can now download and install Apache to go ahead with configuring it.
Working with Apache (Assuming it is pre-installed with stuff needed). Apache in Debian is installed in /etc/apche2/ folder. It does not use httpd.conf instead it uses apache2.conf
1) Changes in apache2.conf – by default Debian works differently and uses /var/www/ and /usr/share/ for sharing web data. For using any other folder we must change the location here and comment out default location. Expose folders which is the root where you want to host your application from as below. Check approprite section with similar tags, you can # comment out other such structures –
<Directory /home/www-data/web2py>
Options Indexes FollowSymLinks
AllowOverride None
Require all granted
</Directory>
Also, add below line at the end of the file.
WSGIScriptAlias / /home/www-data/web2py/wsgihandler.py
This is important to route all the requests automatically from web2py using wsgi. It delegates running of all WSGI applications to the daemon process group that was configured using WSGIDaemonProcess directive. Note this is also specified in file created in /etc/apache2/sites-available/web2py file. And also in Apache configuration file in /etc/apache2/web2py.conf – below are the details