

![[keyword]](https://learnxyz.in/wp-content/uploads/2026/02/1771028408_RapidRAW-Basics-How-to-import-and-organize-your-photo.jpg)
In previous articles, I’ve already written down my first thoughts on the brand-new photo RAW editing application that suddenly appeared out of nowhere, a big surprise for many photo enthusiasts: RapidRAW. In this article, as part of my new RapidRAW Basics tutorial series, I’ll explain how to import and organize your photo files in RapidRAW.
Content of the article
- Introduction
- Photo organization in general
- Importing an existing photo library
- Folder organization in RapidRAW
- Importing images in RapidRAW
- Image organization in RapidRAW
- Final words
Introduction
If you are an avid photographer like me, you probably have thousands or tens of thousands of photo files saved on your hard drive. Maybe you have a solid photo organization structure in place, while others simply organize their photos in a large, unorganized pile, or in a simple but perhaps difficult-to-maintain or expand file structure. In this article, I’ll cover importing your entire existing photo structure as well as setting up a new, more robust structure from scratch. If you’ve saved years of photos and don’t feel like changing that structure, it’s easy to import this existing structure into RapidRAW, as this article will show. But if you feel the need to create a new photo storage structure from scratch, you will find some usable information as well.
Photo organization in general
I approach all my hobbies fairly seriously and with a sense of organization. One of my creative passions is landscape photography, and also here I strive for an organizational approach that feels logical, efficient, and effective to me. But for someone else, that might require a completely different organizational structure, as we are different and have different needs and visions. However, I can share some general guidelines that can be valuable to everyone.
Base folder
Regardless of which photo organization structure you’re going to use, you’ll need to designate a base folder somewhere on your hard drive. This base folder is the highest level where your folder and photo organization structure will reside. It’s important not to bury your base folder too far or too deep. Give it a location where you can easily find it. Because photography is one of my passions, I have my personal base folder at the highest level of my hard drive, named “My Photo Files.”
A folder structure that makes sense
We’re all different types of photographers. I prefer landscape photography. But in the past, I was also a wedding photographer in addition to my regular IT work. You might enjoy taking family photos, or you’re a street photographer, or you want to organize and edit your vacation photos. Or you might have a mix of different areas of expertise. So, it’s difficult to come up with a one-size-fits-all solution. You have to organize your photos in a way that best suits your use cases, but also fits, for example, the volume of your body of photography work. However, there are some general organization types you can consider in your decisions, and you can even combine them.
- Time-based organization
- Project-based organization
- Type-based organization
- Client-based organization
Regardless of your preferred or required organization type, I always recommend starting the folder name with a time stamp in reverse order, such as YYYYMMDD for a single-day event or the start date of a multi-date event, or YYYYMM to indicate only the year and month of the event. It might seem obvious, but the reverse order of the timestamp YYYYMMDD provides excellent automatic, correct ordering of your folders. Further, I advise not to store these timestamp-based folders all on the same organizational level, but to store them within a yearly subfolder. In this way, you make sure you don’t end up with hundreds or thousands of folders at the same hierarchical level.
With a Time-based organization, you rely on the historical data of the photos you have taken. So your organizational structure is chronologically oriented. My preference is to use a folder naming convention like (YYYYMMDD – EventName). This organization type is suitable for, for example, travel and event photographers. An example is “20190305 – Texel Day Trip”, in case of a one-day trip. When you have to organize photos of a multi-day event, you can, for example, omit the DD, for example, “202307 – Manhattan”.
With a Project-based organization, you rely on the project of the photos you have taken. So your organizational structure is project-oriented. You can think of a folder naming convention like (YYYYMMDD – ProjectName). This organization type is suitable for, for example, wedding event photographers. An example is “20190305 – Wedding Marloes and Joop”. My preference is to go a bit more detailed and use a folder naming convention like (YYYYMMDD – ProjectType – CoupleName), like for example “20190305 – Wedding – Marloes and Joop”. This is actually a combination of the project-based and the type-based approach described below.
With a Type-based organization, you rely on the type of photos you have taken. So your organizational structure is type-oriented. My preference is to use a folder naming convention like (YYYYMMDD – ProjectType – CoupleName). This organization type is suitable for, for example, wedding event photographers. An example is “20190305 – Wedding – Marloes and Joop”.
With a Client-based organization, you rely on the clients for whom you took the photos. So your organizational structure is client-oriented. You could use a folder naming convention like (YYYYMMDD – ClientName), or even (YYYYMMDD – ClientType – ClientName). This organization type is suitable for, for example, marketing event photographers. An example is “20220609 – Banking – ABNAmroBank”.
Sub folder structure
In the above examples, we rely heavily on including all important information in the folder name. But it is also possible to bring this information into the folder structure itself. For example, use the timestamp and ProjectType in different folder levels, like below:
Option 1:
- Base Folder / 2019 / 20190305–Wedding-Marloes and Joop
- Base Folder / 2019 / 20200108–Wedding–Marijke and Siem
Option 2:
- Base Folder / 2019 / Wedding / 20190305–Marloes and Joop
- Base Folder / 2019 / Wedding / 20200108–Marijke and Siem
Separate originals from final versions
Although you can edit non-RAW image files in RapidRAW, we use RapidRAW mainly to convert RAW photo files into actual digital photographs, so you could see the RAW file as the original (in analogue terms, the photo negative slide) and the edited and exported version as the final image (in analogue terms, the printed photograph). My preference is always to have separate subfolders for the original RAW files and for the final edited and exported photo files.
Tagging
In the above-described options to approach your photo organization, you could read that we made the Type part of the folder naming convention. If you only distinguish a limited number of types, this isn’t a problem. However, my advice is not to go overboard with a large number of different types, as it makes navigating in your structure worse instead of better, and it will be more difficult to assign your new photos to the correct location in the hierarchy. When you conclude that you need many different types, we have a better tool for this: the Tag. The advantage of the Tag, which is just a label, is that you can assign multiple Tags to a photo, while you can place a photo in only one folder. A Tag is a folder location-independent and independent of the limitations a folder structure inherently imposes. Suppose you’re making wedding photos, and some of them are taken in a beautiful, expansive landscape. Will you place this photo in a Wedding folder or in a Landscape folder? In this case, you could also choose not to use the Type in the folder structure at all, but to assign two Tags to the photo: both the Wedding and Landscape tags. You can then later search and filter by these Tags using the search function, which we will discuss in a separate tutorial.
Importing an existing photo library
Let’s start with importing your existing folder and file structure, containing your photo files, into RapidRAW.
1) When you first launch RapidRAW, you will see the following screen:
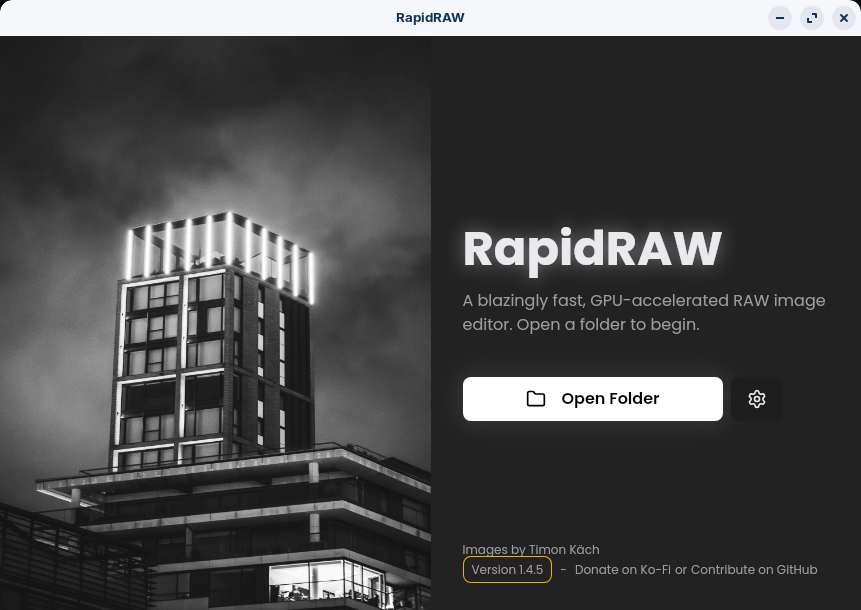
Here you’ll be prompted to open a folder before starting RapidRAW.
2) Click Open Folder, search for the location where your photos are currently stored, and select the folder to open.
Now the Library view will be opened. The folder you selected and opened represents what’s in RapidRAW , called the Base Folder. If this top-level folder contains subfolders, the entire underlying hierarchy will now be visible in RapidRAW.
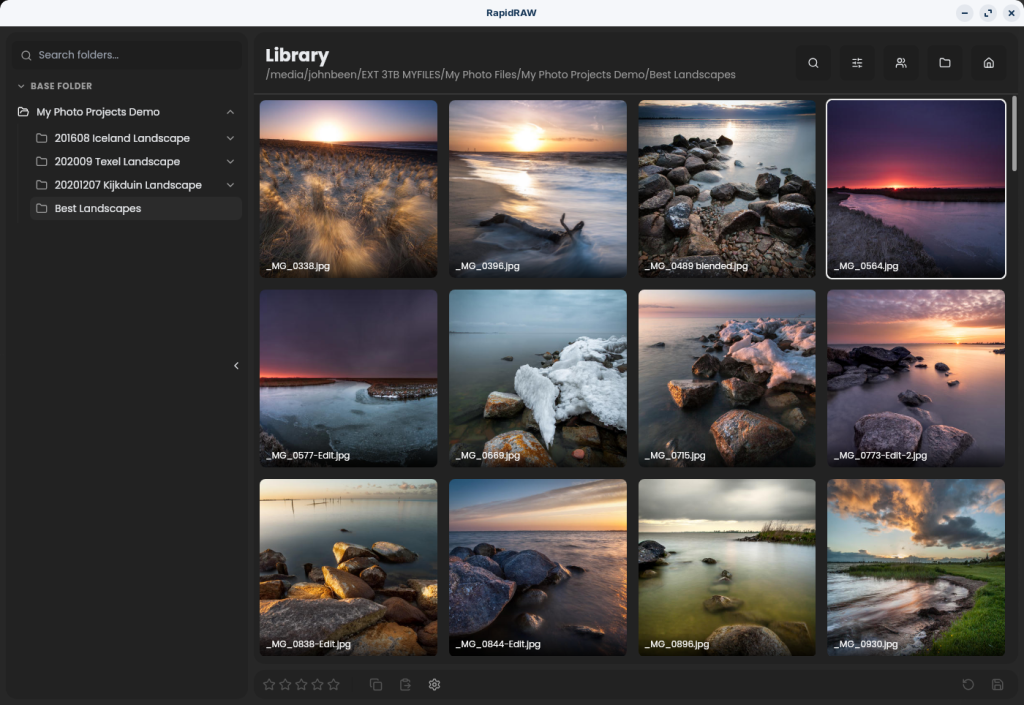
Now that you have chosen a base folder, it does not mean that you are stuck to this folder forever. You can simply switch between different base folders with their own set of subfolders and images. You can now even pin different base folders, so you can easily switch between them.
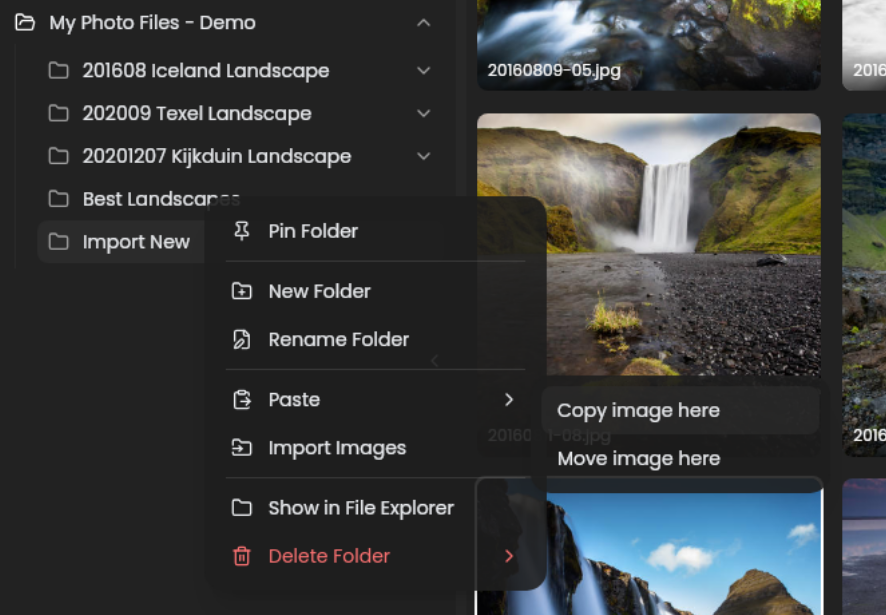
Folder organization in RapidRAW
Now that your photo library is in RapidRAW, you have several options for managing both photo files and folders. However, keep in mind that RapdRAW isn’t a full-fledged photo organization tool. For example, if you want to move folders within your existing structure, that’s not possible in RapdRAW. You’ll still need your regular file manager for that. However, renaming a folder, creating a new one, or deleting a folder is possible within RapdRAW.
Creating and deleting folders
Now that your photo library is in RapidRAW, you can see in the library screen your photo hierarchy below the Base folder.
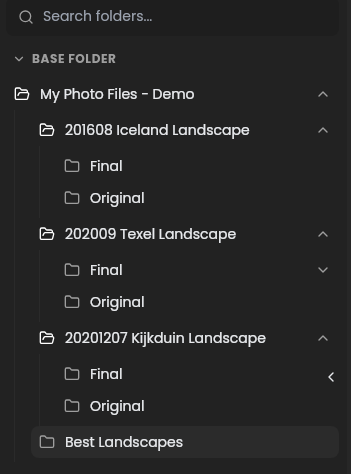
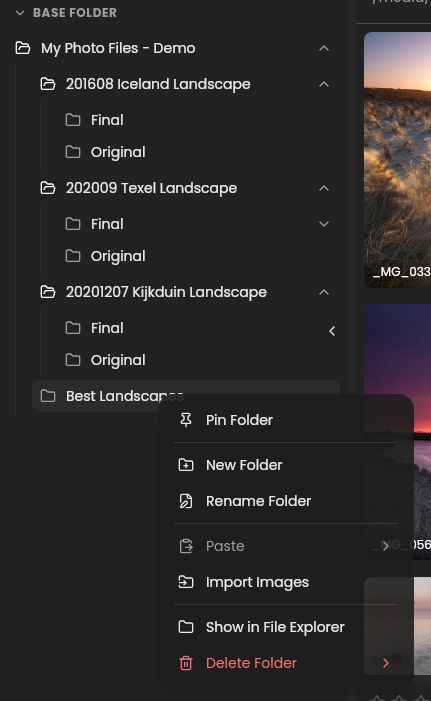
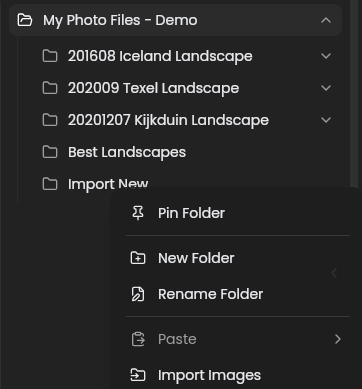
Here you can, by right-clicking on a folder, add new subfolders right below the Base Folder, or on lower levels in your hierarchy. Here you can also rename and delete a folder.
Keep in mind that when you select a folder that you want to delete, all underlying folders will also be deleted. If you don’t want this to happen, then you must move some of the folders via your regular file manager in your Operating System first.
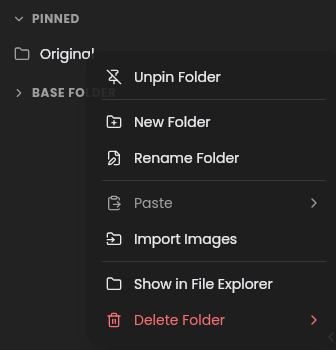
Pinning folders
When you right-click on a folder, you also have the option to Pin the folder. Pinning folders gives you quick access to folders that you, for example, use a lot or are currently working on. This helps to not navigate to that folder through your complete folder structure each time you open RapidRAW. The pinned folder will be visible in the new section Pinned, above the Base Folder section. When you want to remove a pin, simply right-click on the pinned folder in the Pinned section and select Unpin Folder.
Importing images in RapidRAW
Now
Import image files
When you have an empty base folder, or you have a filled photo hierarchy, in both situations, you can add new photo files to your library. This can be done from different sources, such as a memory card or a location on your hard drive. You can’t import a complete photo hierarchy. You import individual or selections of multiple photo files.
So, let’s create a new subfolder first, which we call Import New. Now, right-click on this folder and select the option Import Images.
Now you have the possibility to find the location of the new photos to be imported. When you are in the correct location, select one or more (use Ctrl + left-click, or Shift + left-click to highlight multiple images) and click on Open. Now you will see the pop-up screen:
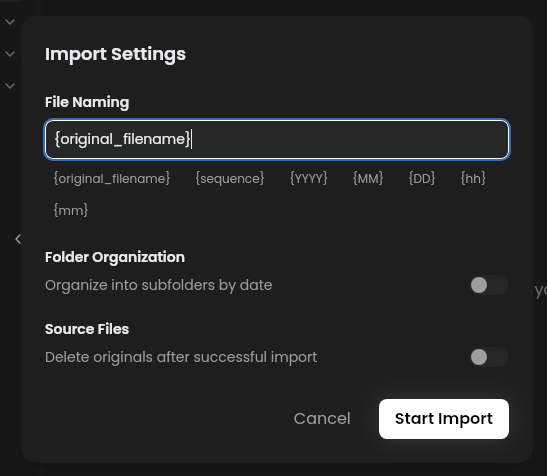
Here you have the option to determine a standard naming convention for your imported images. You can play with (a combination of) the following options:
- {original_filename} >> keep the original name
- {sequence} >> the sequence number based on the order of the creation date of the file
- {YYYY} >> The year indicator
- {MM} >> The month indicator
- {DD} >> The day indicator
- {hh} >> The hour indicator
- {mm} >> The minute indicator
For example: {YYYY}{MM}{DD}-{sequence}
Further, you have the option to organize your images into subfolders by date, according to a date format you can define yourself. Also, you can choose to automatically delete the originals after successful import. I prefer to disable this option and manually delete, if required, the originals myself on a later moment.
If you have made your selections, click on Start Import.
Now your new images are imported according to your own file naming convention in the folder you appointed.
Image organization in RapidRAW
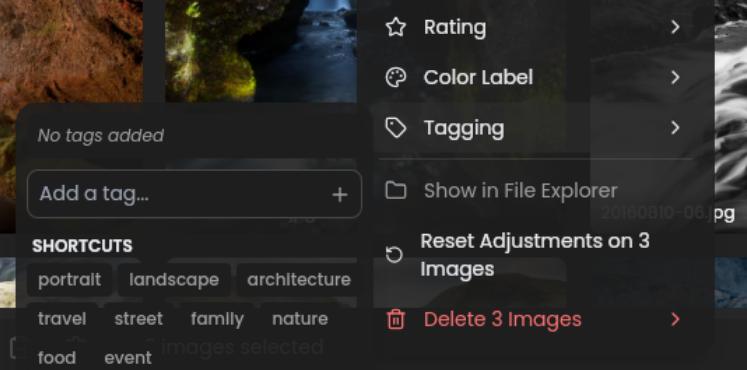
Now that we know how to handle folders and import new images in RapidRAW, we can also organize individual images. In the Library view, right-click on one of your images.
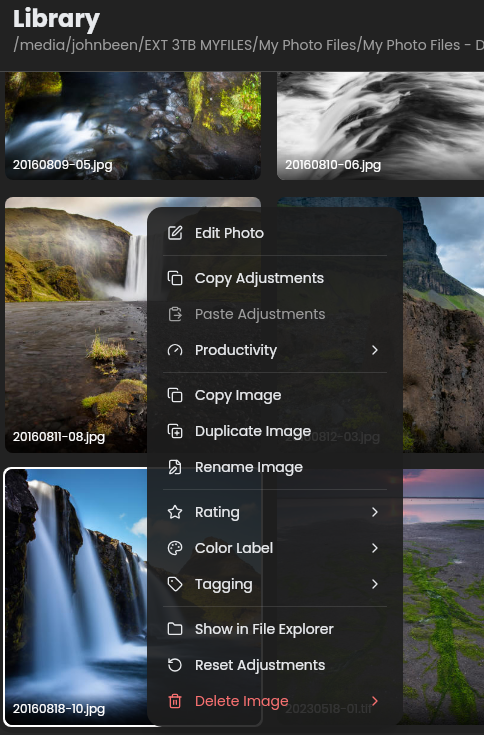
Here you have the options to copy, duplicate, and rename the image. You can also choose to show the image via the file manager. And, as we discussed earlier in this article, you can use Tags to further organize your images.
Copy Image Via this option, you can copy the selected image or multiple images. Once you select the Copy Image option, you can now right-click on one of your folders and select Paste. Here you have two extra options: 1) Copy image here and 2) Move image here.
Duplicate Image Via this option, you can simply create a duplicate of an image file. If you have edited the image file, the duplicate will have the same edits. This helps to have an alternative version for which you can, for example, slightly change your edits for comparison.
Rename Image Here, you have the option to rename just one image, or rename a batch of images, according to the naming convention pop-up as described in the Importing images in RapidRAW section of this tutorial.
Tagging The advantage of the Tagging functionality is that you can assign multiple labels or Tags to a photo. A Tag works much better and is more flexible than organizing your photos completely from a folder-based approach. A Tag is a folder location independent. Suppose you’re taking wedding photos, and some of them are taken in a beautiful, expansive landscape, somewhere in Australia. Will you place this photo in a Wedding folder, or in a Landscape folder, or in a Country folder? In this case, you can just assign three Tags to the photo: Wedding, Landscape, and Australia. You can then search and filter by these Tags using the search function.
Final words
This article is the first in a new tutorial series on how to use this relatively new RapidRAW photo editing application. This is the start of hopefully many more articles on this great new photo RAW editing software for Linux. In future tutorials, I will pay attention to downloading and installing RapidRAW under Linux, the basic settings, the more specialist settings, and from there I will move on to topics such as the user interface, giving ratings to photos, using filters to easily find specific photos, a deep dive into the different editing options, and finally exporting the photos. I am very much looking forward to writing these tutorials.
Have a look at my latest book on Linux, in Paperback or Kindle format.
For more info on my book click here.
When you want to buy the book click on the image below.

If you appreciate what I do on this website…,

Post Views: 244


![[keyword]](https://learnxyz.in/wp-content/uploads/2026/04/elementary-OS-811-Available-Now-⋅-elementary-blog.png)