

![[keyword]](https://learnxyz.in/wp-content/uploads/2026/02/Personal-Infrastructure-Setup-2026-scaled.jpg)
As I started this post, I realized that I have been maintaining personal infrastructure for over a decade!
Most of the things I have offered myself are for personal use. Email server, a blog, an IRC server, image hosting, RSS reader and so on. All of these things were all a bit all over the place and never really streamlined. Some were in containers, some were just flat files with an nginx service in front and some were a random installed Debian package from somewhere I just forgot.
When I decided early last year that I should give up streaming services, I realized that I needed to rethink the approach a bit and try to streamline how I wanted to offer different things.
The goal is to have personal infrastructure and services locally at home. Most things should be easy to set up, but fundamentally I’m willing to trade some convenience for the sake of self-hosting. I also have a crappy ISP at home that NATs everything, so I have to expose things to the internet through a wireguard tunnel, preferably well hosted in a way where I don’t have to think about it.
The hardware I use it on below ranges from ancient to fairly modern.
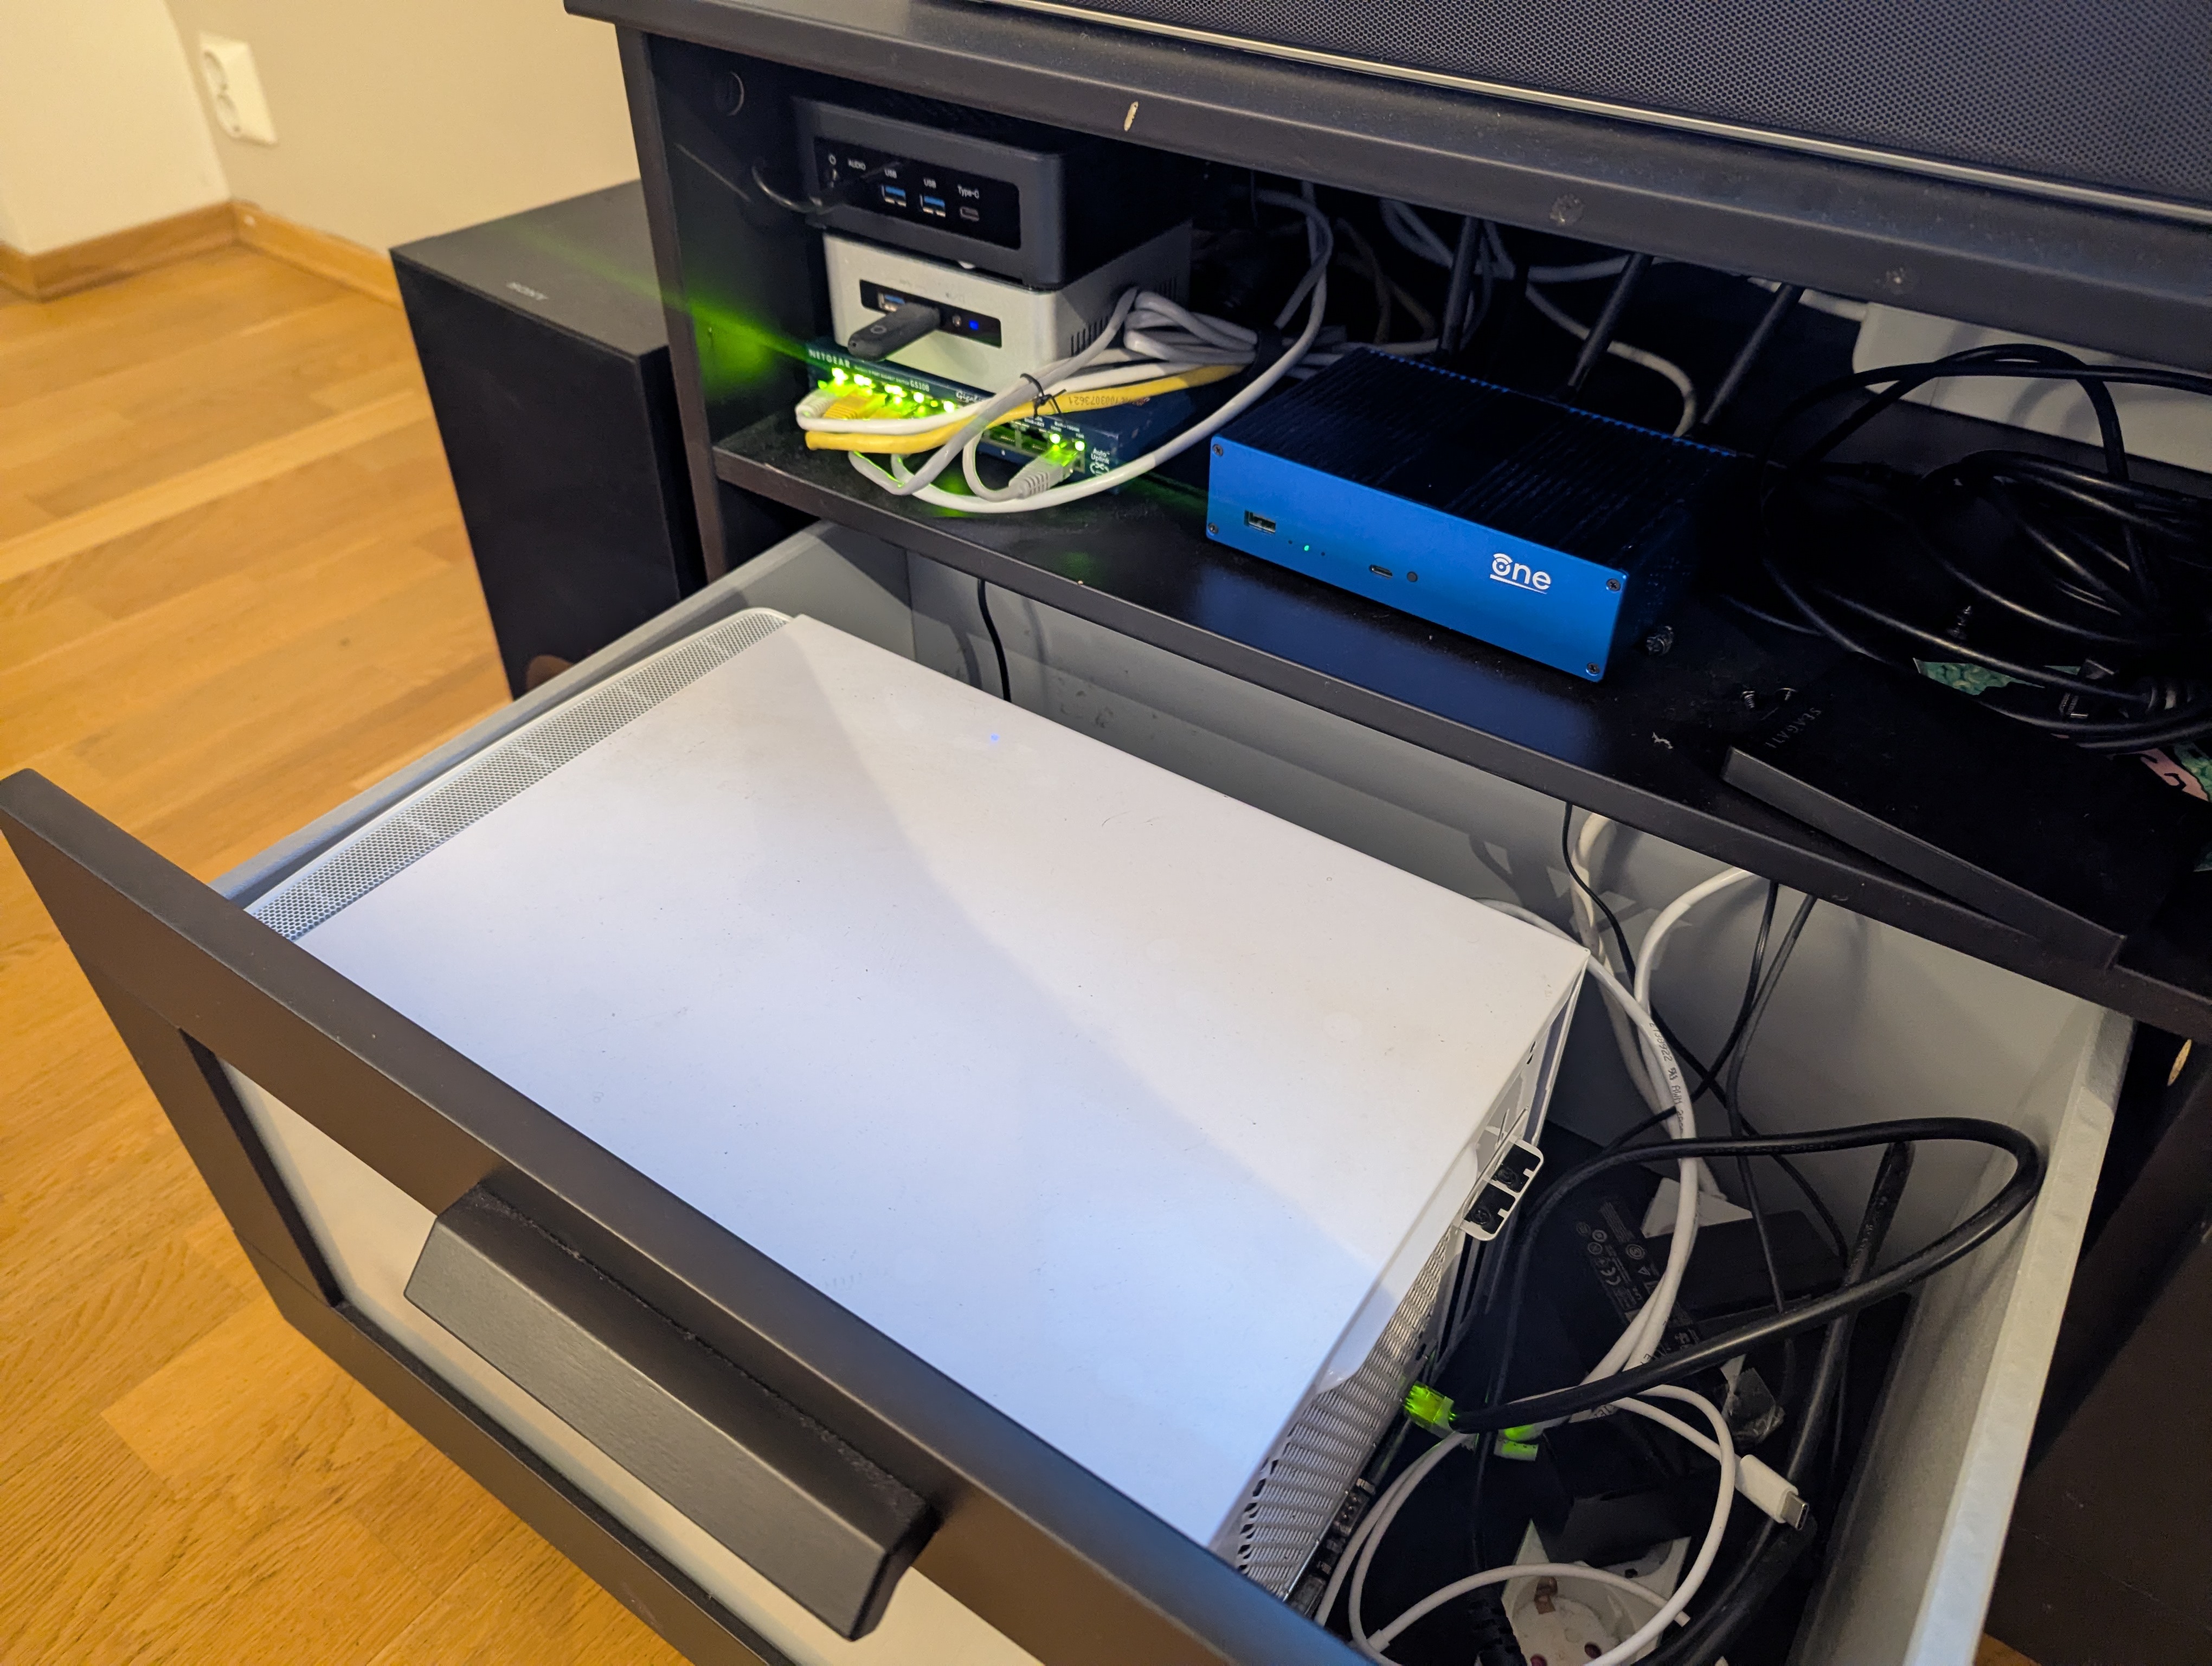
- A NAS build with 2×8 TB drive and all hardware from what I think is 2012?
- Intel NUC from 2015. Intel i5-6260U and 16 GB RAM
- AMD NUC with AMD Ryzen 7 8745HS and 64 GB RAM from AliExpress
- OpenWRT One
There are a few things I won’t go into in great detail. For my NAS setup, I plan to write a post about my photo setup. It was created primarily to support my photo editing and storage, and the use in my infrastructure was not really intended in that regard.
For my network setup, I don’t really have anything special. It’s all flat.
I also wrote about my DNS setup before. And I’m happy to report that it worked great. It also serves my home domain, .home.arpa, from the same server, only allow my internal IPs listed. It also has an acme CA setup which I want to write about at another point.
For more DNS: Self-hosted DNS for no fun, but some profit!
Incus
I have used incuse (previously lxd) for several years at this point. It’s been my goal to mock locally and test infrastructure, but I’ve never really used it to offer custom services. With the introduction of OCI container support it all just got easier!
I can host almost all my services as a normal lxc container, a QEMU VM or an OCI container pulled from a container registry.
I’ve been running for years even in different configurations at this point. It’s very reliable and I’ve never had to worry about updates between versions of things suddenly breaking. It was very important to me to just have infrastructure that I could rely on without thinking too hard about it.
The group includes the AMD NUC (called amd) and the Intel NUC (called
byggmester).
λ ~ » incus cluster list -c nuas
+------------+---------------------------+--------------+--------+
|    NAME    |            URL            | ARCHITECTURE | STATUS |
+------------+---------------------------+--------------+--------+
| amd        | https://10.100.100.3:8443 | x86_64       | ONLINE |
+------------+---------------------------+--------------+--------+
| byggmester | https://10.100.100.2:8443 | x86_64       | ONLINE |
+------------+---------------------------+--------------+--------+
If I want to spin up a Valkey container, I can just launch it directly from Docker.
λ ~ » incus remote add docker https://docker.io/ --protocol=oci --public
λ ~ » incus launch docker:valkey/valkey valkey
Launching valkey
λ ~ » incus list valkey -cns4tL
+--------+---------+----------------------+-----------------+------------+
|  NAME  |  STATE  |         IPV4         |      TYPE       |  LOCATION  |
+--------+---------+----------------------+-----------------+------------+
| valkey | RUNNING | 192.168.1.148 (eth0) | CONTAINER (APP) | byggmester |
+--------+---------+----------------------+-----------------+------------+
For various reasons (I don’t know networks very well), my entire network is down. On both amd and byggmester I mentioned a bridge device br0and all containers only use this bridged network as their NIC. Which means I get a local IP, and my router lets me resolve domains for them.
λ ~ » ping valkey.local
PING valkey.local (192.168.1.148) 56(84) bytes of data.
64 bytes from valkey.local (192.168.1.148): icmp_seq=1 ttl=64 time=0.613 ms
64 bytes from valkey.local (192.168.1.148): icmp_seq=2 ttl=64 time=0.328 ms
64 bytes from valkey.local (192.168.1.148): icmp_seq=3 ttl=64 time=0.500 ms
They use systemd-networkd and the configuration files look like this:
# /etc/systemd/network/20-wired.network
(Match)
Name=en*

(Network)
Bridge=br0

# /etc/systemd/network/50-br0.netdev
(NetDev)
Name=br0
Kind=bridge

# /etc/systemd/network/50-br0.network
(Match)
Name=br0

(Network)
Address=192.168.1.2/24
Gateway=192.168.1.1
DNS=192.168.1.1
The default profile in Incus only points to this device.
# λ ~ » incus profile show default
description: Default Incus profile
devices:
  eth0:
    nictype: bridged
    parent: br0
    type: nic
  root:
    path: /
    pool: default
    type: disk
name: default
used_by:
- /1.0/instances/valkey
project: default
When I do some more network segmentation in the future, incus is probably going to get its own vlan. But for a nice and simple setup I think it works just fine.
This works out pretty well, but I don’t want to remember a bunch of commands for Incus, so clearly we want something a little more descriptive.
Open tofu
Even if you have good supplier for open tofu. This allows us to declaratively define our incus resources and treat everything as ephemeral with all persistent data stored on my NAS.
My terraform files for incus can be found here:
https://github.com/Foxboron/ansible/tree/master/terraform/incus
All my services are separated into projects with a common template for shared permissions, network and default profiles. It’s easy to just have everything similar across the different things I deploy.
It also makes things more compartmentalized when messing with new infrastructure.
This is all managed by a single module called opentofu project from which all my other opentofu modules are derived.
https://github.com/Foxboron/ansible/blob/master/terraform/incus/modules/project/main.tf
As a result, I have a few projects piled up!
λ ~ » incus project list -c ndu
+-------------------+------------------------------------------+---------+
|       NAME        |               DESCRIPTION                | USED BY |
+-------------------+------------------------------------------+---------+
| ca                | ca project                               | 4       |
+-------------------+------------------------------------------+---------+
| default (current) | Default Incus project                    | 48      |
+-------------------+------------------------------------------+---------+
| dns               | dns project                              | 7       |
+-------------------+------------------------------------------+---------+
| immich            | immich project                           | 14      |
+-------------------+------------------------------------------+---------+
| mediaserver       | Mediaserver project                      | 18      |
+-------------------+------------------------------------------+---------+
| miniflux          | miniflux project                         | 6       |
+-------------------+------------------------------------------+---------+
| syncthing         | syncthing project                        | 3       |
+-------------------+------------------------------------------+---------+
| test              |                                          | 2       |
+-------------------+------------------------------------------+---------+
| user-1000         | User restricted project for "fox" (1000) | 2       |
+-------------------+------------------------------------------+---------+
I don’t think all of this is interesting, but I thought it would be neat to show the Immich opentofu setup I ended up with.
Terraform code:
https://github.com/Foxboron/ansible/tree/master/terraform/incus/modules/immich
λ ~ » incus list -c ntL
+-------------------------+-----------------+----------+
|          NAME           |      TYPE       | LOCATION |
+-------------------------+-----------------+----------+
| auto-album-jpg          | CONTAINER (APP) | amd      |
+-------------------------+-----------------+----------+
| auto-album-raw          | CONTAINER (APP) | amd      |
+-------------------------+-----------------+----------+
| database                | CONTAINER (APP) | amd      |
+-------------------------+-----------------+----------+
| immich                  | CONTAINER (APP) | amd      |
+-------------------------+-----------------+----------+
| immich-machine-learning | CONTAINER (APP) | amd      |
+-------------------------+-----------------+----------+
| redis                   | CONTAINER (APP) | amd      |
+-------------------------+-----------------+----------+
Since incus supports docker containers, it is trivial to translate upstream docker-compose files into deployable opentofu files. This is great and really saves me from having to think about how to deploy infrastructure when they often just provide a docker setup anyway.
The setup for the valkey container we effectively launched earlier looks like this:
resource "incus_image" "redis" {
  # This references the main project name, "immich" in this case
  project = incus_project.immich.name
  alias {
    name = "redis"
  }
  source_image = {
    remote = "docker"
    name   = "valkey/valkey:8-bookworm"
  }
}

resource "incus_instance" "immich_redis" {
  name    = "redis"
  image   = incus_image.redis.fingerprint
  project = incus_project.immich.name
  target  = "amd"

  config = {
    "boot.autorestart" = true
  }
}
Aside from the confusing name “redis”, it’s all pretty straight forward. We define the image and then define an instance. Rest is all taken care of by the
default incus profile that includes a network configuration and options for the root disk.
Now that we’re running an immich instance locally, we might want to expose it. It’s cool to host all of this on a local network, but we actually want some of this to be exposed to the Internet as well.
Network and expose things
The main purpose of this is to offer Internet-facing services, as well as internal services, itself. I’ve tried a bunch of things. Less clever ideas too! I ended up bridging my local network to the hackerspace.
Releasing my DHCP leases to the server racks, the basement of our hackerspace, is a less smart idea.
However, Matthew Garrett finally posted about doing a wireguard point-to-site VPN where you forward all traffic that hits the box to your local network.
Locally host an Internet-connected server
When you want to expose services to the internet from your local network, you’ll end up dealing with crappy ISPs that NAT all the traffic and floating IPs that change. It makes for boring work!
If you host a reverse tunnel from a small VPS box that can have static IPv4 and IPv6, you have a more reliable connection and can pretend the IPs are yours.
What I have done currently is that I provisioned a small VPS at my local
hackerspace and given it an IPv4 and IPv6 address. I then made a wire guard tunnel to me byggmester node as mjg you describe in his blog post.
On byggmester I host nginx which just proxies reverse things i want internet exposed in my incus servers. I’m trying to resolve things with my internal DNS server so I don’t have to keep IPs in my nginx configuration.
With nginx-acme I can also largely ignore and leave certbot for TLS certificates nginx deal with it yourself. This makes for fairly simple reverse proxying for services I want to expose externally.
Some snippets from my nginx setup:
# /etc/nginx/nginx.d/10-acme.conf
acme_issuer letsencrypt {
    uri         https://acme-v02.api.letsencrypt.org/directory;
    contact     root@linderud.dev;
    state_path  /var/lib/nginx/acme;
    accept_terms_of_service;
}

acme_shared_zone zone=ngx_acme_shared:1M;

server {
    listen 80;

    location / {
        return 404;
    }
}


# /etc/nginx/snippets/acme.conf
acme_certificate      letsencrypt;
ssl_certificate       $acme_certificate;
ssl_certificate_key   $acme_certificate_key;
ssl_certificate_cache max=2;


# /etc/nginx/nginx.d/30-bilder.linderud.dev.conf
server {
    (listen)(listen) 443 ssl;
    listen (::):443 ssl;
    server_name bilder.linderud.dev;

    access_log /var/log/nginx/bilder.linderud.dev/access.log;
    error_log /var/log/nginx/bilder.linderud.dev/error.log;

    include snippets/acme.conf;
    include snippets/sslsettings.conf;

    client_max_body_size 50000M;

    resolver 192.168.1.1 ipv6=off;

    location / {
        set $immich immich.local;
        proxy_pass http://$immich:2283;
        proxy_set_header Host              $http_host;
        proxy_set_header X-Real-IP         $remote_addr;
        proxy_set_header X-Forwarded-For   $proxy_add_x_forwarded_for;
        proxy_set_header X-Forwarded-Proto $scheme;

        proxy_http_version 1.1;
        proxy_set_header   Upgrade    $http_upgrade;
        proxy_set_header   Connection "upgrade";
        proxy_redirect off;
    }
}
It only leaves my static files!
Websites over syncing?
I have some static websites, like this blog. For years I pushed it straight to git and then played a possible role that would build my page and push it. For years I’ve considered just moving this whole thing to Github pages, but with the current direction of Github, that doesn’t spark joy.
And like, having a whole CI setup for a few static files seems like overkill. Clearly we can do worse^wbetter!
I think I was exposed to this idea years ago by someone in Arch Linux, but I have a single user system. Root is my oyster and I can do whatever I want with any directory on my system. I did /srv! According to somewhere it should “store common server payload”. Well.
let’s mkdir /srv/linderud.dev and serve it over synchronize to my web server!
λ /srv » tree -L2
.
└── linderud.dev
    ├── blog	    <- this blog
    ├── coredns01   <- my dns server configs (long story)
    └── pub	    <- my public/shared files
Serving this blog now becomes just a matter of building hugo with an export directory!
$ hugo build -d /srv/linderud.dev/blog/
Donate! It works. My web page published. No service dependency. No CI/CD setup. Not Github action runners. Not possible playbooks!
I don’t think this is a particularly new idea. But I like the simplicity of this compared to other options, making my desktops and websites bird like a proper network instead of complicated build steps that I have to remember.
OpenWRT One
Last but not least, a small note about my network.
OpenWRT One is an OpenWRT developer focused router. I bought it from AliExpress and wrote a opentofu provider for that.
Honestly, I don’t understand much about networking, so the setup is straight forward and everything is just flat. The terraform setup can be found on my
github.
I have some plans to get an openwrt supported switch and maybe do some vlans at some point, but I don’t think there are many interesting things to say about the setup beyond that.
usbkvm
For handling a bunch of small computers, I had to lug a screen around and connect to it. During the 38th Chaos Communication Congress, I came across a hackerspace that sells small usbkvm devices for about 20 euros. I bought two! They were great.
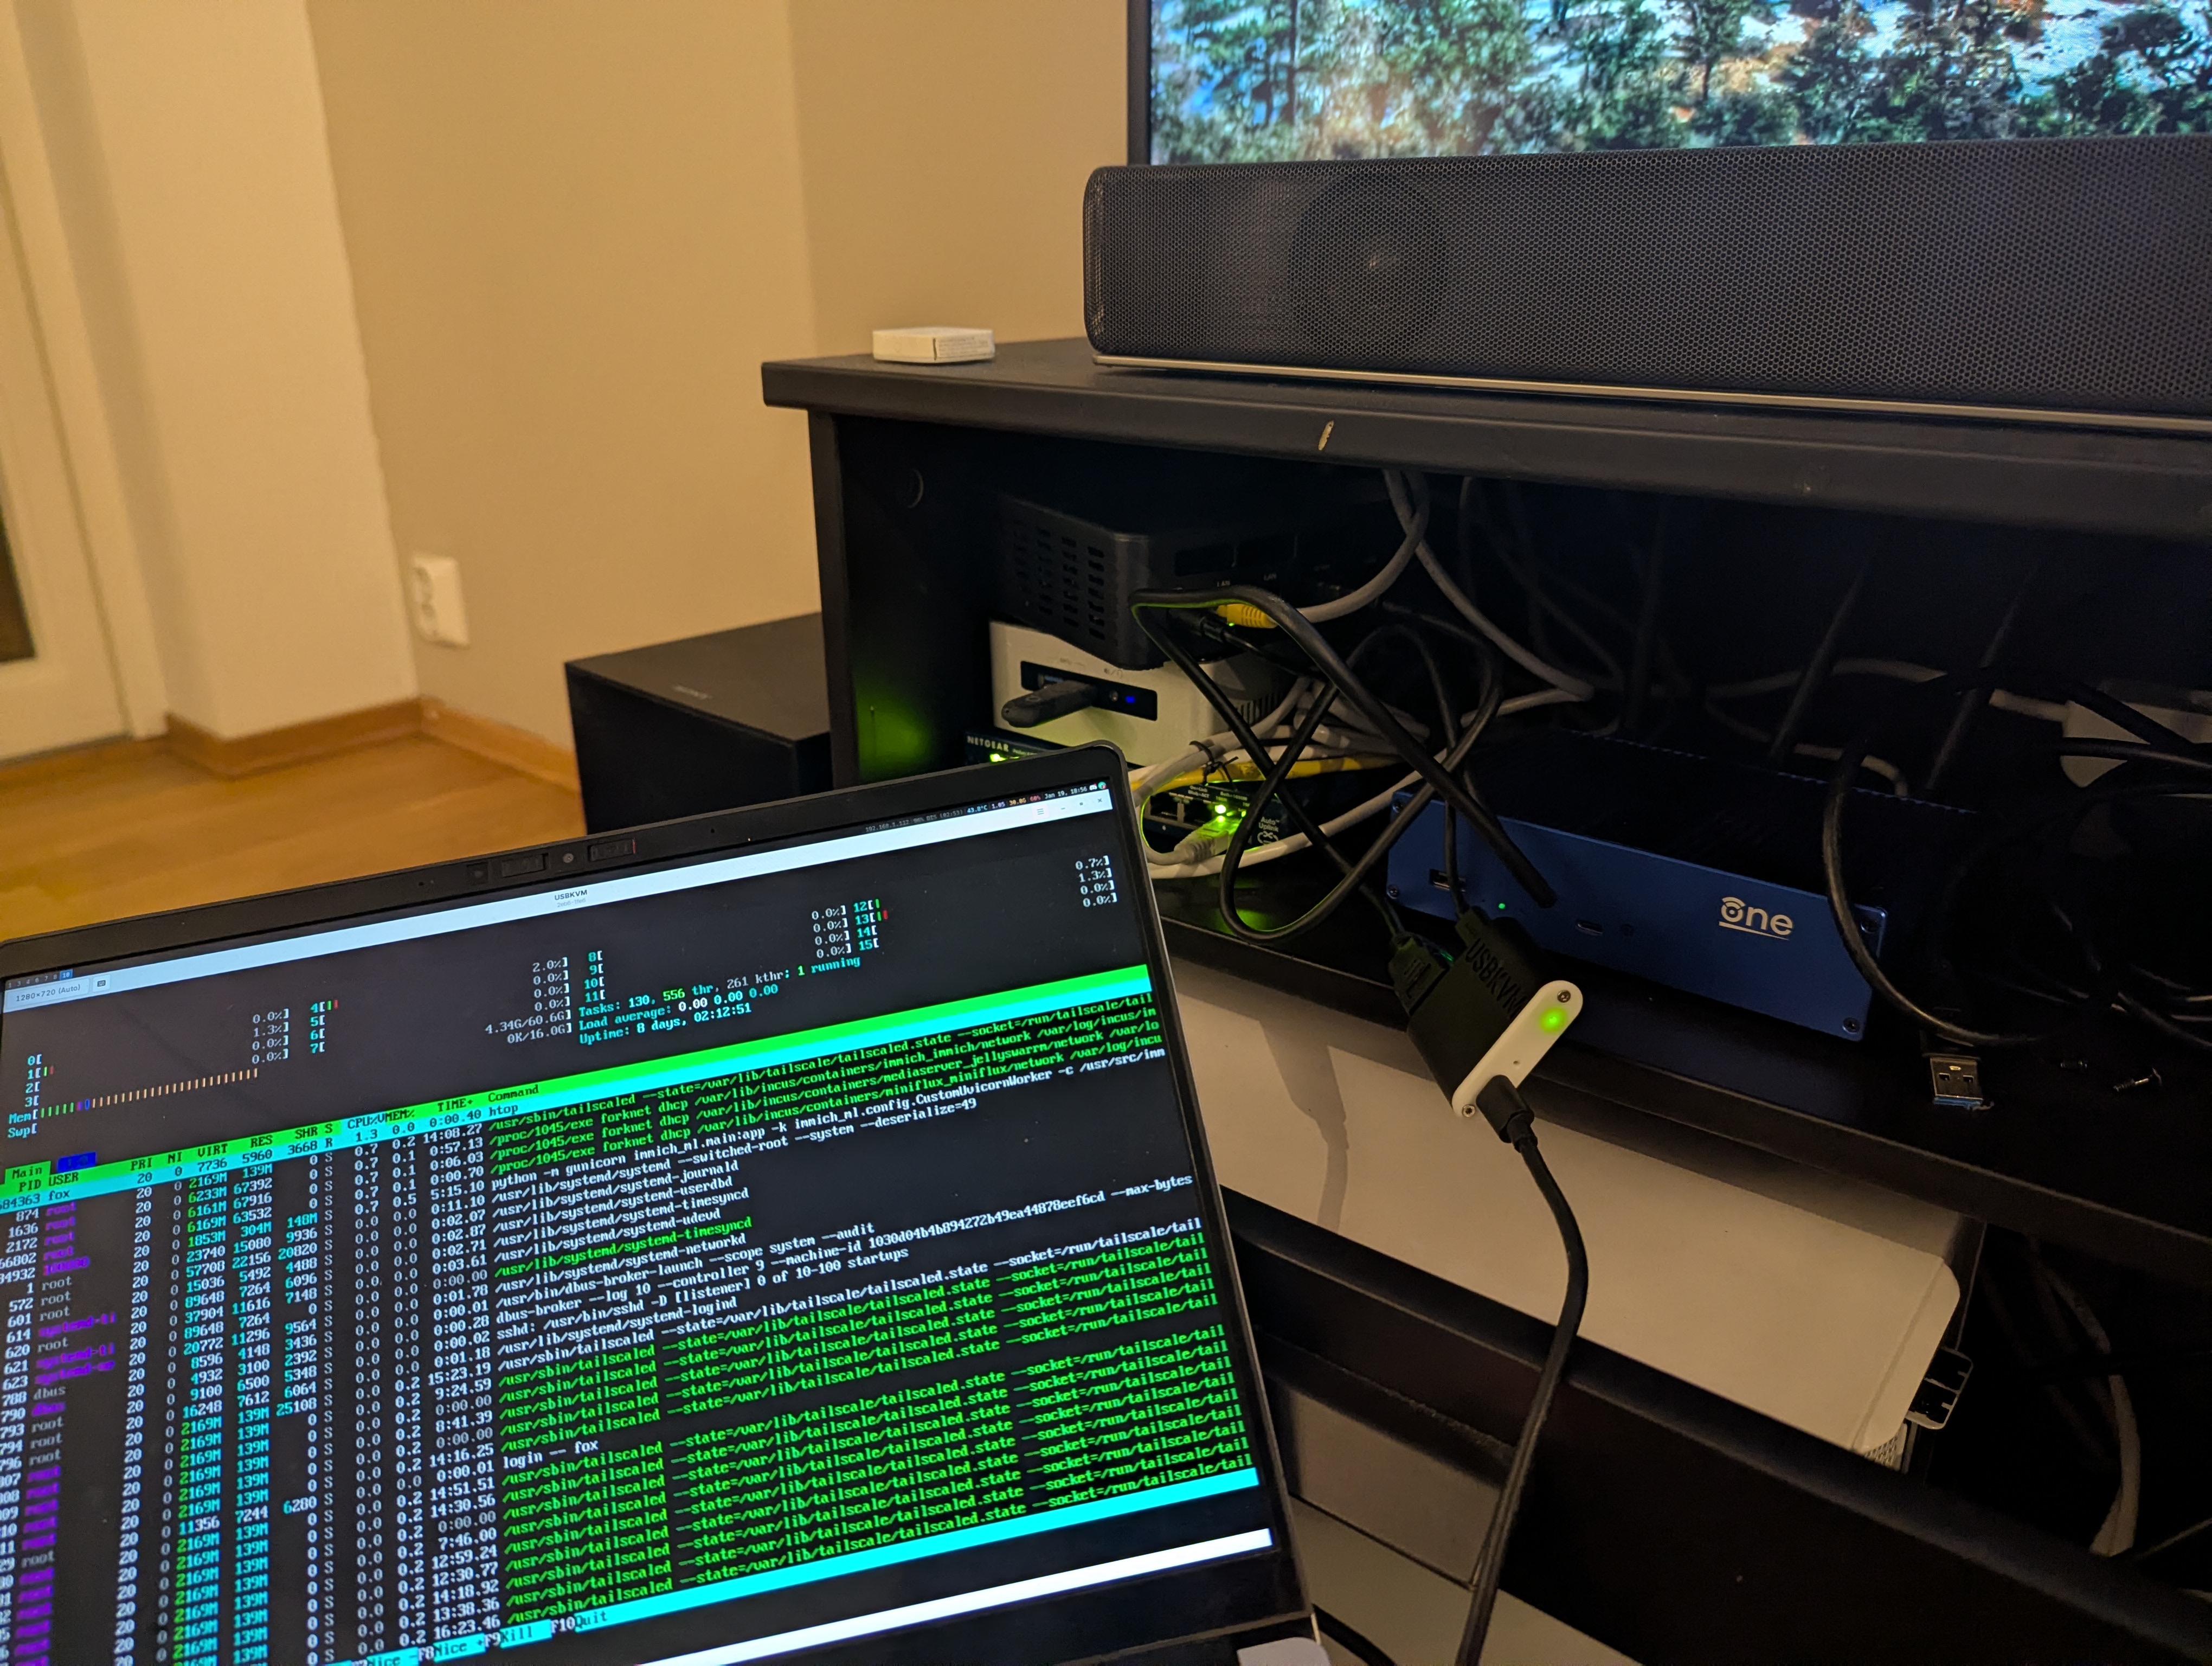
I can just have an HDMI cable and a USB-C cable and I can connect to the computer I need to set up. Super simple, small and neat to work with. Makes managing home infrastructure much easier.
Deduction
This is a quick overview of how I am currently fixing and setting up my personal infrastructure. This wasn’t meant to be a comprehensive guide, but might provide some inspiration for people who have recently started looking into hosting more stuff from home. I’ll strive to keep my personal infra as open as possible, as I think there’s a lot to learn just from reading other people’s code on these things.


![[keyword]](https://learnxyz.in/wp-content/uploads/2026/02/1771249369_How-to-start-a-Deep-Learning-VM-on-Google-Cloud.png)